[restored from my Wordpress blog]
If you plan to use vFabric TC Server as a container for your Java applications in Windows Azure PaaS Cloud Services Worker Roles with the help of the Azure Plug-In for Eclipse, you need to do some customization to the Azure plug-in for Eclipse and add component configuration. This blog-post shows, how you can do it and also gives some background information and context on the scenario.
Background Information / Context
This week I’ve been working with some larger software vendors in Tel Aviv / Israel on moving their products & services to Windows Azure. One of those partners I spent most of the time with while being here is using a pretty large-scale Java-based solution with some NoSQL and BigData-solutions in the backend.
Their case is a perfect example for a mixed cloud app involving PaaS Cloud Services that are automatically managed as well as Virtual Machines running Linux with the NoSQL and BigData solutions they’re using. Therefore as part of our efforts we decided to try to move their Java-stack onto Web/Worker Role Cloud Services in Azure while running the rest in Virtual Machines. That way the application and services tier of their architecture would be automatically managed by Windows Azure. At the same time with the help of our Java/Eclipse Azure Plug-In, we can solve some of their core-challenges in Azure, especially SSL Offloading. SSL offloading btw. is a default option when using the Azure Plug-In for Eclipse in the meantime.
Concretely that partner is using vFabric TC Server which is a special and extended version of Apache Tomcat. If you want to try it out by yourself, it’s the app server that ships by default in the Spring Tool Suite (STS) for debugging and development purposes. For production purposes it requires a commercial license, nevertheless, as far as I understood.
The challenge nevertheless is, that vFabric TC Server is not one of the default-options in the Azure Plug-In for Eclipse we as Microsoft have published. And of course vFabric TC Server works different than Tomcat what finally means that the deployment- and startup-procedures for the Worker Role deployments created with the Azure Plug-In for Eclipse need to be customized.
Enable vFabric TC Server in the Azure Plug-In for Eclipse
First of all you should get familiar with the Azure Plug-In for Eclipse if you’re not, already. Install the plug-in and make yourself familiar through the docs on MSDN.
After installed, you can create deployment projects in Eclipse with that plug-in to get your Java-application running in Windows Azure Platform-as-a-Service Cloud Services. This project essentially packages your JDK of choice, your container/app server of choice as well as your application packages together. It also generates deployment procedures to enable automatic deployments, initialization and running your app server or applications in Worker Roles whenever instances are added or recycled in your deployments. That way your environment can be managed automatically by Windows Azure without you being interfered on temporary failures, update cycles and the likes.
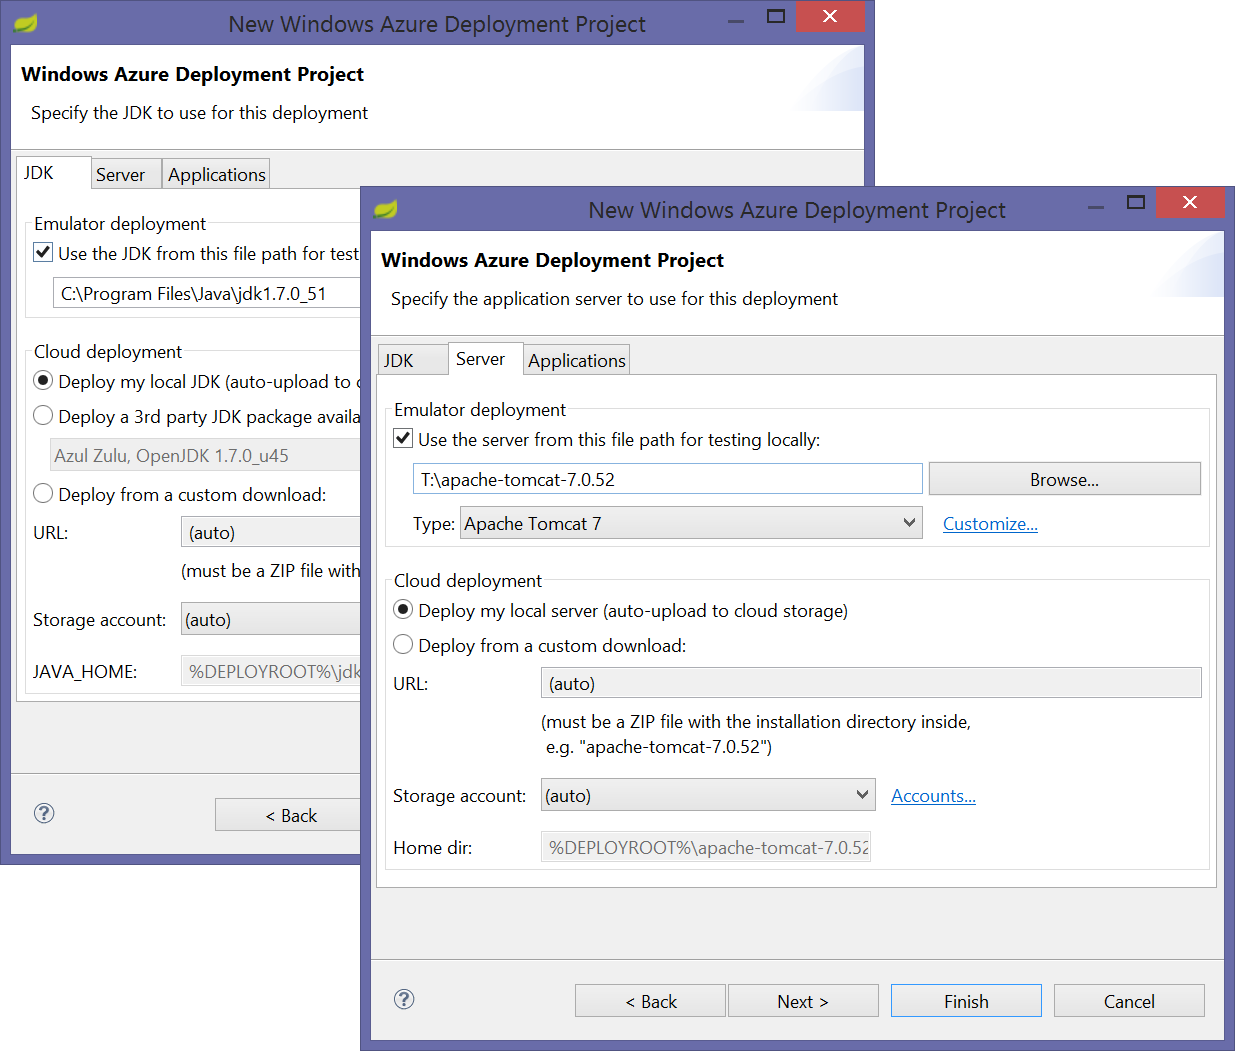
All of this is done through a variety of configurations filled through several dialogs of the plug-in. The most important dialogs are those where you configure the server-configs as well as environment variables as shown below:
Unfortunately vFabric TC Server is not part of the list of server-types the plug-in knows. Fortunately the mechanism is extensible. So to get vFabric TC Server integrated with the Azure Plug-In for Eclipse, just follow the subsequent steps.
(1:) Add a new component configuration for the plug-ins server-types
For this purpose in the server-configuration dialog as shown in the previous screen-shot, next to the “Type”-combobox where you can select the application server of choice (e.g. Tomcat), select “Customize…”. This will open up a plug-in-wide configuration file where you need to enter the following, additional component-configuration section. Make sure you do this BEFORE you create your first project that uses vFabric TC Server so that the build-files get generated appropriately:
<componentset name="vFabric TC Server 2.9.3" type="server" detectpath="lib\tc-runtime-instance-2.9.3.RELEASE.jar">
    <startupenv name="TC_INSTANCE_NAME" value="yourinstancename" />
    <startupenv name="CATALINA_HOME" value="${placeholder}\%TC_INSTANCE_NAME%" type="server.home"/>
    <startupenv name="SERVER_APPS_LOCATION" value="%CATALINA_HOME%\webapps" type="server.app.loc"/>
    <component importsrc="${placeholder}" importmethod="copy" type="server.deploy" deploydir="%DEPLOYROOT%" deploymethod="copy"/>
    <component deploydir="%SERVER_APPS_LOCATION%" deploymethod="copy" importsrc="${placeholder}" importmethod="${placeholder}" importas="${placeholder}" type="server.app"/>
    <component deploymethod="exec" deploydir="%CATALINA_HOME%\bin" importas="tcruntime-ctl.bat run" type="server.start"/>
</componentset>
This will tell the Eclipse Plug-In for Azure how the actual app server does work. Since TC Server is based on Tomcat, you’ll see some familiar settings but some additional ones, as well.
First of all I’ve added an environment variable to the settings called “TC_INSTANCE_NAME”. vFabric TC Server always works with app server instances which need to be created upfront. These are then the actual containers to which your application packages (WARs) get deployed. Before deploying vFabric TC Server to a Worker Role, you should prepare the instance (that’s at least the easiest way, but we could also script the creation of an instance as part of the auto-deployment process of the plug-in as an alternative).
Second the home directory is not the root directory of the app server anymore, it’s the one of the specific instance executed by vFabric TC server.
Third the startup of that instance takes place with the “tcruntime-ctl.bat” batch file instead of the well-known startup.bat from Tomcat.
Fourth there is a nice property called “detectpath” which allows you to identify a file or a path inside of your app server directory that allows the plug-in during project-creation-time to automatically detect the appropriate componentset-configuration just by picking the root-path of your application server when creating the Azure project (see step 3). This is optional, so if it is not there you need to manually select the server-configuration from the drop-down shown in the screen shot above with Tomcat selected.
(2:) Prepare your vFabric TC Server Directory and Instance
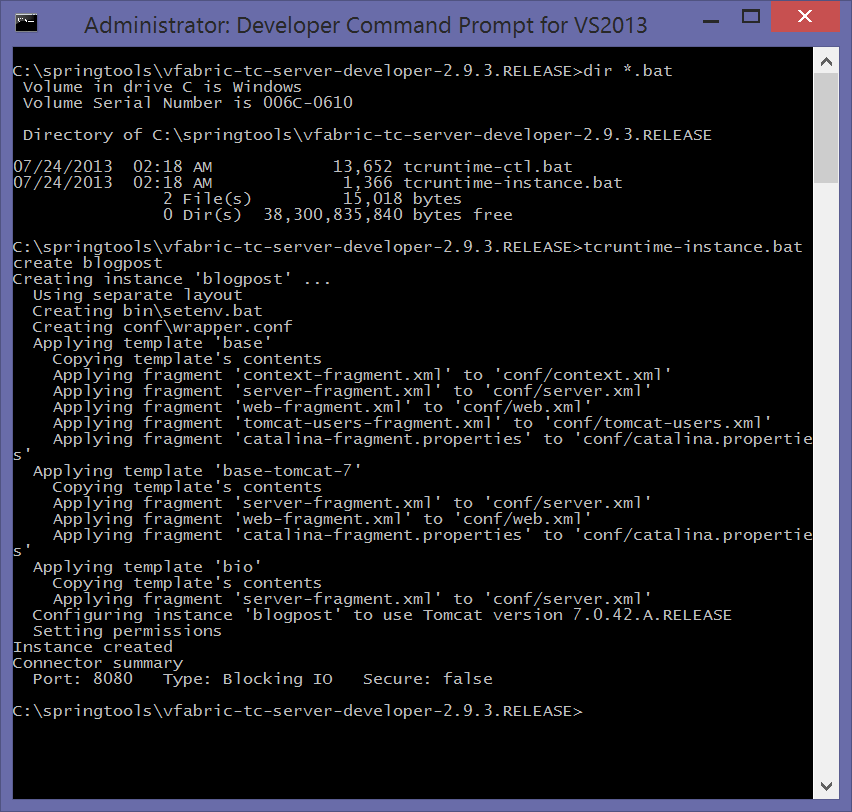
As mentioned above, TC server works with instances where it runs applications. For the approach described in this blog post I assume the instances get prepared locally before deployment. To prepare your TC server, just open up a command prompt, get to the path where you have your TC server local installation files and create a new instance by issuing the following command:
tcruntime-instance.bat create yourinstancename
This will configure and create a new TC server instance as shown in the following screen shot. Remember that instance name since you’ll need it later when creating the Azure deployment projects in Eclipse.
Now before moving forward there’s a tweak in the vFabric TC Server config files you need to make. When creating the instance it creates a config file under the following path:
<vFabric TC Server root>\<yourinstancename>\conf\wrapper.conf
This file sets the JAVA_HOME-directory to a hard-coded path pointing to the JVM it finds locally on your machine:
set.JAVA_HOME=C:\Program Files\Java\jdk1.7.54 (example)
you need to change that to use the %JAVA_HOME% environment variable as shown below which is set by as part of the automated deployment process of the Worker Role by the packages created through the Azure Plug-In for Eclipse.
set.JAVA_HOME=%JAVA_HOME%
Next it creates another file in the instance-directory where the Java-home directory is set based on your local Java-installation.
<vFabric TC Server root>\<yourinstancename>\bin\setenv.bat
In this file make sure you comment out the line at the beginning that sets the JAVA_HOME environment variable since it will be set by the Azure Plug-In for Eclipse deployment-process to the correct path where it automatically deployed the JDK to, earlier in the process. The file should look similar to the following:
rem Edit this file to set custom options
rem Tomcat accepts two parameters JAVA_OPTS and CATALINA_OPTS
rem JAVA_OPTS are used during START/STOP/RUN
rem CATALINA_OPTS are used during START/RUN

rem set JAVA_HOME=c:\hadoop\java
set AGENT_PATHS=
set JAVA_AGENTS=
set JAVA_LIBRARY_PATH=
set JVM_OPTS=-Xmx512M -Xss256K
set JAVA_OPTS=%JVM_OPTS% %AGENT_PATHS% %JAVA_AGENTS% %JAVA_LIBRARY_PATH%
(3:) Create your Windows Azure Deployment Project with Eclipse
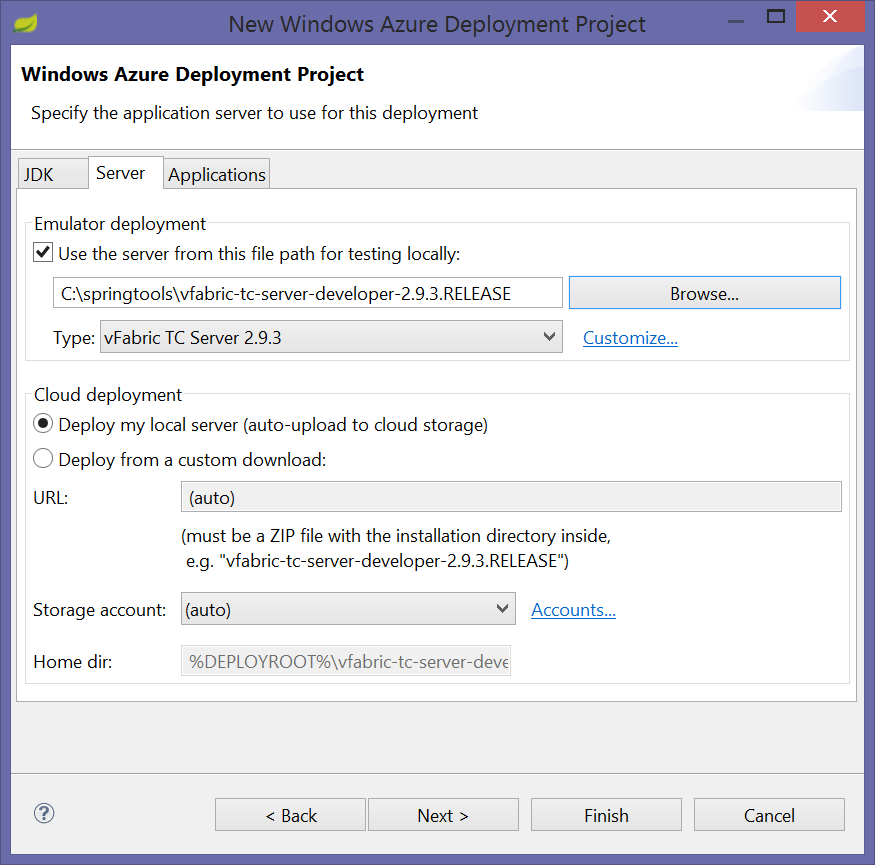
Finally after all these steps are completed, you can use the normal process for creating the Windows Azure Deployment Project through the Azure Plug-In for Eclipse. When creating your project, in the server-configuration make sure to point to the directory with the vFabric TC Server where you previously created the instance as shown in the last screen shot.
Now there’s one last step you need to accomplish. Remember the instance you’ve created earlier for TC server!? In the <componentset /> I’ve defined earlier for the Azure Eclipse Plug-In I referred to the instance-name through an environment-variable. You need to set this variable in the Environment Variables properties settings for the worker role you want to use with TC server as shown below.
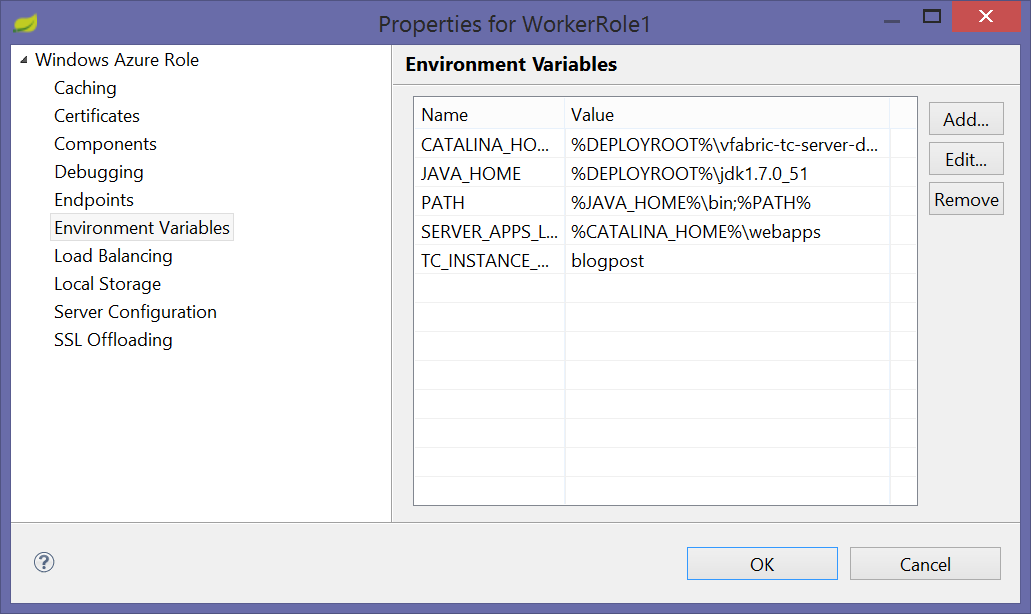
Since I did name the instance for this blog-post “blogpost” earlier when I created it with tcruntime-instance.bat as per the screen shot, I also used this name here in the environment variable definition.
(4:) Done – Now we can deploy to Azure
That’s it, after that you can deploy the project to Windows Azure. The neat thing is that the component configuration above in the first step needs to happen only once / dev-machine. After done you can re-use that configuration for each new project you create. Definitely an optimization would be to also script the creation of an instance in TC server, but at the same time deploying it in a prepared way simplifies the deployment process and things that potentially could go wrong with it. So I am in favor of this, simpler way of doing things if possible.
That said, have much fun running vFabric TC Server in automatically managed Windows Azure PaaS Worker Roles. Feel free to get back to me through Twitter if you have any comments or questions.