A lot changed since my last blog post… we had a great and beatiful summer with an awesome vacation and I am now part of the Azure Customer Advisory Team which is the customer-facing part from Azure Engineering. So, I finally ended up in Jason Zander’s part of Microsoft, the person who’s responsible for Azure, itself. That means I am now involved in the most complex Azure-projects we run with customers and not dedicated to SAP, only, anymore. Although I still work with SAP a lot.
Now, in the meantime a lot of Azure tech stuff expanded as well. In this post I want to focus on two specific features - the In-VM Instance Metadata Service and the Managed Service Identity (in short, MSI) which we recently started using in a customer project even before MSI got publicly available and announced.
I’ve posted about the need for in-VM instance metadata as well as an approach for allowing Virtual Machines to perform automated management operations in a previous blog-post, already. While what I wrote back then is technically still possible, MSI and in-VM Instance Metadata are the recommendation for such scenarios right now. So, you can consider this as the long-awaited follow-up post for this previous one!
Recap the scenario
The scneario I posted about back then was about virtual machines that need to read data about themselves and also modifying configuration settings about themselves through Azure Resource Manager REST API calls. In the meantime, that very same customer I blogged about back then came with a new scenario that requires a similar capability to us.
Essentially, in that scenario a VM needed to capture it’s own IP addresses and determine the IP addresses of its peers for performing automated configurations of networking routes and keepalived settings for an HA setup (more details to follow in a separate blog post).
All of this is possible through a combined use of the new Azure in-VM instance metadata service and the Managed Service Identity!
In-VM Instance Metadata in a Nutshell
This is really nothing special, AWS and other cloud providers have it for ages, already. It essentially gives applications and scripts running inside of the VM an HTTP endpoint available from within the VM, only. This endpoint returns fundamental basic details about a Virtual Machine such as its name, network configurations, unqiue identifiers etc. For Azure Virtual Machines, this endpoint is available on http://169.254.169.254/metadata/instance?api-version=2017-04-02 and returns JSON-formatted data about the virtual machine that looks similar to the following:
myuser@mylinuxvm:~$ curl -H Metadata:true "http://169.254.169.254/metadata/instance?api-version=2017-04-02" | jq

  % Total    % Received % Xferd  Average Speed   Time    Time     Time  Current
                                 Dload  Upload   Total   Spent    Left  Speed
100   515  100   515    0     0   115k      0 --:--:-- --:--:-- --:--:--  125k
{
  "compute": {
    "location": "westeurope",
    "name": "mylinuxvm",
    "offer": "UbuntuServer",
    "osType": "Linux",
    "platformFaultDomain": "0",
    "platformUpdateDomain": "0",
    "publisher": "Canonical",
    "sku": "16.04-LTS",
    "version": "16.04.201708151",
    "vmId": "d7......-9...-4..4-b..b-2..........4",
    "vmSize": "Standard_D2s_v3"
  },
  "network": {
    "interface": [
      {
        "ipv4": {
          "ipAddress": [
            {
              "privateIpAddress": "10.1.0.5",
              "publicIpAddress": "xx.xx.xx.xx"
            }
          ],
          "subnet": [
            {
              "address": "10.1.0.0",
              "prefix": "24"
            }
          ]
        },
        "ipv6": {
          "ipAddress": []
        },
        "macAddress": "00........B3"
      }
    ]
  }
}
myuser@mylinuxvm:~$
It’s a simple REST-service only accessible to anything that runs inside of the VM. All you need to take care off is ensuring, that you pass the Metadata: true HTTP-header when calling into the service. The call above shows the fundamental basics, only. There’s much more the service provides, for a complete look, review the documentation.
Managed Service Identities (MSI)
The in-VM instance metadata service is great if you need to query details about the VM, itself. What what if you need to query more? For example, which other servers are available in the same resource group to be able to configure keepalived for automatically configuring an HA-setup with Unicast instead of multi-cast for the availability pings? That’s especially important on Azure, since Multi-Cast is blocked by the VNET infrastructure. Finding out which other servers are available in the same resource group is not possible through the in-VM instance metadata service!
In my previous blog post about this topic when Instance-Metadata and MSI where not available, yet, the scenario was for a Marketplace Image to open up ports on Azure NSGs as part of an automated process after the user entered more details into a post-provisioning registration application that ran inside of the VM. Again, such actions do require access to the Azure Resource Manager REST APIs… and that, in turn, requires to authenticate against Azure Active Directory with a valid principal.
In the past, you had to manually create a Service Principal for such actions and assign permissions in the Azure Subscription for it. Then, from within the VM, you had to sign-in against Azure AD from your script or application using this Service Principal to gain access to the Azure Resource Manager REST APIs. This introduced a very delicate challenge: where would you store the credentials for being able to sign-in with the Service Principal from within the VM!?
With Managed Service Identities, these kind of scenarios become way easier to implement and removes the challenge for you to manage secrets in Virtual Machines for Service Principals. With MSIs activated, all sorts of Azure Service Instances can get identities assigned which are fully managed by Azure through it’s Microsoft.ManagedIdentity resource provider.
MSIs can be enabled on Virtual Machines, but also other types of Services as you can read in the documentation. You can enable it through the portal, via an ARM template or with PowerShell or the Azure CLI!
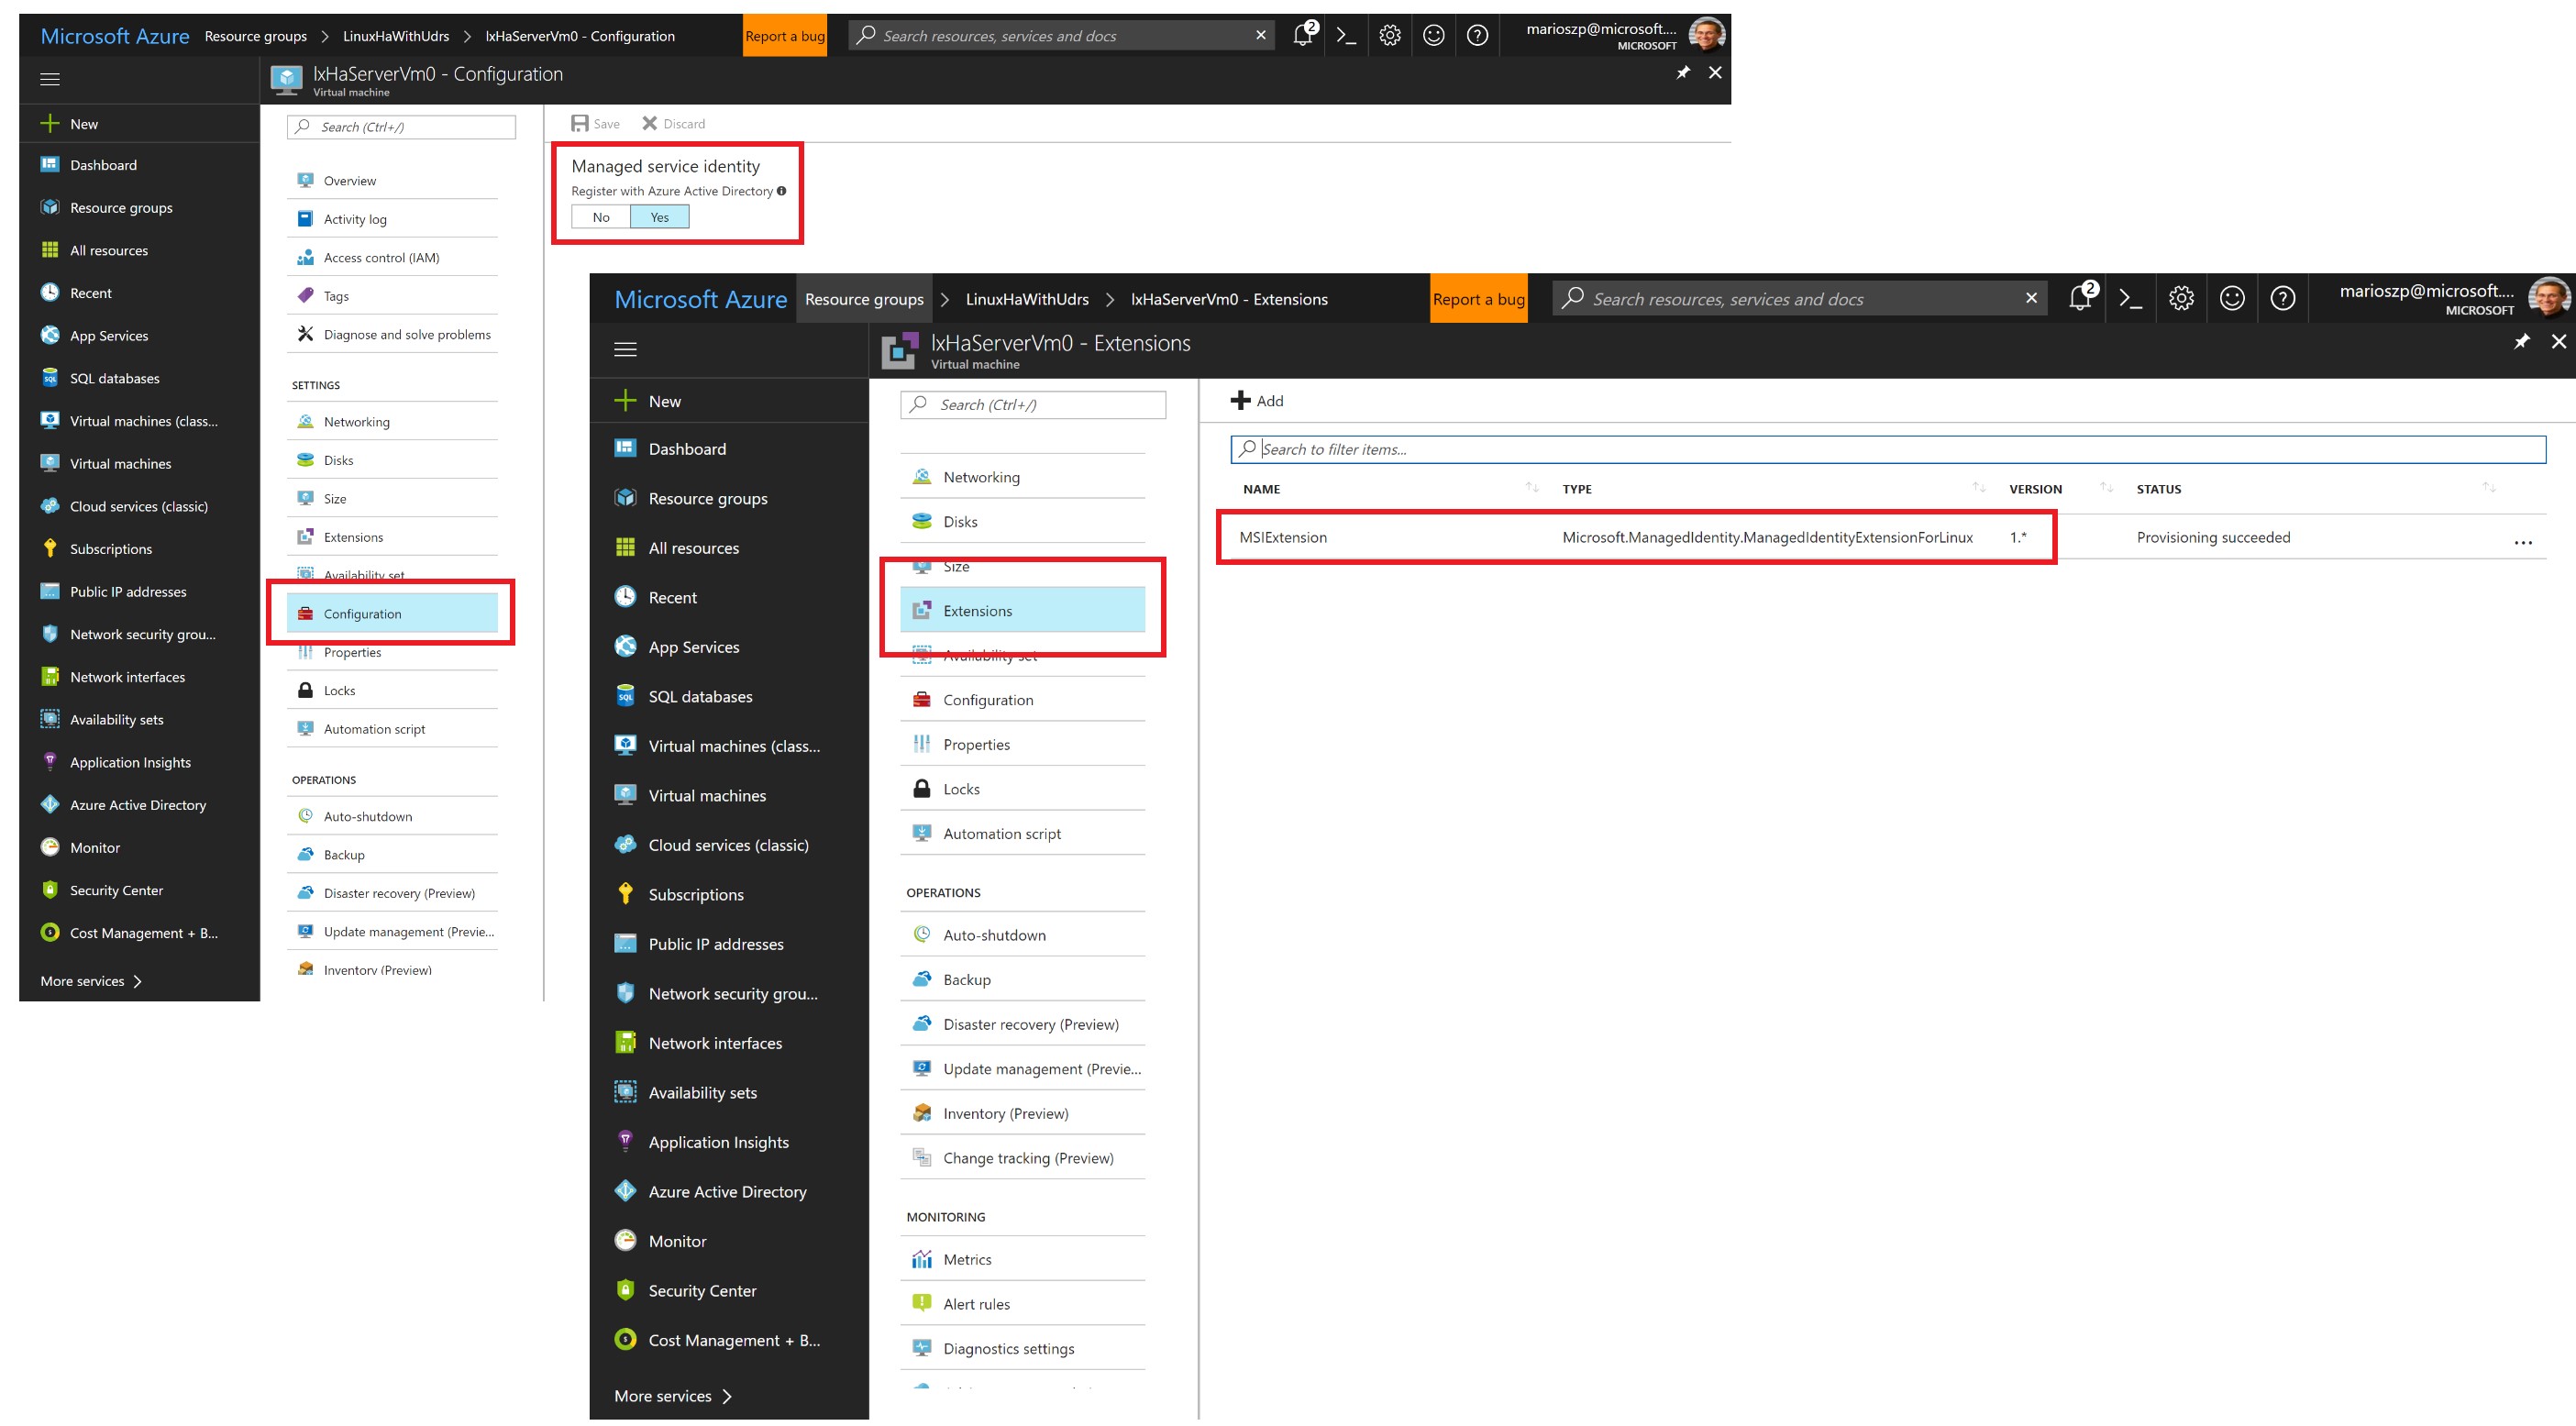
There are two pieces to it, which are getting more visible when you enable MSIs through:
-
Assigning an MSI to a resource which essentially results in the creation of a “managed service principal” for an Azure Resource such as a Virtual Machine that is made available to this Azure Resource, only!
-
Making tokens available to the respective resource for which the Managed Service Identity has been created. For VMs, this happens through a Virtual Machine Extension called the
ManagedIdentityExtensionForWindowsorManagedIdentityExtensionForLinux, respectively. When the extension is enabled for a virtual machine, any software running inside of the VM can request a token which is created as a result of an authentication against Azure AD with the MSI credentials. You don’t have to take care about those credentials since they are managed by the MSI infrastructure for you.
Once you have an MSI attached to a Virtual Machine (or another Azure Resource), you can to assign permissions to this identity for performing management operations against resources in your Azure subscriptions. The following screen shot shows this in the portal:
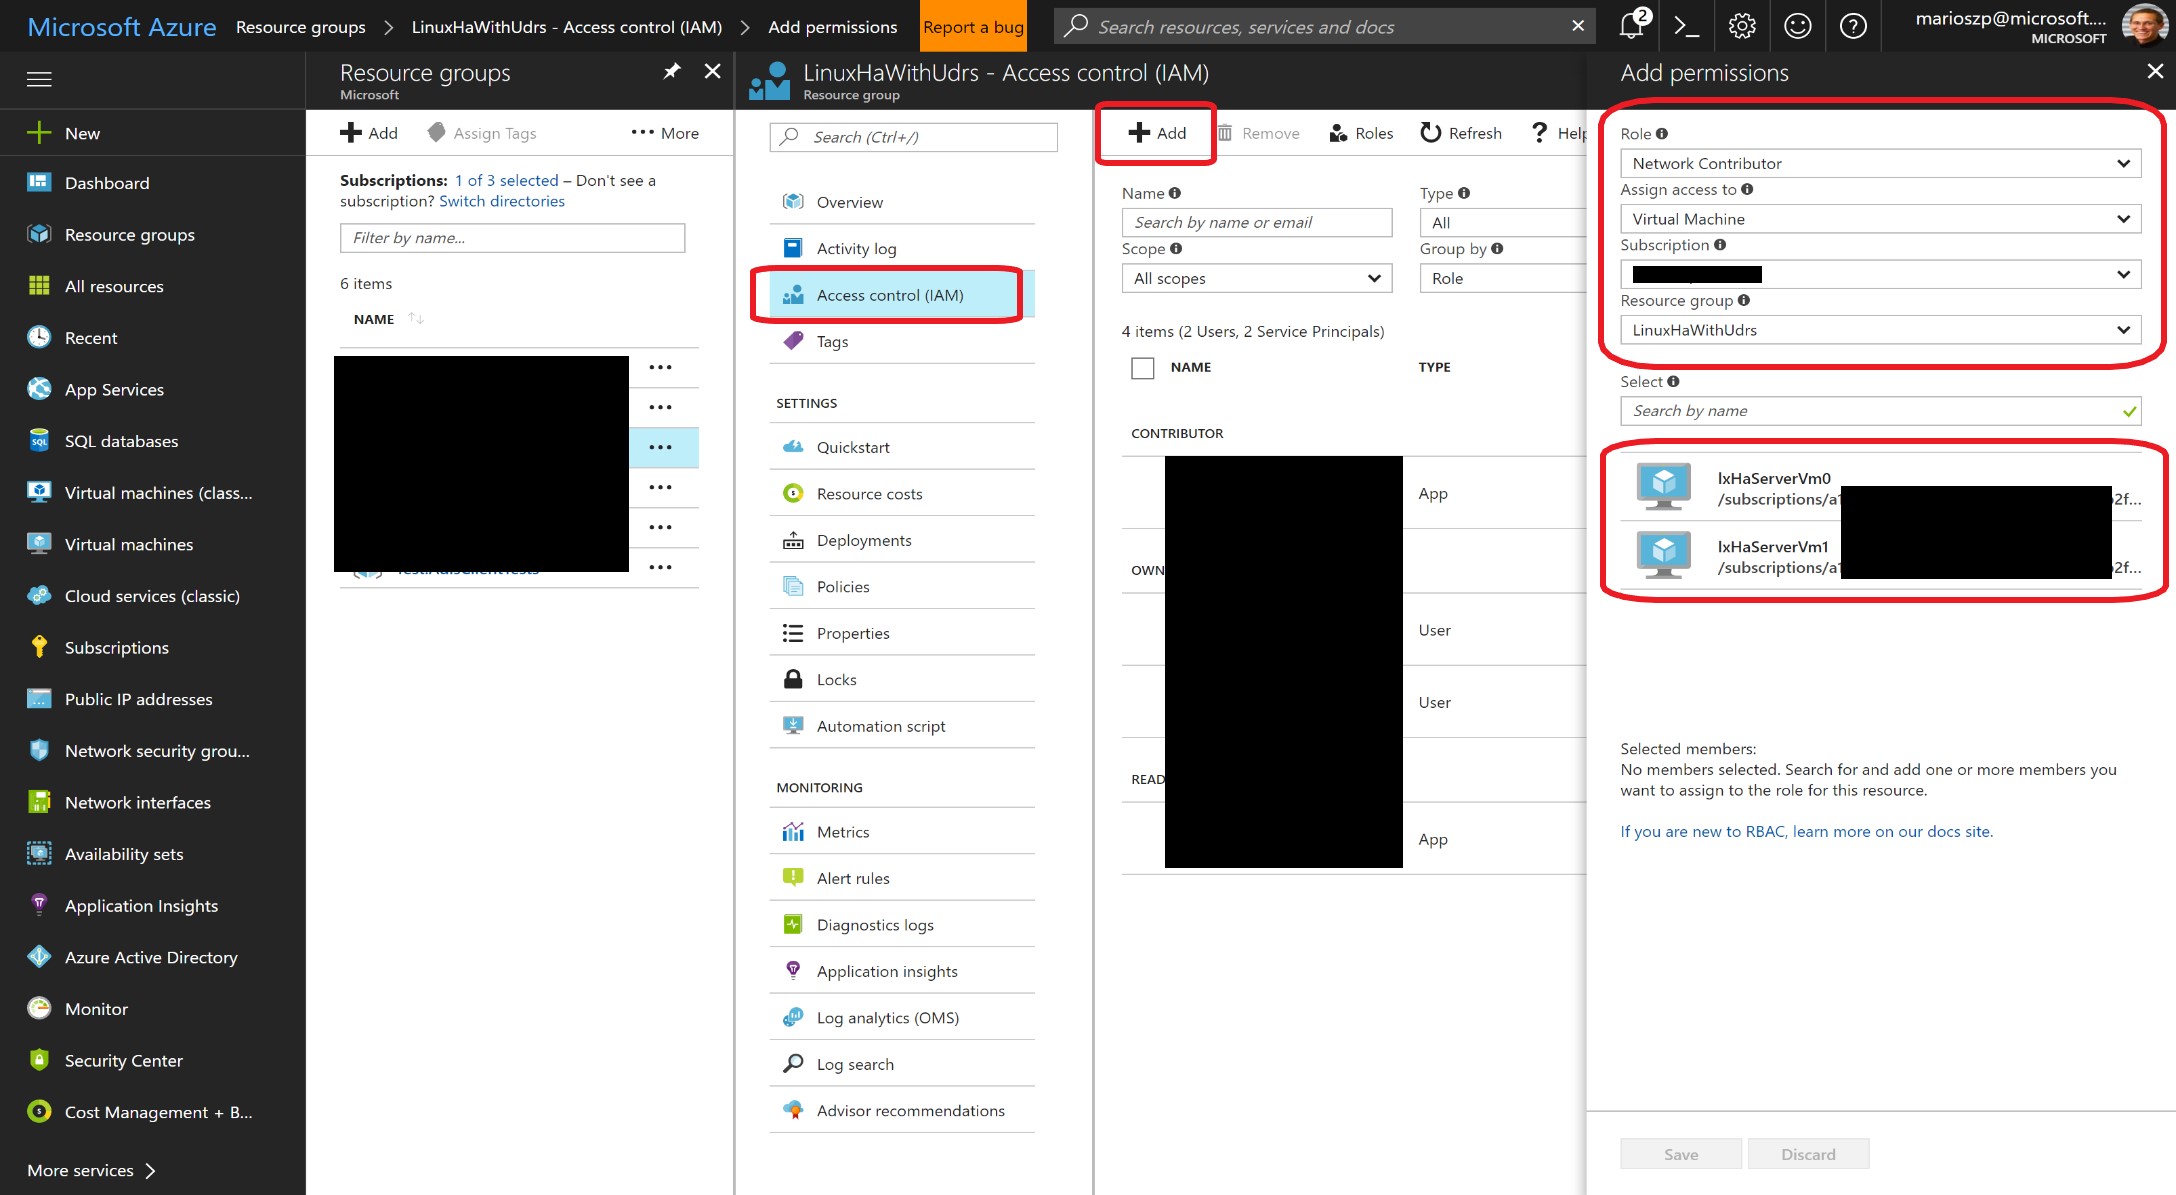
If you need to assign the permissions via CLI, then you need to get the object IDs and App IDs for the service principals which are managed for you behind the scenes. Below is an excerpt of Azure CLI commands and results showing what you need to do!
mszcool@dev:~$ az vm show --resource-group LinuxHaWithUdrs --name lxHaServerVm0 --out json
{
  ...
  "id": "/subscriptions/a...fe/resourceGroups/LinuxHaWithUdrs/providers/Microsoft.Compute/virtualMachines/lxHaServerVm0",
  "identity": {
    "principalId": "f3....26d",
    "tenantId": "72....47",
    "type": "SystemAssigned"
  },
  "instanceView": null,
  "licenseType": null,
  "location": "westeurope",
  "name": "lxHaServerVm0",
  "networkProfile": {
    ...
  },
  "osProfile": {
    ...
  },
  "plan": null,
  "provisioningState": "Succeeded",
  "resourceGroup": "LinuxHaWithUdrs",
  "resources": [
    ...
  ],
  "storageProfile": {
      ...
    }
  },
  "tags": {},
  "type": "Microsoft.Compute/virtualMachines",
  "vmId": "52.....6bf"
}
mszcool@dev:~$ az ad sp show --id f3....26d
AppId             DisplayName       ObjectId          ObjectType
----------------  ----------------  ----------------  ----------------
8b............f1  RN_lxHaServerVm0  f3............6d  ServicePrincipal
As you can see, when you get the VM object through ARM, it contains a new section called identity which contains all the details about the managed service identity you need to retrieve further details from Azure AD (above also by using the CLI).
That information can be used for things such as creating custom roles with permissions and then assigning the MSI to this custom role instead of assigning explicit permissions.
And end-2-end example
As I’ve mentioned before, one of the main use cases - so also for my customer - to use these assets combined is all about VMs that need to retrieve (and modify) details about themselves and peers in a joint-deployment. In an simplified example I wanted to demonstrate the fundamental the basic mechanics of the Instance Metadata Service and the Managed Service Identity so that you understrand, how you can make use of them in your own scripts and applications.
The sample builds the foundation for the scenarios I’ve explained earlier (VMs getting infos about themselves and their peers). Rather than trying to hit it all with a single post, you can expect more complex scenario posts later on that make use of the mechanics explained in this post.
Essentially, the sample creates an infrastructure with a jump-box and a set of servers as shown in the following Azure Network Watcher topology diagram.
All of the code is available on my GitHub repository for review:
https://github.com/mszcool/azureMsiAndInstanceMetadata
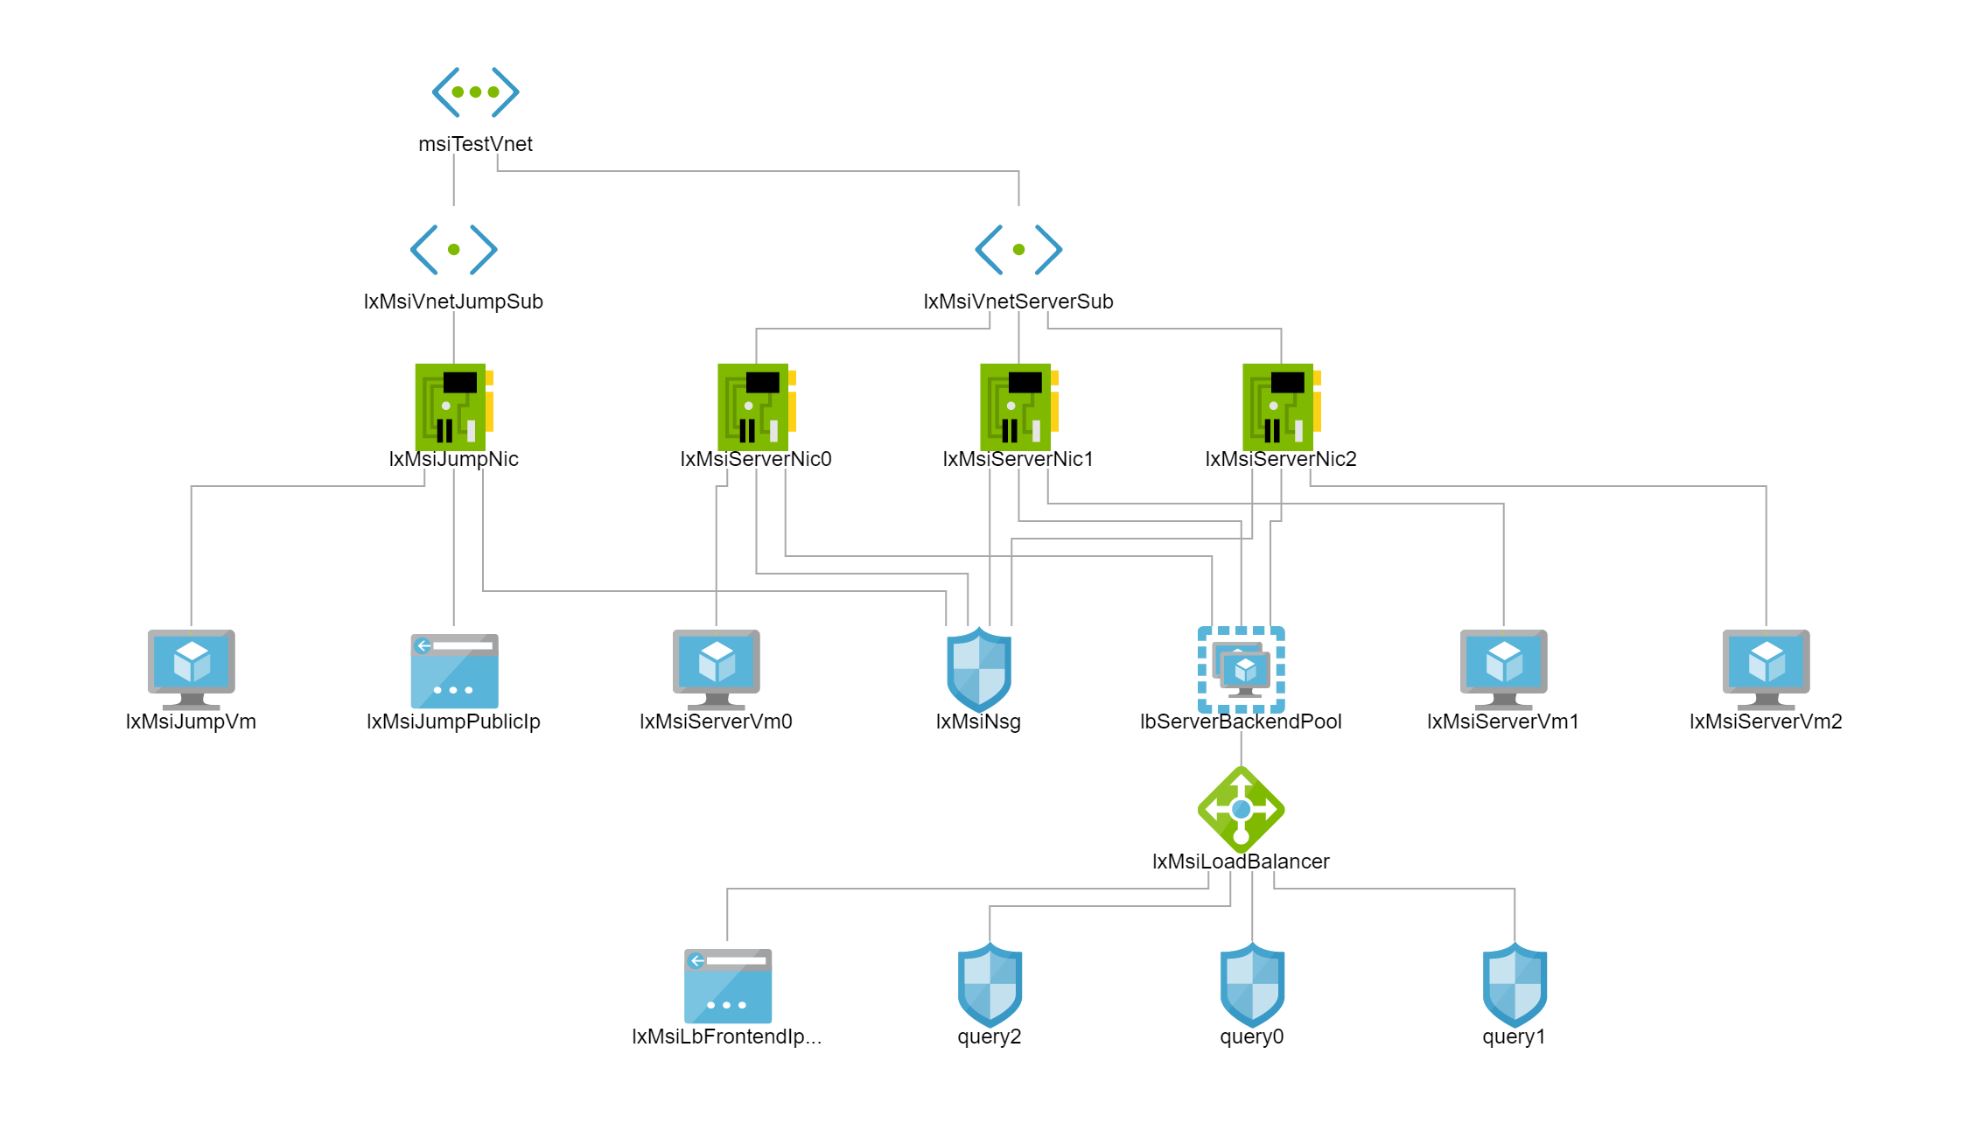
On each of the servers, a simple GO-based REST API runs which allows to show the instance metadata of the server itself as well as get all the other servers in the same machine. The servers are exposed through an Azure Load Balancer using NAT so that every server can be accessed, individually on a port to be able to call into specific servers. Note that I’ve set this up this way for demo-purposes, only so that you easily can access each server and examine its instance metadata and its output of getting details about its peers individually.
In a real-world environment I could rarely or not at all think about scenarios to expose instance metadata or data about peers to the public, directly. So, this is for demo-purposes, only, I wanted to re-iterated on that.
Assigning MSIs to the Servers and giving them permissions
For the sample, I used ARM templates to assign MSIs to the individual Server VMs and enable the respective MSI VM extension so that an application running inside of the respective VM can get a token for accessing resources under the identity of the VM it’s running in - the excerpt is from the azuredeploy.json template on my GitHub repository.
...
{
    "apiVersion": "[variables('computeAPIVersion')]",
    "type": "Microsoft.Compute/virtualMachines",
    "copy": {
        "name": "serverVmCopy",
        "count": "[parameters('serverCount')]"
    },
    "name": "[concat(variables('serverVmNamePrefix'), copyIndex())]",
    "location": "[parameters('location')]",
    "identity": {
        "type": "systemAssigned"
    },
    "dependsOn": [
        "[resourceId('Microsoft.Network/networkInterfaces',concat(variables('serverNicNamePrefix'),copyIndex()))]",
        "[resourceId('Microsoft.Storage/storageAccounts', variables('storageAccountName'))]",
        "[variables('serversAvSetId')]"
    ],
    "properties": {
        ...
    }
}
...
{
    "apiVersion": "[variables('computeAPIVersion')]",
    "type": "Microsoft.Compute/virtualMachines/extensions",
    "name": "[concat(variables('serverVmNamePrefix'),copyIndex(),'/IdentityExtension')]",
    "location": "[parameters('location')]",
    "copy": {
        "name": "serverVmMsiExtensionCopy",
        "count": "[parameters('serverCount')]"
    },
    "dependsOn": [
        "[resourceId('Microsoft.Compute/virtualMachines', concat(variables('serverVmNamePrefix'), copyIndex()))]"
    ],
    "properties": {
        "publisher": "Microsoft.ManagedIdentity",
        "type": "ManagedIdentityExtensionForLinux",
        "typeHandlerVersion": "1.0",
        "autoUpgradeMinorVersion": true,
        "settings": {
            "port": "[variables('msiExtensionPort')]"
        },
        "protectedSettings": {}
    }
}
...
As you can see above, the server-VM gets a system assigned identity in the ARM template. Further down in the template, the Managed Identity Extension is activated for each server VM instance. The variable msiExtensionPort is set to 50342 in my example, which means that an application or script running inside of the VM can retrieve a token for management operations from within the VM on that port (http://localhost:50342/oauth2/token).
Taking care of RBAC
Now we have an MSI and the ability for applications to get tokens when running inside of the VM. But so far the possibilities of using that identity are limited since it does not have any permissions, yet. These are assigned through the ARM template, as well:
...
{
    "apiVersion": "[variables('authAPIVersion')]",
    "type": "Microsoft.Authorization/roleAssignments",
    "name": "[parameters('rbacGuids')[add(mul(copyIndex(),2),1)]]",
    "copy": {
        "name": "serverVmRbacDeployment",
        "count": "[parameters('serverCount')]"
    },
    "dependsOn": [
        "[resourceId('Microsoft.Compute/virtualMachines', concat(variables('serverVmNamePrefix'), copyIndex()))]"
    ],
    "properties": {
        "roleDefinitionId": "[variables('rbacContributorRole')]",
        "principalId": "[reference(concat(resourceId('Microsoft.Compute/virtualMachines',concat(variables('serverVmNamePrefix'),copyIndex())),'/providers/Microsoft.ManagedIdentity/Identities/default'),variables('managedIdentityAPIVersion')).principalId]",
        "scope": "[resourceGroup().id]"
    }
},
..
This assigns permissions to created MSIs for the VMs to read resources of the resource group the VMs are deployed in. To get the role definition, which is stored in the [variables('rbacContributorRole')] in my template, I had to execute an Azure CLI statement along the lines of the following:
az role definition list --query "[?properties.roleName == 'Contributor']" --out json
The next tricky bit is the name of the RBAC role assignment. Unfortunately, that needs to be a unqiue GUID. In my very simplified example, I pass in the GUIDs for the role assignments as parameters in the template:
...
"rbacGuids": {
    "type": "array",
    "metadata": {
        "description": "Exactly ONE UNIQUE GUID for each server VM is needed in this array for the RBAC assignments (sorry for that)! WARNING: if you want to keep this template deployment repeatable, you must generate new GUIDs for every run or delete RBAC assignments before running it, again!"
    },
    "defaultValue": [
        "12f66315-2fdf-460a-9c53-8654ae72c390",
        "12f66315-2fdf-460a-9c53-8654ae72c391",
        "12f66315-2fdf-460a-9c53-8654ae72c392",
        "12f66315-2fdf-460a-9c53-8654ae72c393",
        "12f66315-2fdf-460a-9c53-8654ae72c394",
        "12f66315-2fdf-460a-9c53-8654ae72c395",
        "12f66315-2fdf-460a-9c53-8654ae72c396",
        "12f66315-2fdf-460a-9c53-8654ae72c397",
        "12f66315-2fdf-460a-9c53-8654ae72c398",
        "12f66315-2fdf-460a-9c53-8654ae72c399"
    ],
    "minLength": 4,
    "maxLength": 18
}
...
The reason for this is to make it simple to replace those values as part of an integrated CI/CD pipeline with every continuous build that might involve such an ARM-template deployment. I might write a separate, short post about that topic. For now, I just grab a GUID for each server-RBAC-assignment I want to make as part of my template to generate a unique name for the assignment by using "name": "[parameters('rbacGuids')[add(mul(copyIndex(),2),1)]]".
The next trick part of this section in the template is getting the ID of the principal created for the managed service identity of the respective server VM. This part of the template really gets hard to read, so I broke it up into multiple lines although you cannot do that in a real template:
    "properties": {
        "roleDefinitionId": "[variables('rbacContributorRole')]",
        "principalId": "[reference
        (
            concat(
                resourceId(
                    'Microsoft.Compute/virtualMachines',
                    concat(
                        variables('serverVmNamePrefix'),copyIndex()
                    )
                ),'/providers/Microsoft.ManagedIdentity/Identities/default'
            ),
            variables('managedIdentityAPIVersion')
        ).principalId]",
        "scope": "[resourceGroup().id]"
    }
The code is using the reference()-template-function to get the principal ID of the service principal created as managed identity. That principal is a child-object of the virtual machine, so we need to start with the resourceId() of the virtual machine and attach the identities section to it. Finally, the reference()-function requires an API version where we use the version for the managed identity provider from a variable "managedIdentityAPIVersion": "2015-08-31-PREVIEW" in the code.
Getting a Token for your MSI
Based on the requests from that specific customer project where we needed this functionality, I decided to use Go as a programming language. I am still not a GoLang-expert, so I took the opportunity to learn. Using MSIs always follows two major steps:
-
Acquire a token through the locally installed VM Extension.
This happens by calling into
http://localhost:<port-selected-in-MSI-extension> settings/oauth2/tokenendpoint which is offered by the MSI VM Extension. -
Use that token in REST API calls to the Azure Resource Manager
These are regular REST-calls with the HTTP Authorization header containing the bearer token retrieved earlier.
In my GoLang-based example, I have one module contained in the file msitoken.go which performs a REST-call against the local OAuth2 server offered by the VM Extension (note that this is an incomplete excerpt, for the full code look at the file msitoken.go on my GitHub repo):
// etc. ...

const msiTokenURL string = "http://localhost:%d/oauth2/token"
const resourceURL string = "https://management.azure.com/"

// etc. ...

var myToken MsiToken

// Build a request to call the MSI Extension OAuth2 Service
// The request must contain the resource for which we request the token
finalRequestURL := fmt.Sprintf("%s?resource=%s", fmt.Sprintf(msiTokenURL, msiPort), url.QueryEscape(resourceURL))
req, err := http.NewRequest("GET", finalRequestURL, nil)
if err != nil {
    log.Printf("--- %s --- Failed creating http request --- %s", t.Format(time.RFC3339Nano), err)
    return myToken, "{ \"error\": \"failed creating http request object to request MSI token!\" }"
}

// Set the required header for the HTTP request
req.Header.Add("Metadata", "true")

// Create the HTTP client and call the instance metadata service
client := &http.Client{}
resp, err := client.Do(req);
if err != nil {
    t = time.Now()
    log.Printf("--- %s --- Failed calling MSI token service --- %s", t.Format(time.RFC3339Nano), err)
    return myToken, "{ \"error\": \"failed calling MSI token service!\" }"
}
// Complete reading the body
defer resp.Body.Close()

// Now return the instance metadata JSON or another error if the status code is not in 2xx range
if (resp.StatusCode >= 200) && (resp.StatusCode <= 299) {
    dec := json.NewDecoder(resp.Body)
    err := dec.Decode(&myToken)
    // etc. ...
}
// etc. ...
Two aspects are important:
-
First, you always need to add the “Metadata: true” header for the call. All other calls will be rejected!
-
Second, you need to add a query-string parameter to the request called
resource=uri://to-your-resource-you-want-to-do-calls-to. In our case, this is always the Azure Resource Manager REST APIs resourcehttps://management.azure.com/.
Once we have executed the call, we do have a valid token available. Note that we didn’t have to fiddle around or deal with any kinds of secrets which is super-convenient. The Azure MSI infrastructure is totally taking care of the required details and there is not even a possibility to get access to any kinds of secrets for Managed Identities.
Using the MSI Token
This is the rather simple part of the story because it’s no different to any other Azure REST API call performed with any other kind of Azure AD user/principal. Once you have the token, you just use it in the HTTP Authorization header to call into the Azure Resource Manager REST APIs and if permissions are set up as previously outlined when I wrote about RBAC, all should go well.
The following snippets are parts of the GoLang Source file mypeers.go
const (
    environmentNameSubscription string = "SUBSCRIPTION_ID"
    environmentNameResourceGroup string = "RESOURCE_GROUP"

    restAPIEndpoint string =
        "https://management.azure.com/subscriptions/%s/resourceGroups/%s/%s"

    vmRelativeEndpoint string =
        "providers/Microsoft.Compute/virtualmachines?api-version=2016-04-30-preview"

    authorizationHeader string = "%s %s"
)

func GetMyPeerVirtualMachines(msiToken MsiToken) (vms string, errOut string) {
    // etc. ...
    subID := os.Getenv(environmentNameSubscription)
    resGroup := os.Getenv(environmentNameResourceGroup)
    // etc. ...

    // Create the final endpoint URLs to call into the Azure Resource Manager VM REST API
    finalURL := fmt.Sprintf(restAPIEndpoint,
                              subID, resGroup, vmRelativeEndpoint)
    finalAuthHeader := fmt.Sprintf(authorizationHeader,
                              msiToken.TokenType, msiToken.AccessToken)

    // Build a request to call the instance Azure in-VM metadata service
    req, err := http.NewRequest("GET", finalURL, nil)
    if err != nil {
        // etc. ...
    }
    req.Header.Add("Authorization", finalAuthHeader)

    // Create the HTTP client and call the instance metadata service
    client := &http.Client{}
    resp, err := client.Do(req);
    if err != nil {
        // etc. ...
    }
    // Complete reading the body
    defer resp.Body.Close()

    // Now return the raw VM JSON or another error if the status code is not in 2xx range
    if (resp.StatusCode >= 200) && (resp.StatusCode <= 299) {
        bodyContent, err := ioutil.ReadAll(resp.Body)
        if err != nil {
            // etc. ...
        }
        // etc. ...
        return string(bodyContent), ""
    }

    // etc. ...

    return "", fmt.Sprintf("{ \"error\": \"Azure Resource Manager REST API call returned non-OK status code: %d \" }", resp.StatusCode)
}
This code is super-simple and just retrieves all other servers in the same resource group. It assumes, that the resource group and the subscription ID are both set as environment variables before the GO-application is started. This should give you an idea, how a server in a resource group could find other servers and get their private IP addresses to automatically configure components such as e.g. keepalived during an automated post provisioning step or something similar.
The Instance Metadata Service
The MSI and Azure ARM REST API calls can help retrieving details about peers or performing more complex management operations incl. creating or updating resources depending on the permissions given to a particular MSI. But for retrieving information details about itself, a VM does not necessarily need to go through MSI and ARM REST APIs since there’s a way simpler approach if it’s just about retrieving details about the VM itself.
For a few months, Azure makes an in-VM instance metadata service available which can be called from within the VM, only, but without additional authentication requirements. The documentation about the instance metadata service shows, how-to retrieve the data with simple tools such as curl. Again, the important thing is to include the metadata header as with the MSI token service, before.
In this end-2-end sample, I show, how to call the in-VM instance metadata service from a GoLang application. Again, I just show the mechanics, no concrete scenario for this post, but it should equip you with being able to implement scenarios such as the ones I’ve explained several times throughout the post. And I plan for subsequent blog-posts making use of these mechanics for a real scenario implementation. Below again an excerpt of the GoLang-code that retrieves instance metadata, for the full code please review metadata.go:
const instanceMetaDataURL string =
          "http://169.254.169.254/metadata/instance?api-version=2017-04-02"

/*GetInstanceMetadata ()
 *Calls the Azure in-VM Instance Metadata service and returns the results to the caller*/
func GetInstanceMetadata() string {
    // etc. ...

    // Build a request to call the instance Azure in-VM metadata service
    req, err := http.NewRequest("GET", instanceMetaDataURL, nil)
    if err != nil {
        // etc. ...
    }

    // Set the required header for the HTTP request
    req.Header.Add("Metadata", "true")

    // Create the HTTP client and call the instance metadata service
    client := &http.Client{}
    resp, err := client.Do(req);
    if err != nil {
        // etc. ...
    }
    // Complete reading the body
    defer resp.Body.Close()

    if (resp.StatusCode >= 200) && (resp.StatusCode <= 299) {
        bodyContent, err := ioutil.ReadAll(resp.Body)
        // etc. ...
        return string(bodyContent)
    }
    // etc. ...
    return fmt.Sprintf("{ \"error\": \"instance meta data service returned non-OK status code: %q \" }", resp.StatusCode)
}
The Main Go-Application
Before putting it all together, let’s have a quick look at the main GoLang application so that you get a sense, where those previous pieces of code are called from. The main application is fairly simple, it bootstraps a GoLang HTTP server and configures some routes for the HTTP-handlers (full source in main.go).
package main

import (
     "log"
     "net/http"
     "github.com/gorilla/mux"
)

var myRoutes = map[string]func(http.ResponseWriter, *http.Request){
        "/": Index,
        "/meta": MyMeta,
        "/servers": MyPeers}

func main() {
    router := mux.NewRouter().StrictSlash(true);
    for key, value := range myRoutes {
        router.HandleFunc(key, value);
    }
    log.Fatal(http.ListenAndServe(":8080", router))
}
The handlers.go then contains the functions which are referred to in the array myRoutes defined in the source code above. These are the actual functions called when the respective route URLs are called:
/*Index (w, r)
 *Returns with a list of available functions for this simple API*/
 func Index(w http.ResponseWriter, r *http.Request) {
    fmt.Fprintln(w, "Welcome!");
}

/*MyMeta (w, r)
 *Returns instance metadata retrieved through the in-VM instance metadata service of the VM*/
func MyMeta(w http.ResponseWriter, r *http.Request) {
    metaDataJSON := GetInstanceMetadata()
    fmt.Fprintf(w, metaDataJSON)
}

/*MyPeers (w, r)
 *Uses the MSI to get a token and list all the other servers available in the resource group*/
func MyPeers(w http.ResponseWriter, r *http.Request) {
    token, err := GetMsiToken(50342)
    if err != "" {
        fmt.Fprint(w, err)
    } else {
        peerVms, err := GetMyPeerVirtualMachines(token)
        if err != "" {
            fmt.Fprint(w, err)
        } else {
            fmt.Fprint(w, peerVms)
        }
    }
}
Putting it all together
To make exploring this as easy as possible for you, the ARM templates and scripts I provide as part of this solution are setting up the entire environment automatically. To recall, here’s the screen shot of the entire environment from the Azure Network Watcher, again:
The ARM template sets up the Network, Virtual Machines, Network Security Groups etc. and for making it simple to explore the responses of the different servers without SSHing into the VMs, I also added a Load Balancer that exposes the GoLang application via Port-Mapping to each of the servers on the public load balancer. That means, you can just perform an http-request against the public load balancer with a port that maps to the server for which you would like to see the responses for. A few examples:
- http://yourloadbalancerip:10000/meta retrieves the instance metadata service through the GoLang REST Proxy I’ve explained in this post for the first server VM.
- http://yourloadbalancerip:10002/servers uses the Managed Serviec Identity of the third server in the deployment to list the other servers in the RG
- http://yourloadbalancerip:10001/ just prints a welcome message… very useful:)
Of course, you can also SSH into the Jump-Box set up as part of this deployment and explore everything from the inside. Essentially, what I do is the following as part of the ARM template deployment to automate the setup of the GoLang application:
-
The ARM-template contains a custom script extension that runs on each of the servers to build the Go-application and generate a shell-script that registers the GoLang REST-API I’ve explained above as a service daemon.
-
The Service Daemon script which is generated as part of the server setup and copied to
/etc/init.d/msiandmeta.shsets the Subscription ID and the target resource group as an environment variable before launching the GoLang Application.
For making the process simple and easy to follow, I use a template for the init.d-script that gets generated with the custom script extension. This script is also on my github repository called template.msiandmeta.sh.
#!/bin/bash
### BEGIN INIT INFO
# Provides:          msiandmeta
# Required-Start:    $local_fs $network $named $time $syslog
# Required-Stop:     $local_fs $network $named $time $syslog
# Default-Start:     2 3 4 5
# Default-Stop:      0 1 6
# Short-Description: GoLang App using Azure MSI and Metadata
# Description:       Runs a Go Application which is a web server that demonstrates usage of Managed Service Identities and in-VM Instance Metadata
### END INIT INFO

appUserName=__USER__
appPath=__APP_PATH__
appName=__APP_NAME__

processIDFilename=$appPath/$appName.pid
logFilename=$appPath/$appName.log

#
# Starts the simple GO REST service
#
start() {
    # Needed by the GO App to access subscription and resource group, correctly
    export SUBSCRIPTION_ID="__SUBSCRIPTION_ID__"
    export RESOURCE_GROUP="__RESOURCE_GROUP__"

    # Check if the service runs by looking at it's Process ID and Log Files
    if [ -f $processIDFilename ] && [ "`ps | grep -w $(cat $processIDFilename)`" ]; then
        echo 'Service already running' >&2
        return 1
    fi
    echo 'Starting service...' >&2
    su -c "start-stop-daemon -SbmCv -x /usr/bin/nohup -p \"$processIDFilename\" -d \"$appPath\" -- \"./$appName\" > \"$logFilename\"" $appUserName
    echo 'Service started' >&2
}

#
# Stops the simple GO REST service
#
stop() {
    if [ ! -f $processIDFilename ] && [ ! "`ps | grep -w $(cat $processIDFilename)`" ]; then
        echo "Service not running" >&2
        return 1
    fi
    echo "Stopping Service..." >&2
    start-stop-daemon -K -p "$processIDFilename"
    rm -f "$processIDFilename"
    echo "Service stopped!" >&2
}

#
# Main script execution
#

case $1 in

    start)
      start
      ;;

    stop)
      stop
      ;;

    restart)
      stop
      start
      ;;

    \?)
      echo "Usage: $0 start|stop|restart"
esac
In this script, you can see tokens such as __SUBSCRIPTION_ID__. These tokens are replaced by the script that’s executed at provisioning time for each of the servers through the custom script extension definition in the main ARM template for the entire solution:
{
    "apiVersion": "[variables('computeAPIVersion')]",
    "type": "Microsoft.Compute/virtualMachines/extensions",
    "name": "[concat(variables('serverVmNamePrefix'),copyIndex(),'/SetupScriptExtension')]",
    "location": "[parameters('location')]",
    "copy": {
        "name": "serverVmSetupExtensionCopy",
        "count": "[parameters('serverCount')]"
    },
    "dependsOn": [
        "[resourceId('Microsoft.Compute/virtualMachines',concat(variables('serverVmNamePrefix'), copyIndex()))]",
        "[concat('Microsoft.Compute/virtualMachines/', concat(variables('serverVmNamePrefix'),copyIndex()),'/extensions/IdentityExtension')]"
    ],
    "properties": {
        "publisher": "Microsoft.Azure.Extensions",
        "type": "CustomScript",
        "typeHandlerVersion": "2.0",
        "autoUpgradeMinorVersion": true,
        "settings": {
            "fileUris": [
                "[concat(parameters('_artifactsLocation'),'/scripts/setup_server_node.sh',parameters('_artifactsStorageSasToken'))]",
                "[concat(parameters('_artifactsLocation'),'/scripts/template.msiandmeta.sh',parameters('_artifactsStorageSasToken'))]",
                "[concat(parameters('_artifactsLocation'),'/app/main.go',parameters('_artifactsStorageSasToken'))]",
                "[concat(parameters('_artifactsLocation'),'/app/handlers.go',parameters('_artifactsStorageSasToken'))]",
                "[concat(parameters('_artifactsLocation'),'/app/metadata.go',parameters('_artifactsStorageSasToken'))]",
                "[concat(parameters('_artifactsLocation'),'/app/msitoken.go',parameters('_artifactsStorageSasToken'))]",
                "[concat(parameters('_artifactsLocation'),'/app/mypeers.go',parameters('_artifactsStorageSasToken'))]"
            ]
        },
        "protectedSettings": {
            "commandToExecute": "[concat('./setup_server_node.sh -a ', parameters('adminUsername'), ' -s ', subscription().subscriptionId, ' -r ', resourceGroup().name)]"
        }
    }
}
The script that’s invoked through the custom script extension above is also on my GitHub repository and generates the final init.d-script for the service registration based on the input parameters. These input-parameters are exactly the subscription-name, the resource group name and the user under which the daemon should run. Here’s an excerpt of the setup_server_node.sh that builds the GoLang App and generates the target init.d-script:
#
# Next compile the Go Application
#
mkdir ./app
mv *.go ./app

export PATH="$PATH:/usr/local/go/bin"
export GOPATH="`realpath ./`/app"
export GOBIN="$GOPATH/bin"
go get ./app
go build -o msitests ./app

sudo mkdir /usr/local/msiandmeta
sudo cp ./msitests /usr/local/msiandmeta
sudo chown -R $adminName:$adminName /usr/local/msiandmeta

#
# Configure apache2 to use the Go application as a CGI script
#
cat ./template.msiandmeta.sh \
| awk -v USER="$adminName" '{gsub("__USER__", USER)}1' \
| awk -v APP_NAME="msitests" '{gsub("__APP_NAME__", APP_NAME)}1' \
| awk -v APP_PATH="/usr/local/msiandmeta" '{gsub("__APP_PATH__", APP_PATH)}1' \
| awk -v SUBS="$subscriptionId" '{gsub("__SUBSCRIPTION_ID__", SUBS)}1' \
| awk -v RGROUP="$resGroup" '{gsub("__RESOURCE_GROUP__", RGROUP)}1' \
>> msiandmeta.sh

#
# Now make sure the script is handled by the system for starting/stopping the service
#
sudo cp ./msiandmeta.sh /etc/init.d
sudo chmod +x /etc/init.d/msiandmeta.sh
sudo update-rc.d msiandmeta.sh defaults
With that, the GoLang-application that accesses the ARM REST APIs through the MSI and the instance metadata service as part of this sample should run, automatically, and always find the correct subscription ID and resource group name as part of the environment variables since they’re set by the init.d-script generated from the template through this way!
Testing the environment
Once you have deployed the ARM template into your subscription, you should be able to call the GoLang-application I’ve explained above that demonstrates the mechanics of the instance metadata service and the Managed Service Identity in action through the Load-Balancer using the NAT-ports for each server. The reason for mapping each server through a port to the outside world was for demo-purposes and to make it as easy as possible for you to examine the different responses of the different servers without SSHing into any machine. The following screen shot shows this in action by comparing different responses from different servers.
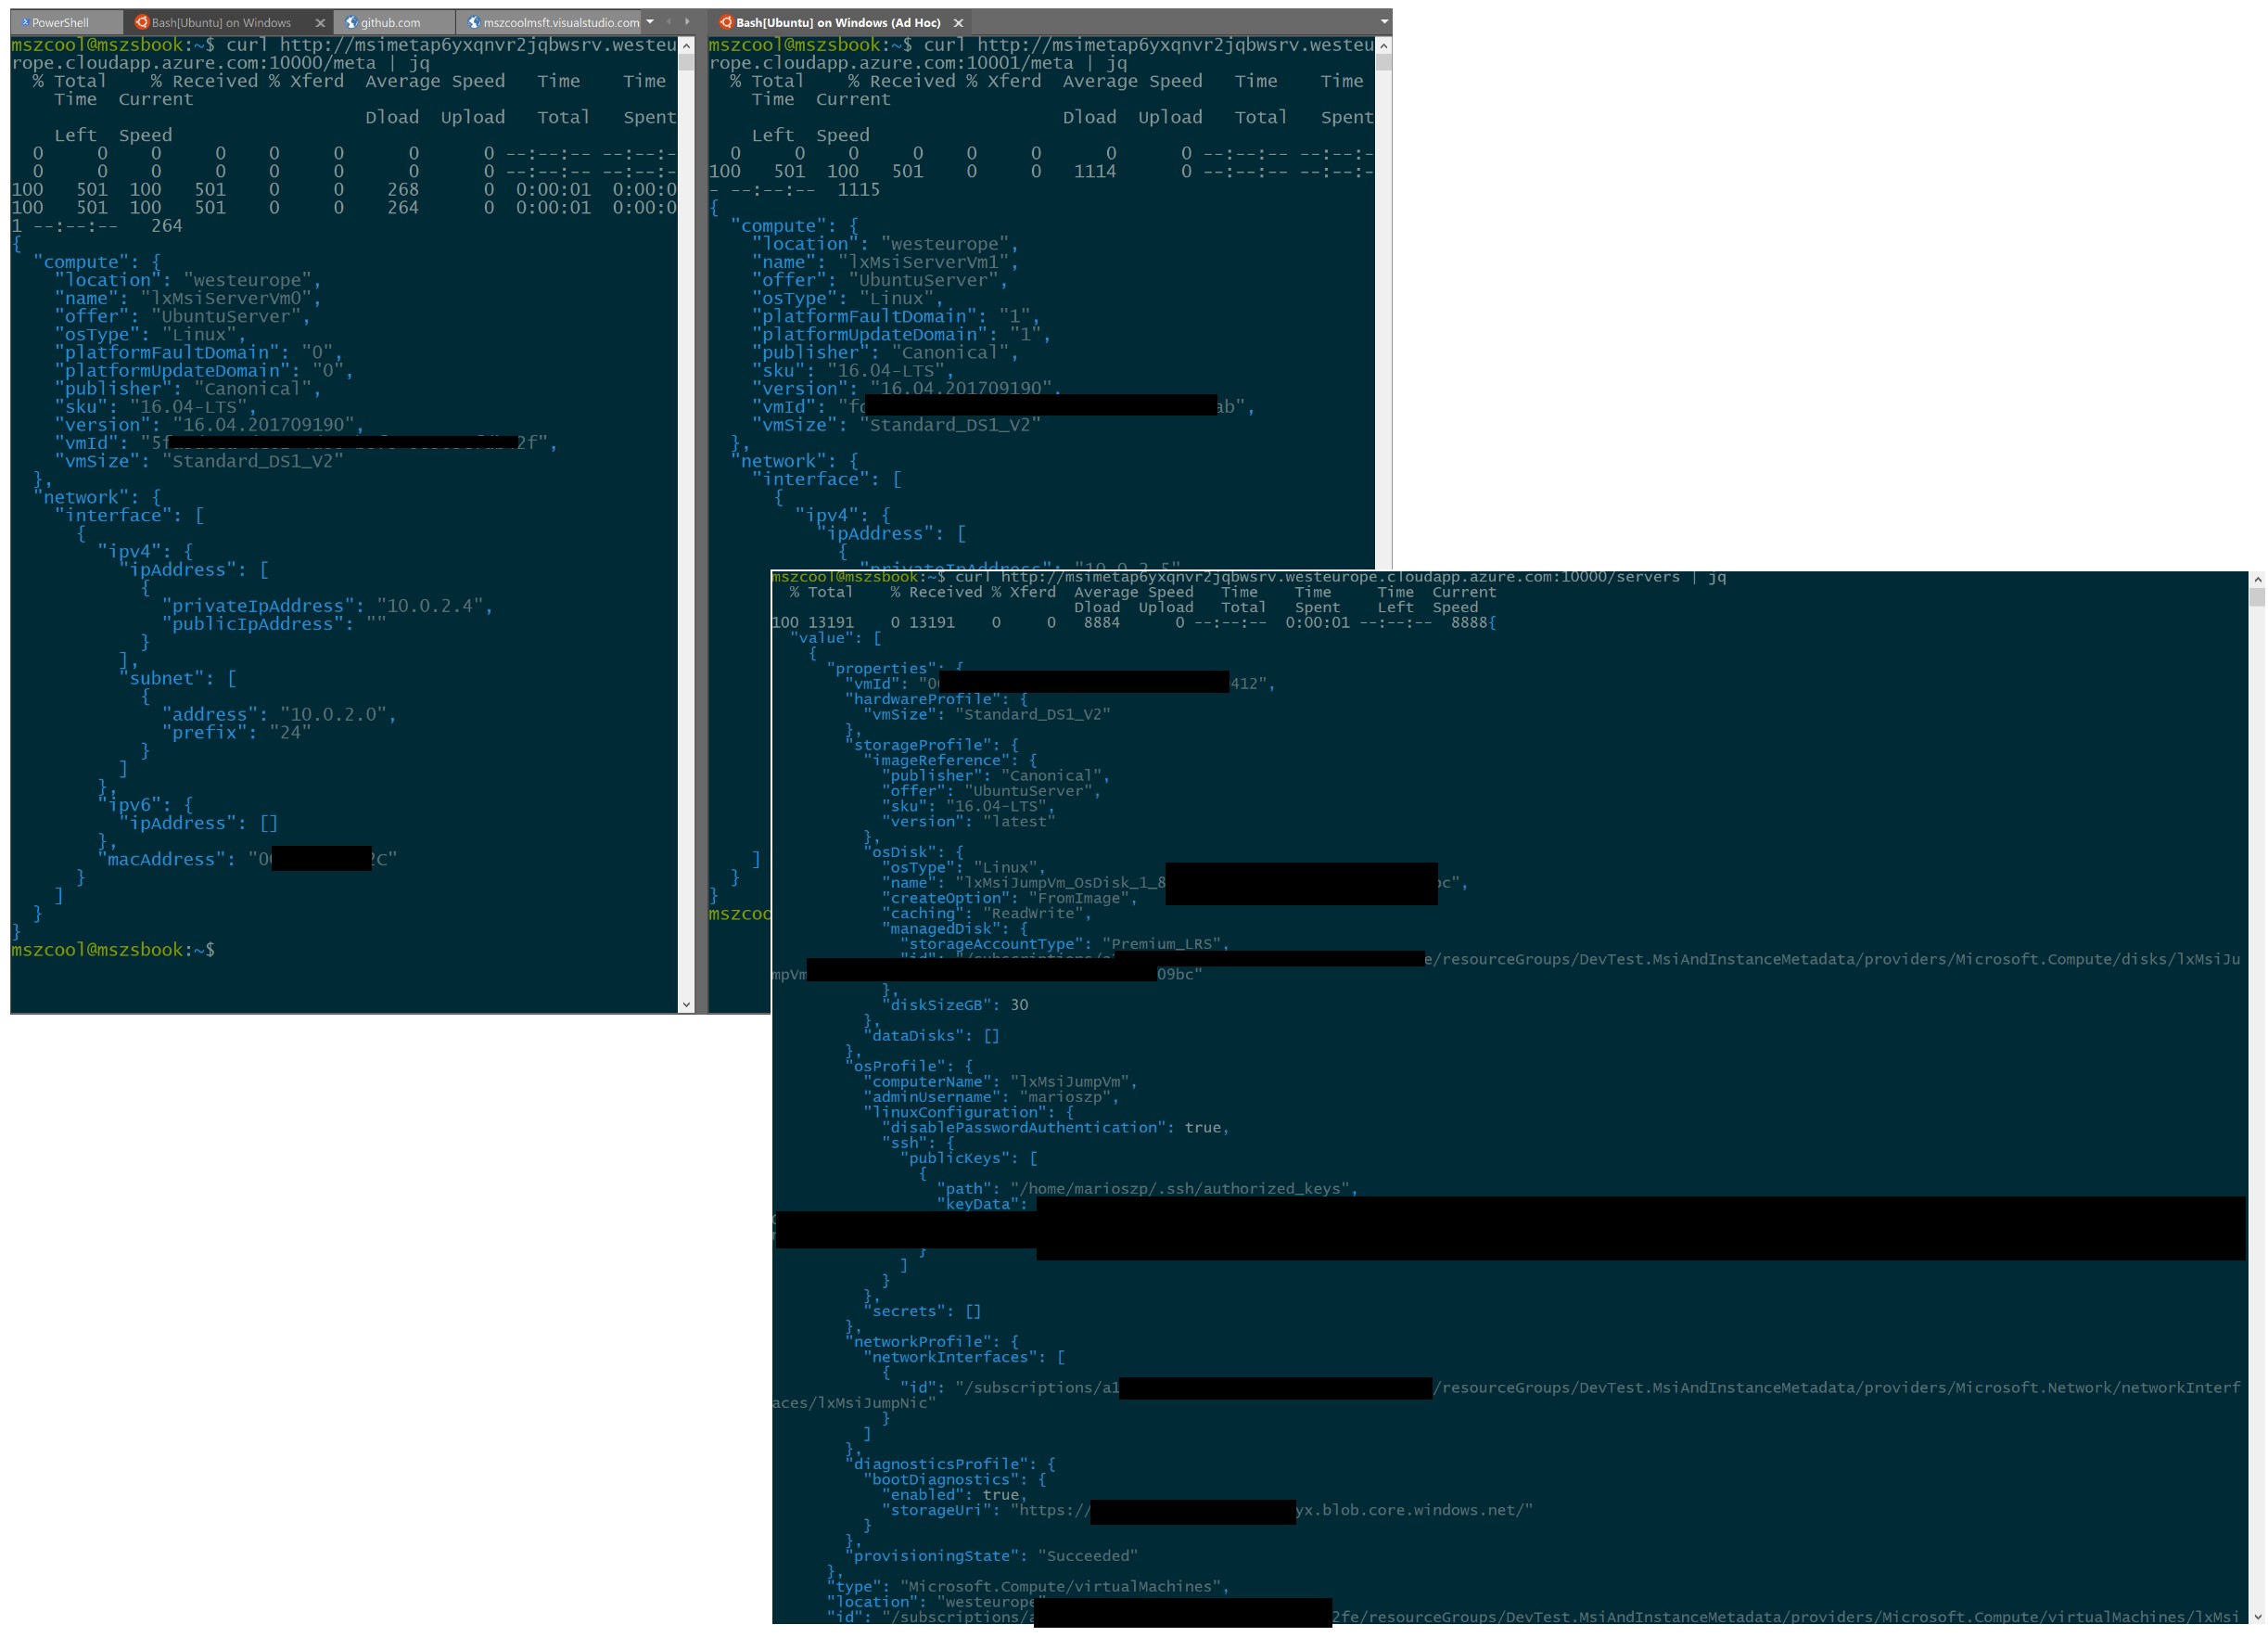
Of course, in the real world you would not expose these things, directly, but rather use them from within your applications!! For this sample and for enabling you to ramp up with details, quickly, it should be helpful, hopefully!
Final Words
Managed Service Identities and the in-VM Instance Metadata Service are extremly helful and it was long overdue to have these kind of great capabilities. Both services allow you to implement complex scenarios such as:
-
Implementing licensing and IP-protection strategies based on the in-VM instance metadata service.
-
Script automated configurations of clustered environments by being able to call into Azure Resource Manager REST APIs from within Virtual Machines without the need of managing secrets for Service Principals.
-
many, many more and similar scenarios.
With both services availabe on Azure, my previous blog-post becomes obsolete for this specific scenario, although there might still be many reasons for leveraging service principals for other scenarios, of course (so it might still be a good source for learning details about service principals in Azure AD, in general). But the specific scenario outlined in both, that previous post and this one, can be implemented way better with Managed Service Identities and the in-VM Instance Metadata Service combined!
I hope you enjoyed reading this and it was valuable for you. We went through something that leverages these mechanics in a very similar way for a concrete scenario with one of my customers… my plan is to post about a concrete scenario that leverages these mechanics as one of my next blogging activities.
Stay Tuned!