[restored from my Wordpress blog]
Batch processing is something nearly everyone I have been working with is doing in some or the other way on Microsoft Azure. Last year some colleagues and I did work with several global partners that had this requirement. Therefore since nothing at the scale of Azure Batch was available, yet, we created GeRes2 as an open source project. GeRes2 covers batch processing in a simple, pragmatic yet scalable way (at full scale of Web/Worker roles as opposed to the limited scale of WebJobs SDK in WebSites). But now, the times when you need GeRes2 are over. Instead you definitely should consider Azure Batch, directly.
What is Azure Batch?
Azure Batch is a completely managed service, you could see it as “batch processing as a service”.
It can be used for simple batch processing up to High-Performance-Compute (HPC) types of workloads. As a managed service, Azure Batch is fully operated by Microsoft and made accessible through an HTTP REST API. While for simpler requirements you might want to use WebJobs SDK, if you really need to scale beyond the options provided by WebSites and do not want to manage infrastructure (e.g. such as it is the case with Windows Server HPC Pack), Azure Batch is your best friend.
A sample on Azure Batch to help you Getting Started!
As a first introduction and to help you get started, I thought to publish a sample inspired by a session from one of the Azure Batch product managers, Mark Scurrell, at TechEd EMEA 2014: an OCR image recognition based on the Tesseract OCR Engine. The whole sample is available on my github.com repository:
https://github.com/mszcool/AzureBatchTesseractSample
The following sketch outlines the flow of the sample which I’ve built to help you get started. Note that I also include a PowerShell Script that sets up the environment in your Azure Subscription (please setup Azure PowerShell correctly, before). It creates all required Azure service accounts (storage, batch), updates app.config configurations, builds the sample and finally uploads sample data as it is needed for testing the scenario right away.
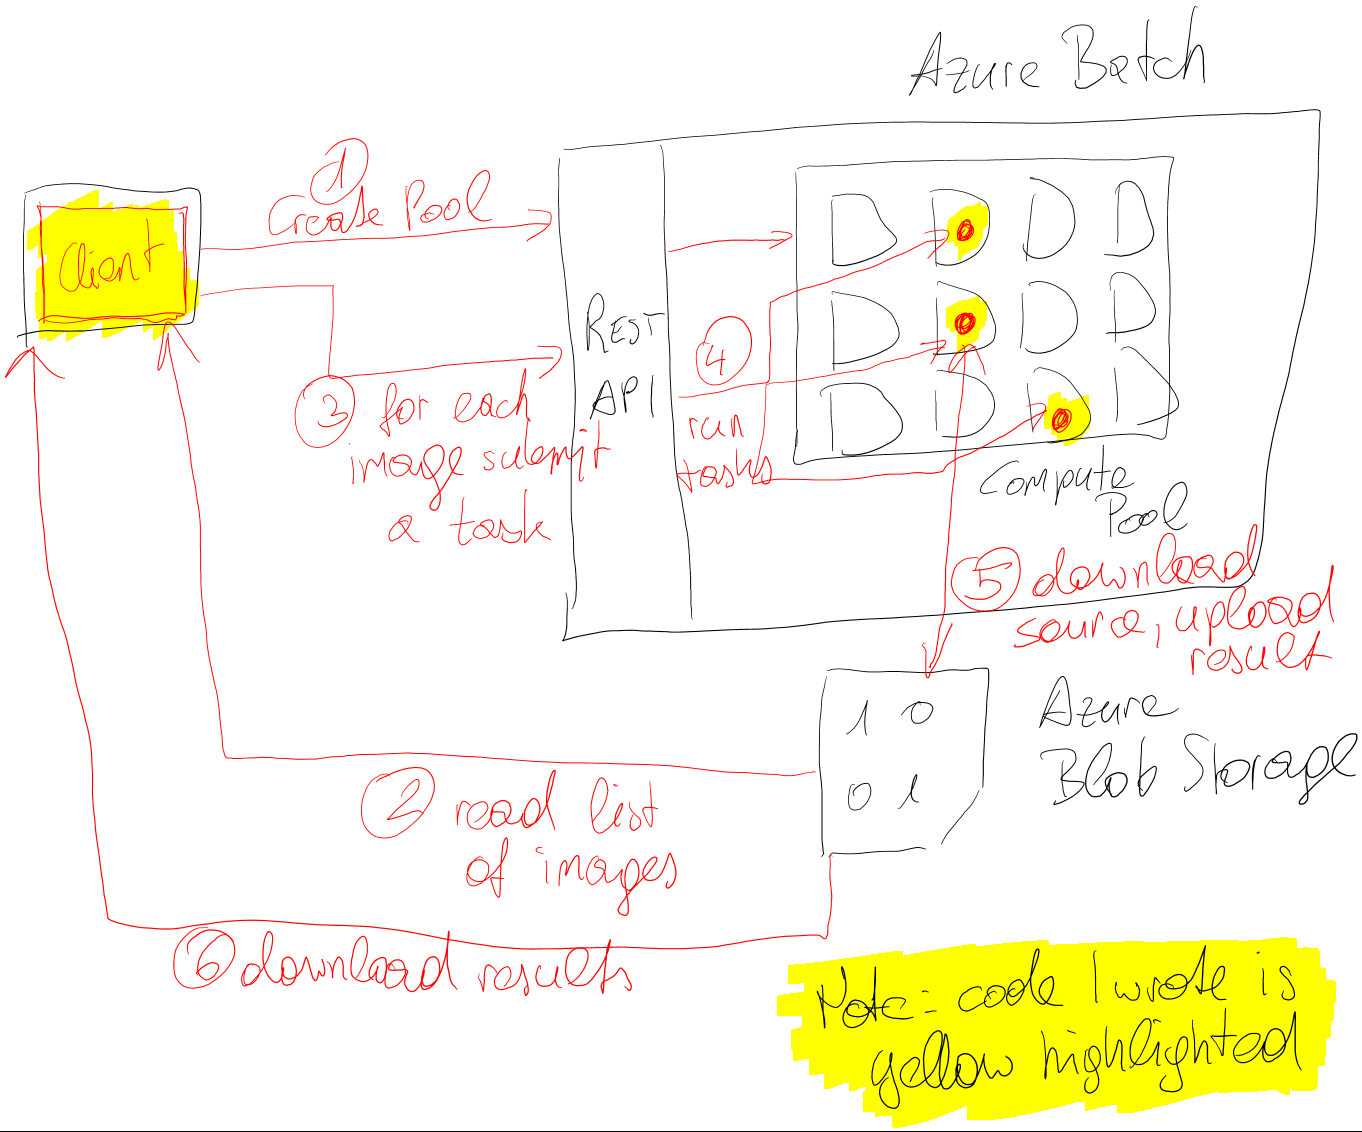
As you can see, the overall solution consists of a client that creates compute pools, submits jobs to that compute pool that use Tesseract for an OCR recognition on-top of PNG-based images stored in Azure Blob Storage and then makes the results available in Azure Blob storage, as well. Although there are different alternative ways with Azure Batch, for this first sample I also wrote a little console application that downloads the source-images from Azure Blob to the task virtual machines (TVM), processes them using tesseract.exe and then uploads the results back to BLOB-storage.
Understanding the fundamental Azure Batch Concepts
Before you can get started, you should understand the fundamental concepts of Azure Batch. Let’s get started with the following terms:
- Azure Batch Account An account is a management unit used to group batch services and batch apps together in a single unit with security access keys.
- Azure Batch REST API For each account, Batch is made available through an HTTP REST API. For .NET developers the team ships an SDK, already. Other languages will follow (or are available after I’ve published this article, already).
- Azure Batch Apps Batch can be used in two flavors, through the low-level REST-API which is more complex but provides you with a bigger set of options and control or through a more managed experience with a management portal and a light-weight API called Batch Apps.
- Compute Pools These are groups of compute nodes used for executing work. Pools can contain many compute nodes and can be configured with auto scaling rules so they add/remove resources based on the load on a pool.
- Task Virtual Machines (TVM) A TVM is a single compute node which is part of a compute pool. Essentially behind the scenes TVMs are worker roles since Azure Batch by itself is implemented with Web/Worker roles. For you as developer, just think of them as scalable, stateless virtual machines.
- Work Items Work Items are used to describe classes of units of works (aka jobs) and configure scheduling properties of jobs (e.g. execute once, regular time-controlled execution etc.). It also allows specifying the compute pools on which jobs of a work item are executed.
- Jobs A job is a unit of work. It describes a set of concrete execution items called tasks. Each task gets executed on a TVM part of a pool that is tied to the work item the job belongs to.
- Tasks A task is a single execution step of a job. Essentially a task is an executable that you need to provide and specify as part of the scheduling process that will be executed on TVMs.
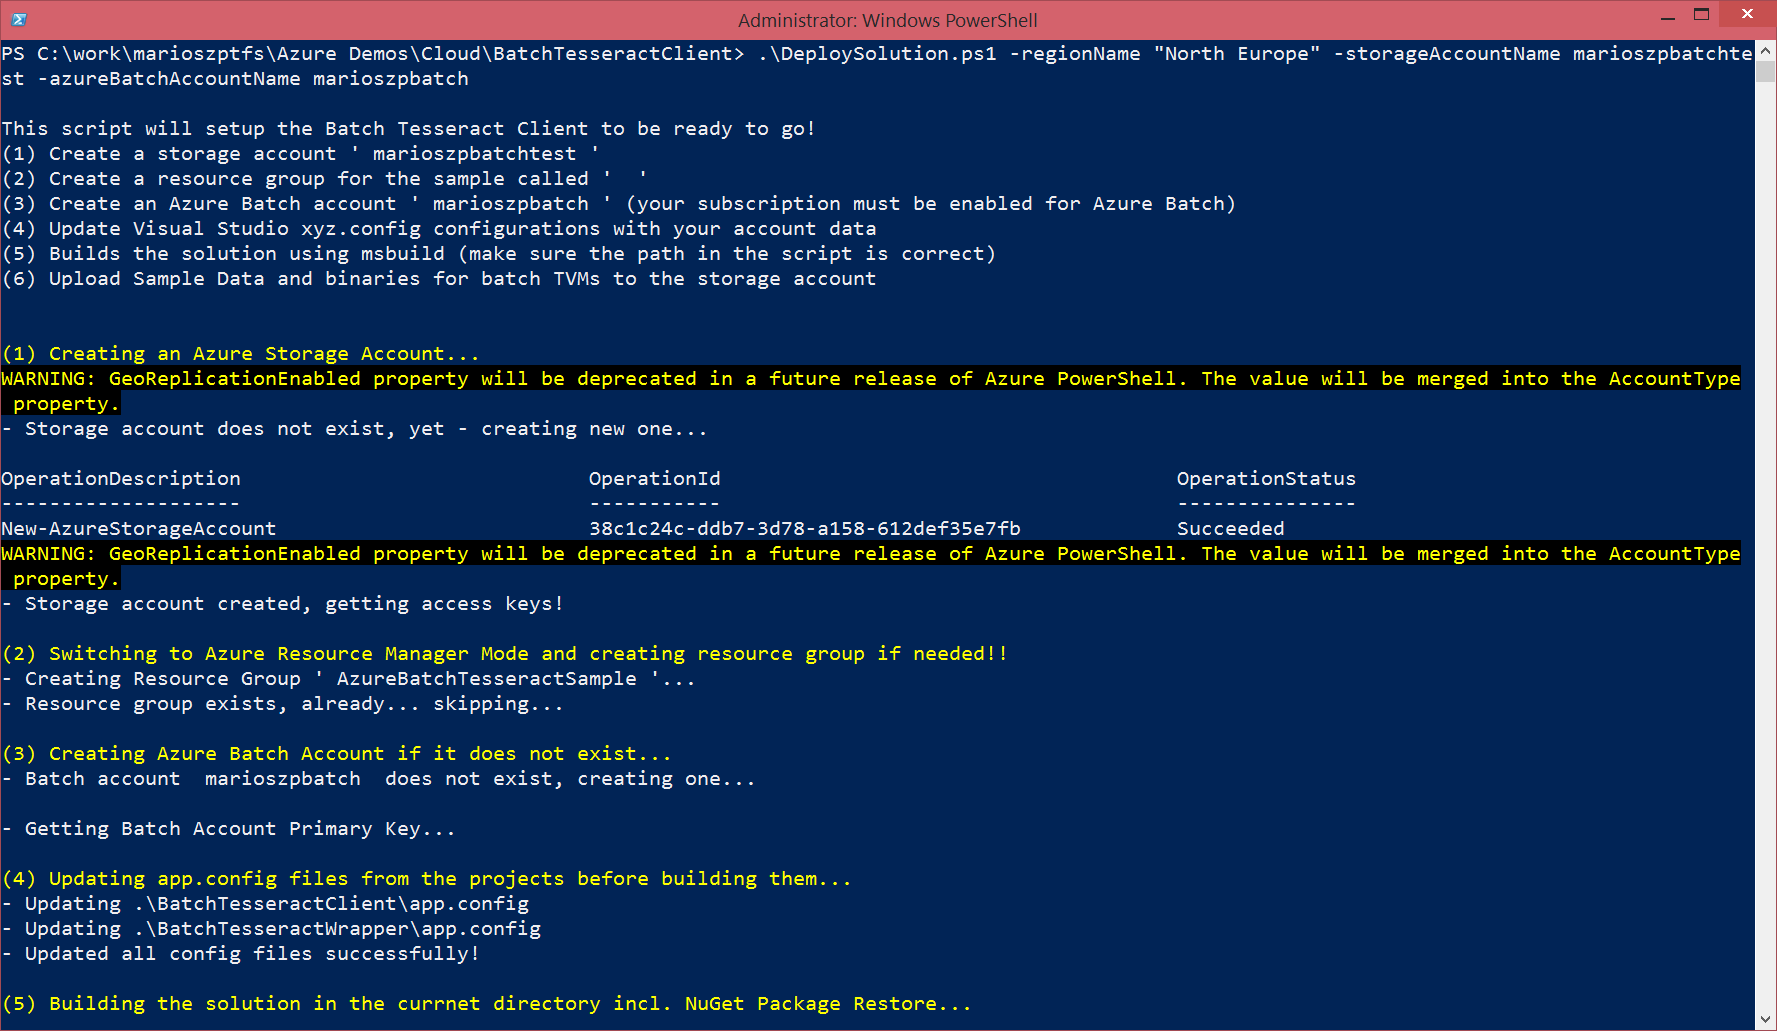
Creating an Azure Batch Account with Azure PowerShell
The first thing you need to do is creating an Azure Batch Account. Note that at the time of writing this article, Batch was still in Preview.
Therefore, make sure you activate it for your subscription, first. The PowerShell script I provide for setting up the sample does that for you. Note that Azure Batch can only be managed as part of the new Azure Resource Manager inside of a Resource Group. Therefore in an Azure PowerShell CmdLet you first need to switch the Azure PowerShell mode to AzureResourceManager:
Switch-AzureMode -Name AzureResourceManager
New-AzureResourceGroup -Name $batchSampleResourceGroupName -Location $regionName
New-AzureBatchAccount -AccountName $azureBatchAccountName `
                       -ResourceGroupName $batchSampleResourceGroupName `
                       -Location $regionName
Below a screen-shot of the script I wrote to setup things in action. That screen shot shows you, how-to call the script to setup the environment required for the demo:
Azure Batch NuGet Package
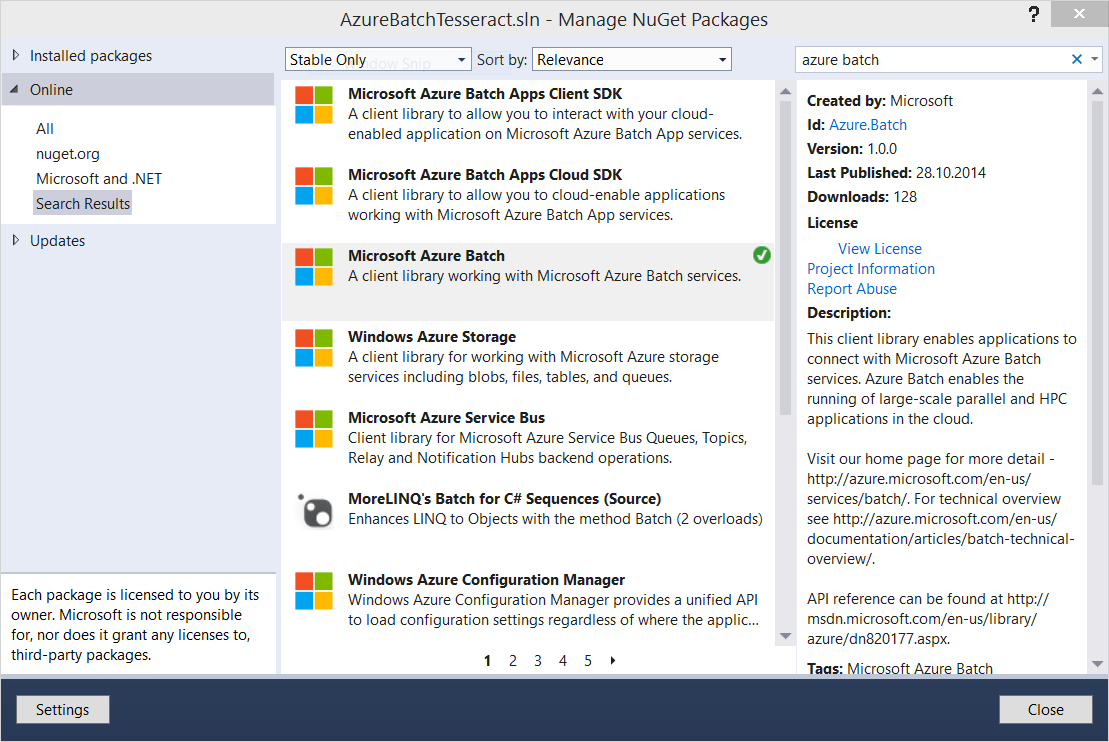
Now that we have an account, you can start developing. In Visual Studio you need to use a NuGet package called Azure Batch. Please make sure to use the core Azure Batch package and not the Batch Apps package in case you want to use the full-blown, low-level Batch APIs.
Creating Compute Pools using the API
The first thing you need to do is creating some compute pools with task virtual machines. The .NET SDK wraps the REST API for such purposes in a very convenient way. After having set-up BatchCredentials and a BatchClient you can open various managers that encapsulate certain management operations, e.g. a Compute Pool Manager as shown below.
using (var pm = batchClient.OpenPoolManager())
{
    var pools = pm.ListPools().ToList();
    var poolExists = (pools.Select(p => p.Name).Contains(PoolName));
    if (!poolExists)
    {
        var newPool = pm.CreatePool
            (PoolName, "3", "small", 5
            );
         newPool.StartTask = new StartTask
         {
             ResourceFiles = binaryResourceFiles,
             CommandLine = "cmd /c CopyFiles.cmd",
             WaitForSuccess = true
         };
         newPool.CommitAsync().Wait();
    }
}
One interesting aspect of the compute pool creation above is the definition of a startup task. This startup task in case of the sample defines a list of files that should be downloaded from Azure BLOB storage to the TVMs as part of the bootstrapping process. That list of files is prepared earlier in the code as shown below:
var binaryResourceFiles = new List<IResourceFile>();
Console.WriteLine("Get list of 'resource files' required for execution from BLOB storage.
foreach (var resFile in blobTesseractContainer.ListBlobs(useFlatBlobListing: true))
{
    var sharedAccessSig = CreateSharedAccessSignature(blobTesseractContainer, resFile);
    var fullUriString = resFile.Uri.ToString();
    var relativeUriString = fullUriString.Replace(blobTesseractContainer.Uri + "/", "");

    Console.WriteLine("- {0} ", relativeUriString);

    binaryResourceFiles.Add(
         new ResourceFile
             (
             fullUriString + sharedAccessSig,
             relativeUriString.Replace("/", @"\")
             )
         );
}
Note that even if the blob container is publicly accessible I had to use shared access signatures to allow Azure Batch downloading those files. These files will be placed in a directory dedicated to the startup task (meaning actual tasks executed later don’t have access to this directory). Therefore one of the files downloaded is a batch-script which is then executed as part of the startup procedure. This batch script copies the file from the startup task working directory to the shared-directory to which all tasks do have access to as shown below:
@echo off
echo "List Files for diagnostics..."
echo %WATASK_TVM_ROOT_DIR%
dir .\ /s
echo.
echo Moving BatchTesseractWrapper files to shared task directory
robocopy /MIR .\ %WATASK_TVM_ROOT_DIR%\shared
if "%errorlevel%" LEQ "4" (
   SET errorlevel=0
 )
One little hint here: Azure Batch considers a task (incl. the startup task) to be successful when it returns an exit code of 0. Since I am using robocopy.exe in my script I need to consider, that robocopy has several non-0 success exit codes. Therefore I map those to the exit code 0.
After my startup task finally completed, I do have all the tesseract-binaries as well as the tesseract wrapper executable I’ve written (which downloads files from BLOB, processes them with tesseract.exe and then uploads the result back to BLOB) in the shared task working directory.
Note that all of these working directories for tasks on TVMs are placed under a sub-directory of the task root directory exposed through the WATASK_TVM_ROOT_DIR environment variable. These directories are:
%WATASK_TVM_ROOT_DIR%\sharedis a shared directory to which all tasks executed on the TVM do have read and execute permissions.%WATASK_TVM_ROOT_DIR%\startupis a directory dedicated to the startup tasks specified as part of the compute pool creation. No other tasks do have any access to this directory%WATASK_TVM_ROOT_DIR%\tasks\<workitemname>\<jobname>\<taskname>is the directory dedicated for task execution whereas every work-item, job and task gets his own directory in this working directory.
A really cool tool for confirming that everything in our startup tasks did work is the Azure Batch explorer. It is also cool for exploring the true, detailed directory structure which I’ve outlined above. I might write about this tool in a subsequent blog post and will continue focusing on the code in this one.
Scheduling Jobs for Execution
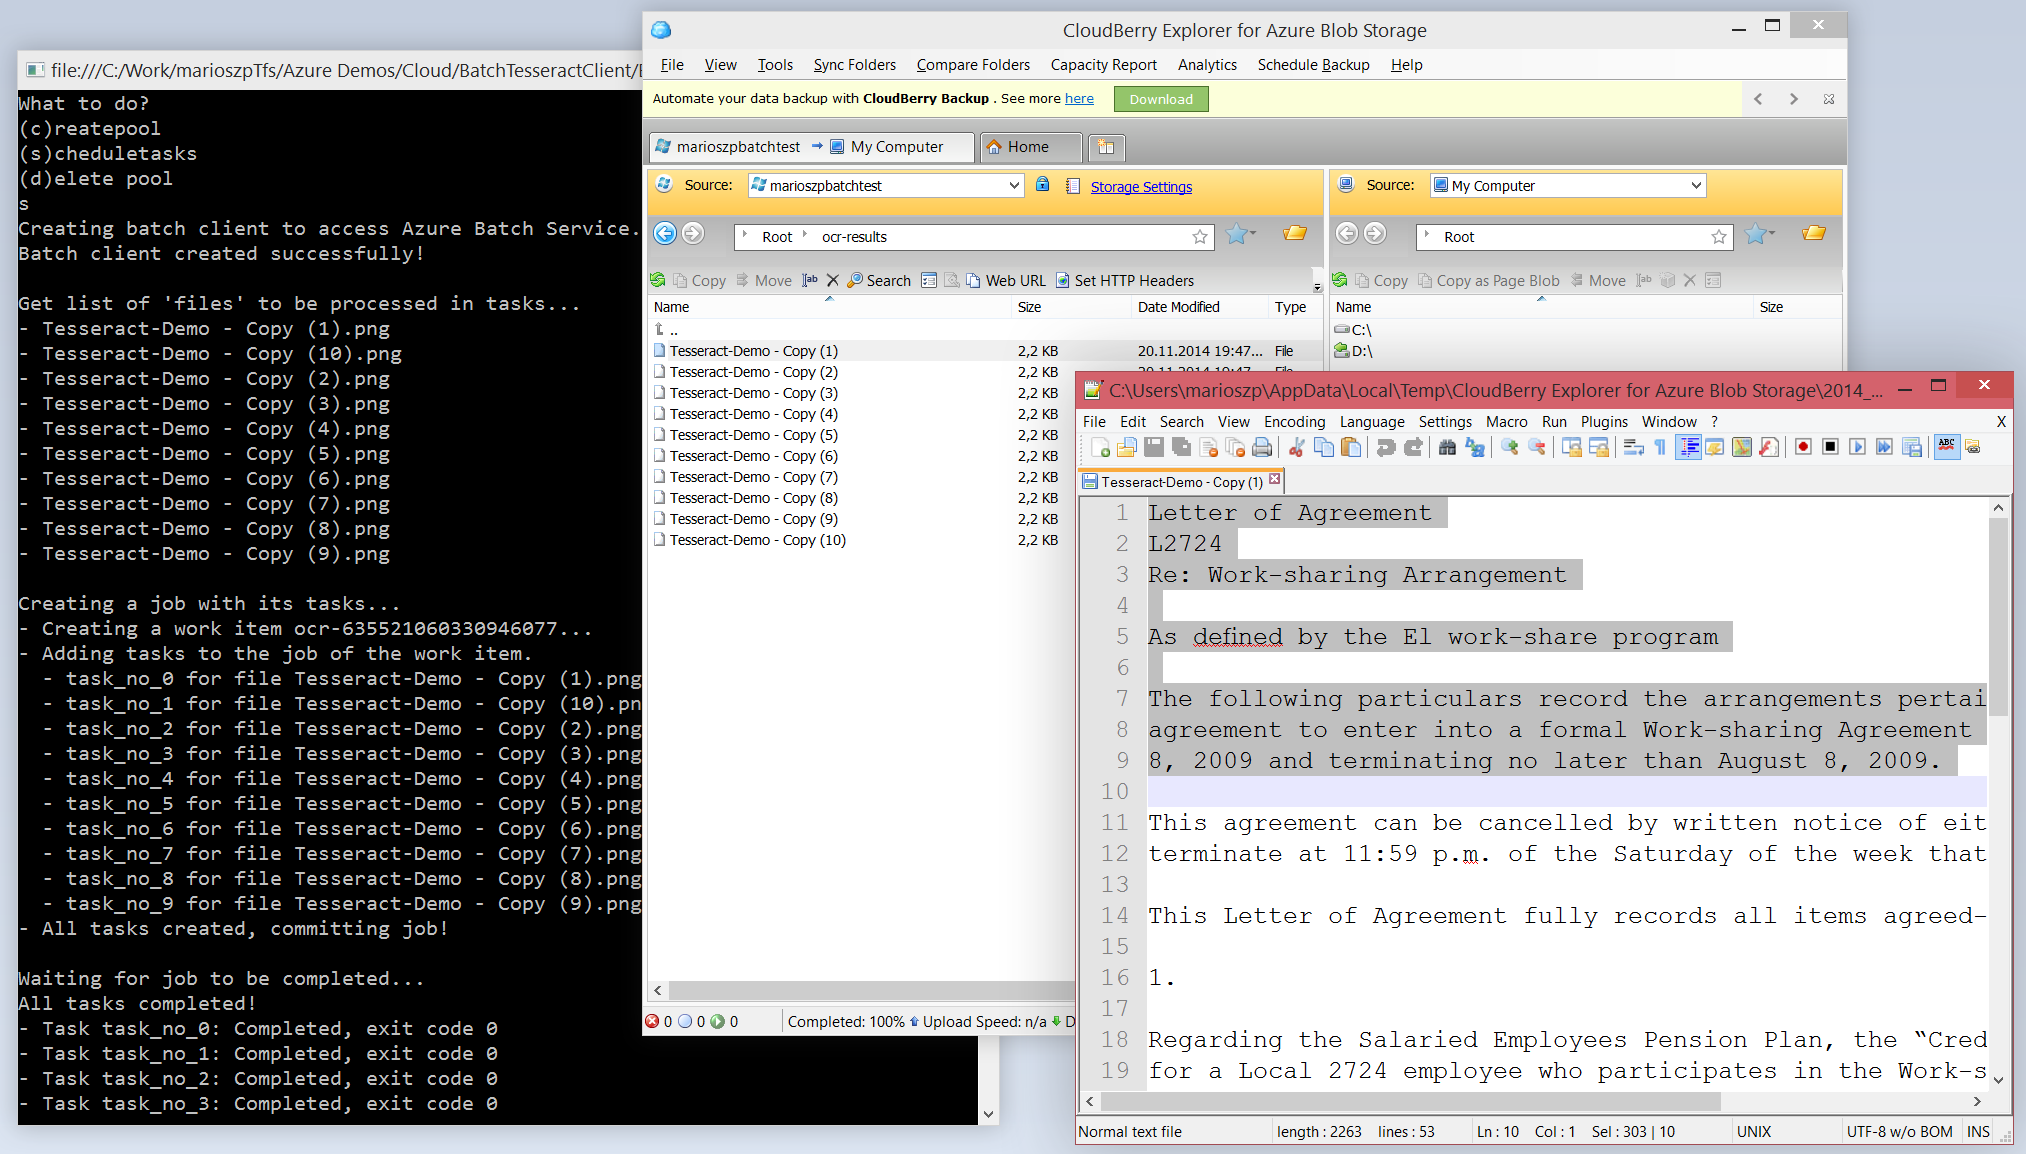
Once the compute pool runs and all the TVMs are prepared with the tesseract binaries through the startup task, we can start scheduling jobs. This happens with the WorkItem manager and by creating a WorkItem with a Job and adding tasks to that job. In my sample I create one task for each file I want to OCR-recognize which I’ve previously uploaded to BLOB storage.
Note: the PowerShell setup script I do provide uploads some sample data I’ve included in the git-repository so that you can get started right away.
 using (var wiMgr = batchClient.OpenWorkItemManager())
 {
     var workItemName = string.Format("ocr-{0}", DateTime.UtcNow.Ticks);
     var ocrWorkItem = wiMgr.CreateWorkItem(workItemName);
     ocrWorkItem.JobExecutionEnvironment =
         new JobExecutionEnvironment
         {
             PoolName = PoolName
         };
     ocrWorkItem.CommitAsync().Wait();

     var taskNr = 0;
     const string defaultJobName = "job-0000000001";
     var job = wiMgr.GetJob(workItemName, defaultJobName);

     foreach (var ocrFile in filesToProcess)
     {
         var taskName = string.Format("task_no_{0}", taskNr++);
         var taskCmd =
             string.Format(
                 "cmd /c %WATASK_TVM_ROOT_DIR%\\shared\\BatchTesseractWrapper.exe \"{0}\" \"{1}\"",
                 ocrFile.BlobSource,
                 Path.GetFileNameWithoutExtension(ocrFile.FilePath));

         ICloudTask cloudTask = new CloudTask(taskName, taskCmd);

         job.AddTask(cloudTask);
     }
     job.Commit();
 }
The submission here happens with the WorkItemManager. Every WorkItem gets a default job (job-0000000001) which can be used immediately for adding tasks to be executed. This is exactly what is done in the code snippet above.
Note: since the job-creation might not be completed, yet, the call to wiMgr.GetJob() should be wrapped with some retry-logic.
For each file I’ve stored in BLOB storage I do create a task. That task ultimately just executes a command shell with the executable that downloads the source image to the TVM, calls tesseract.exe to OCR recognize the image and uploads the resulting text-file back to Azure Blob storage. Since this should be straight-forward for Azure-experienced developers, I leave it to you to look at the code on my github-repository.
Waiting for the tasks to complete and get results
This final step is optional, but in case your program needs to wait for the tasks to complete before doing something else, the code below is helpful.
var toolBox = batchClient.OpenToolbox();
var stateMonitor = toolBox.CreateTaskStateMonitor();
var runningTasks = wiMgr.ListTasks(workItemName, defaultJobName);
stateMonitor.WaitAll(runningTasks, TaskState.Completed, TimeSpan.FromMinutes(10));

var tasksFinalResult = wiMgr.ListTasks(workItemName, defaultJobName);
foreach (var t in tasksFinalResult)
{
    Console.WriteLine("- Task {0}: {1}, exit code {2}", t.Name, t.State,
         t.ExecutionInformation.ExitCode);
}
The Azure Batch SDK for .NET comes with a set of handy utility classes to allow you doing exactly that. Through the TaskStateMonitor utility class the code above waits till all tasks have completed their work, loads the most recent data from the Azure Batch REST API and displays the results.
Important here is that every task, whether succeeded or failed, will be in the completed-state except you terminated it before it completed through the REST API. It’s up to you to check if the task was successful by looking at the exit code of the executable for your task.
The actual results of the tasks should be visible now in your Azure BLOB storage account in a container called ocr-results as shown below.
Final Words
This article and the sample I published on GitHub should help you to understand the basic principles and how-to get started with Azure Batch. As one of the creators of GeRes2, which is also doing scalable execution of jobs on Worker Roles, I really experienced how much effort it is to build something like this on your own.
As a managed service, Azure Batch really does everything for you. You can focus on creating your tasks as well as scheduling your jobs/tasks instead of dealing with all the plumbing infrastructure (e.g. distributing work across compute nodes, compute node management, logging, auto scaling, task binary deployments etc.).
The only thing that you might miss as compared to GeRes2 is notifications via Service Bus and SignalR. But to be honest, when using GeRes2, those notifications did only work up to a maximum of 100 compute nodes since we did not scale out the message queues on Service Bus which we used for the notifications. Of course we could have done that, but based on the needs of those partners who used notifications with GeRes2 it was just not necessary to support > 100 instances while those which used GeRes2 with more than 100 instances did really not use notifications. And there’s still the option of polling the tasks’ status through the APIs made available by Azure Batch. But eventually we’ll work on something to show you, how-to get this remaining piece to Azure Batch, as well.
Azure Batch is really the premium service when it comes to highly scalable batch processing on Azure. It is easy to use and it saves you from a whole lot of plumbing work that needs to be done if you do batch processing manually. In a future blog-post I plan to write about my personal opinion and view on comparing Azure Batch to other batch processing options available on Azure such as WebJobs SDK or running HPC Pack in Windows Server VMs in Azure.
In the meantime, feel free to share some feedback or ask questions via Twitter (http://twitter.com/mszcool).