The main project that kept me busy for the past 7 months was the work with SAP Labs Israel to get a beta version of SAP Cloud Platform running on Azure. During SAP Sapphire, SCP on Azure got now announced together with other public cloud vendors as part of SAP’s multi-cloud strategy (see here and here. It is currently available as public beta for anyone to try on Azure. Here I dig into some first basics…
Note: as outlined in my previous blog post about HANA Express, please note that this is my personal blog which reflects my personal thoughts instead of Microsoft’s official opinion. For offical announcements and statements, please refer to the Microsoft Azure Blog.
Cloud Foundry on Azure and SCP on Azure
Before digging into the details of SAP Cloud Platform (short: SCP), just a quick reminder about how we support Cloud Foundry as a platform on Azure in general.
- First, so far we did support Open Source Cloud Foundry and Pivotal Cloud Foundry on Azure.
- For these efforts, we’ve developed a Bosh CPI for Azure - all full open source.
- In addition we have quick start templates for getting OSS Cloud Foundry set-up on Azure.
With SCP, we now support the 2nd commercially available Cloud Foundry flavor on Azure next next to Pivotal Cloud Foundry. But, what makes SCP on Azure really different to the offers we had so far is, that it is a fully managed PaaS… managed by SAP. So using SCP on Azure is exactly the same as on any other public cloud platform which gives you full portability in a multi-cloud world. We do have a few differentiators in my opinion, though:
- Full Azure Active Directory integration for Single-Sign-On for SAP Cloud Platform which enables you to have SSO across SAP, Azure and Office 365 assets.
- The Azure Meta Service Broker which allows you to integrate Azure-native Services into applications you run in SCP if you want to.
- Microsoft’s broad HANA offerings reaching from bare-metal certified machines with SAP Large Instances to VM-based certifications.
Finally, I strongly believe that from the work we’ve done with SAP, Cloud Foundry on Azure benefits across the board, in general. We’ve made numerous improvements to the Bosh CPI implementation for Azure as part of the efforts and we fixed several bugs. Examples of that are e.g. the Keep-Alive of unhealthy virtual machines for debugging purposes or support for managed disks (which was on the plans, already, but we needed it earlier:)).
Until General Availabiltiy of SAP Cloud Platform on Azure, you’ll see many more improvements in our CPI which I cannot elaborate in detail at the moment.
SAP Cloud Platform on Azure - Getting Started
To get SCP on Azure, you work through the regular SCP administation cockpit. So your starting point is the same as for any other work you do with SCP. You register or log-in as usual, nothing Azure specific with that. For activating Azure, which is at the time of writing this post available as Beta+Trial, you click on the “Start Cloud Foundry Trial”-button within the cockpit!
https://account.hanatrial.ondemand.com
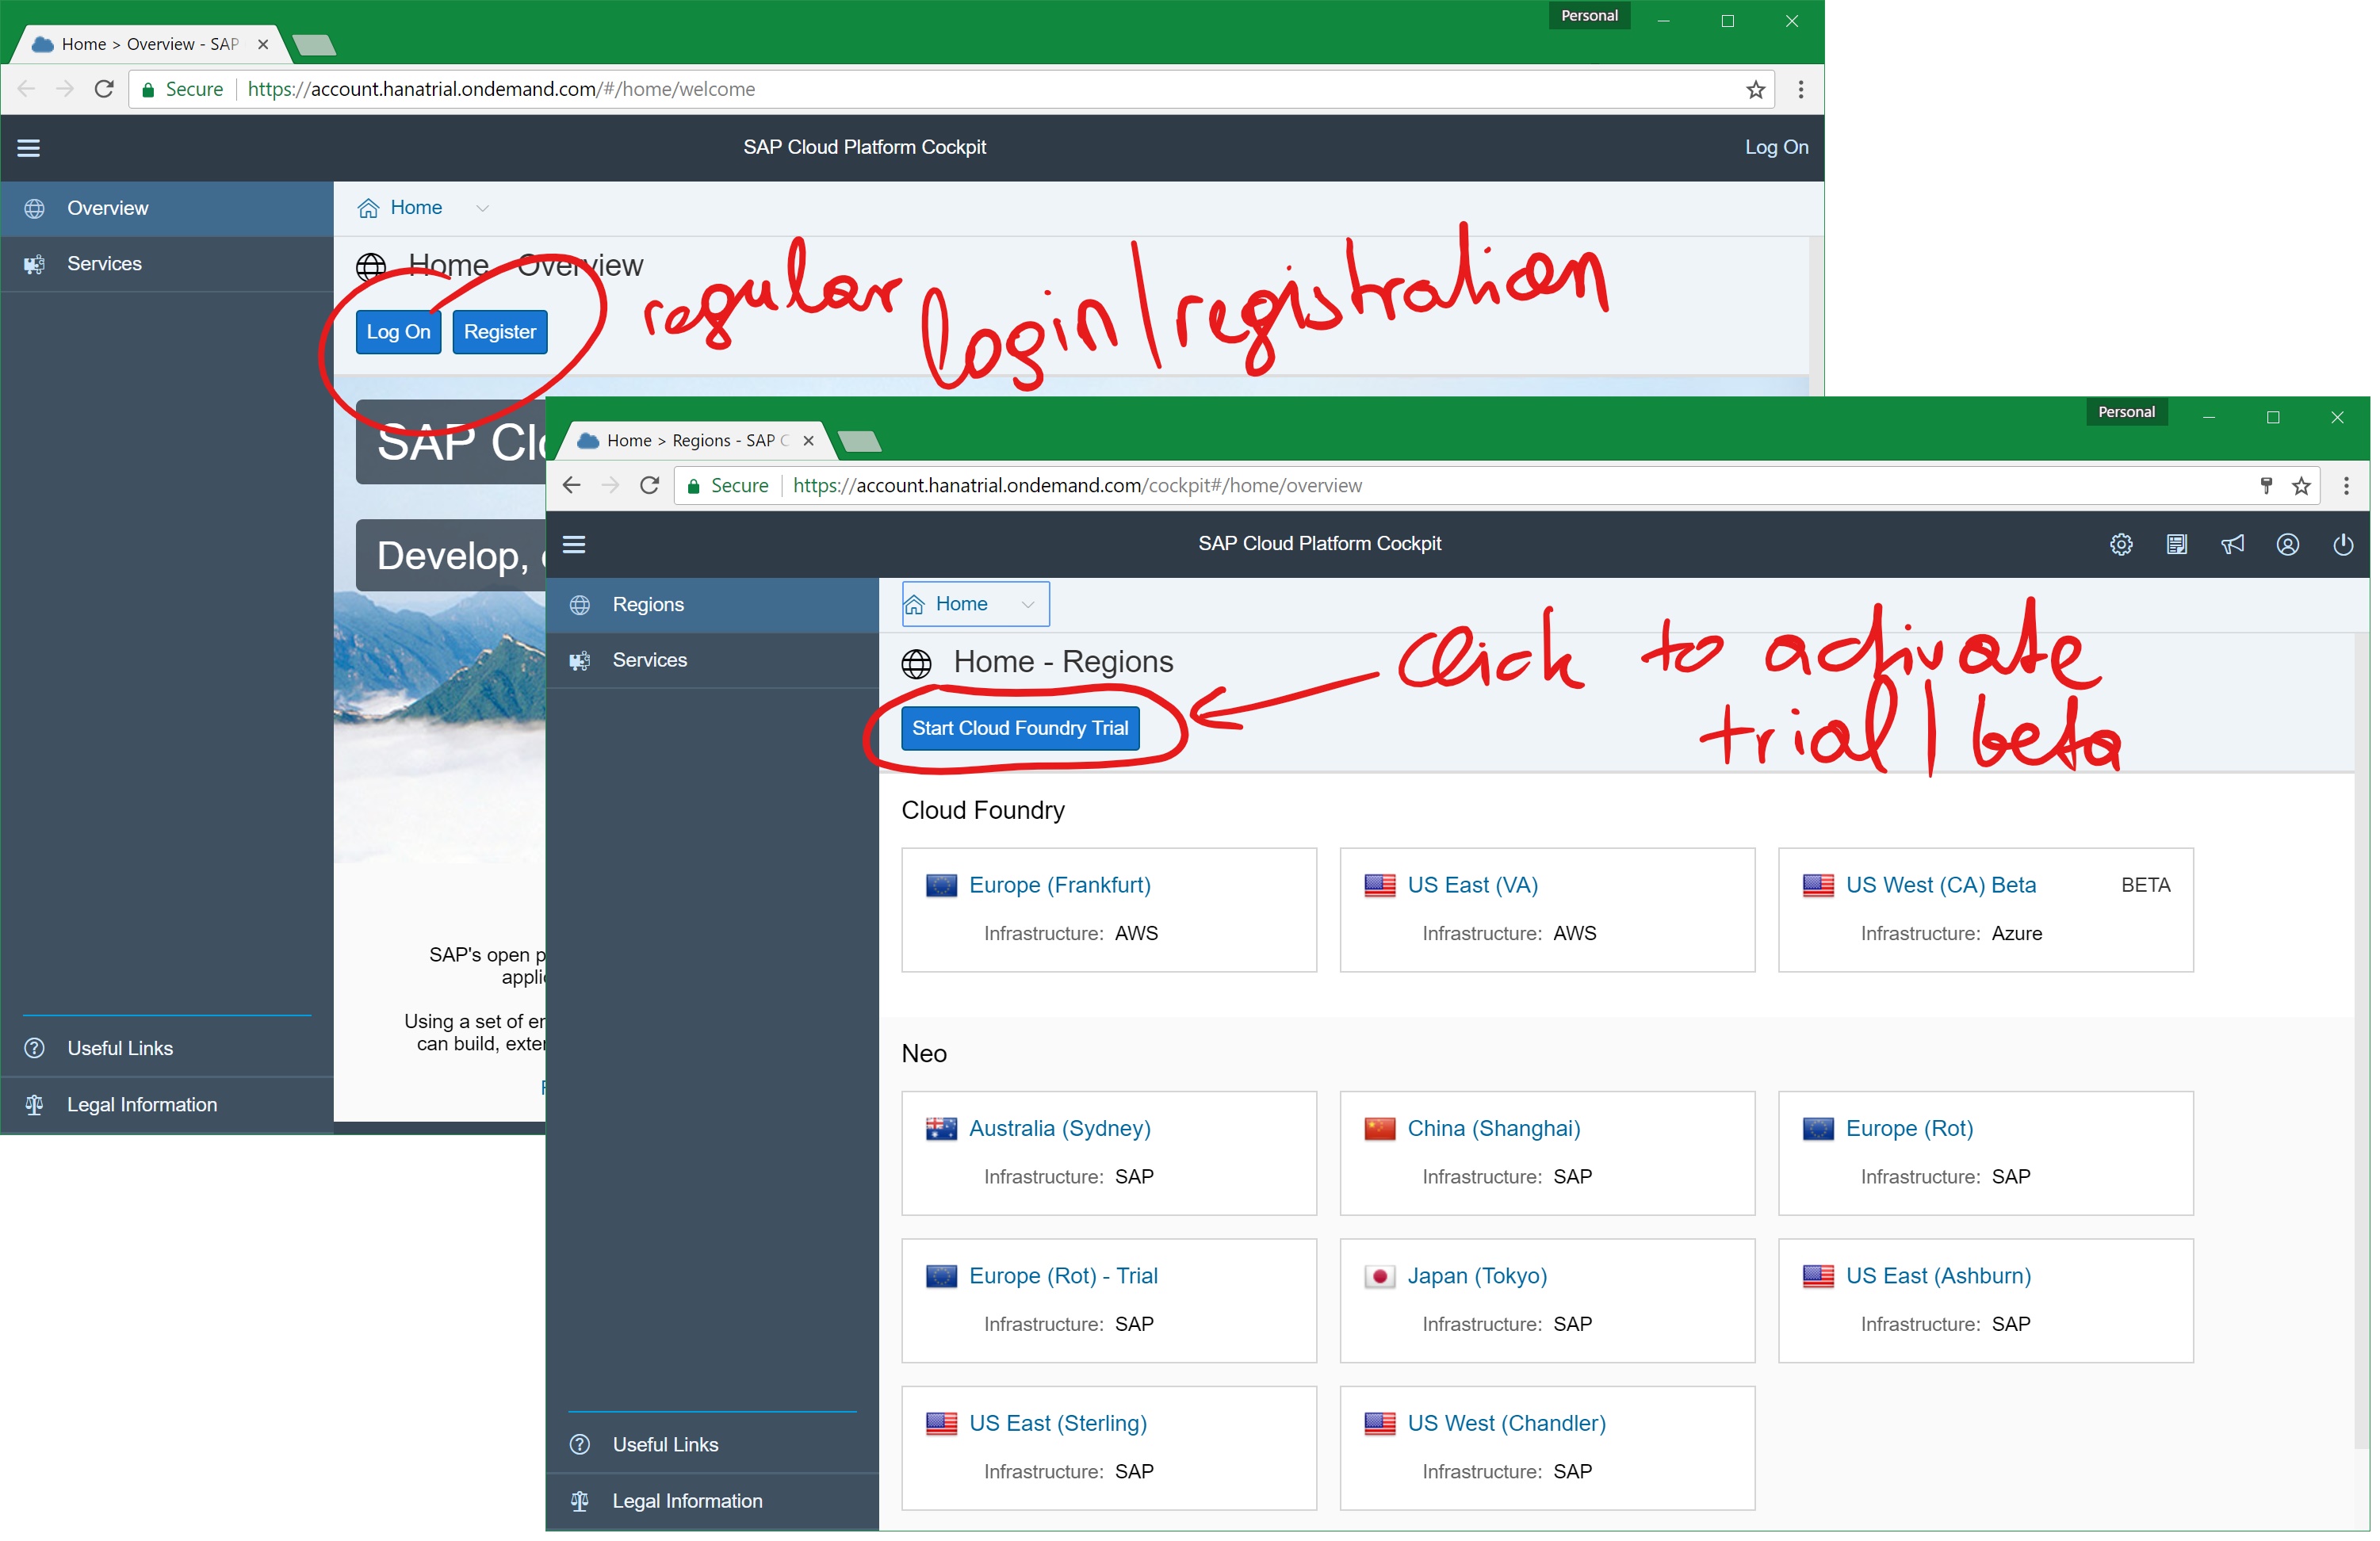
When clicking the button, the SCP cockpit will ask you for selecting a region in which you want to activate the trail. Now, within SCP, activated Azure regions do just appear as an SCP-region within the cockpit. That means, you would pick an SCP-region for the activation that runs on-top of Azure as shown below:
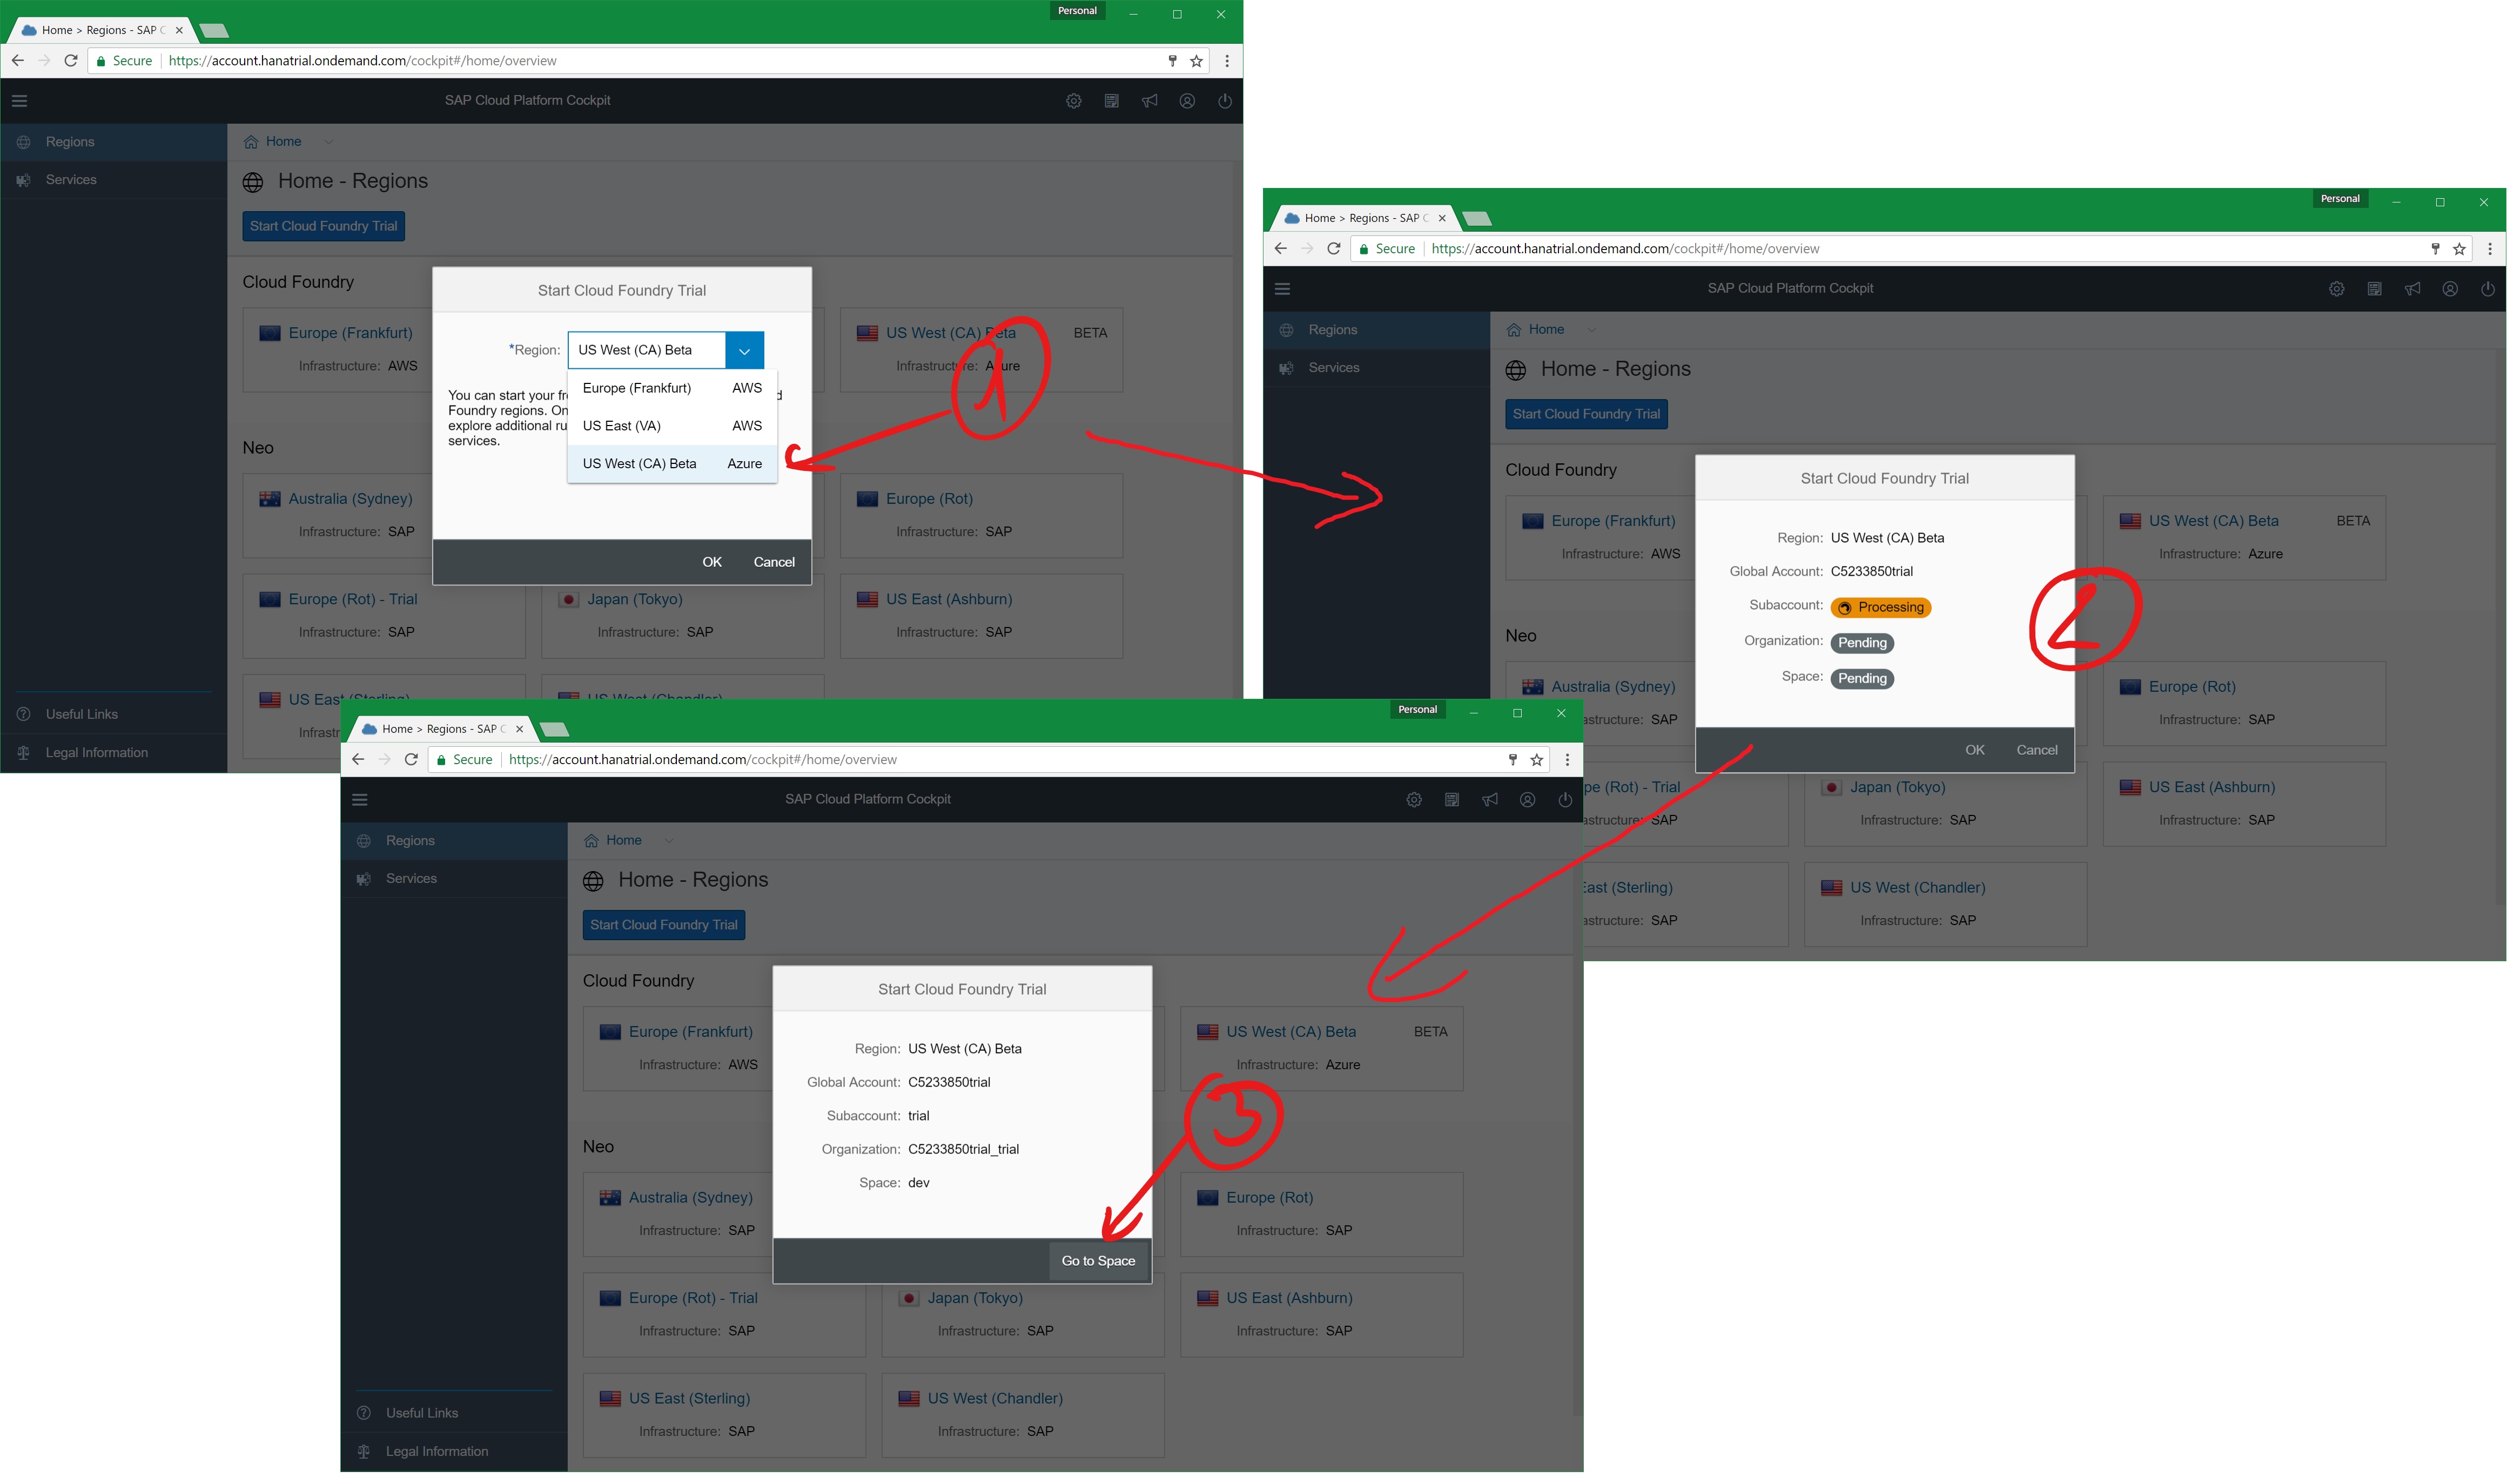
Until now, I’ve done several trial activations. It usually takes a minute till the tenant is activated and available for you. For Cloud Foundry knowledable folks, what happens is the creation of an organization and a space for you within the SCP Cloud Foundry environment.
Exploring what’s available
After that process is completed, you can navigate to your organization and space within the SCP cockpit. Through the cockpit, you have convenient ways to browse and montior deployed applications or also browse the marketplace to review, which backing services SAP has enabled for the Beta+Trial which we’ve enabled on Azure. Cloud Foundry veterans will find it quite easy to navigate through the portal.
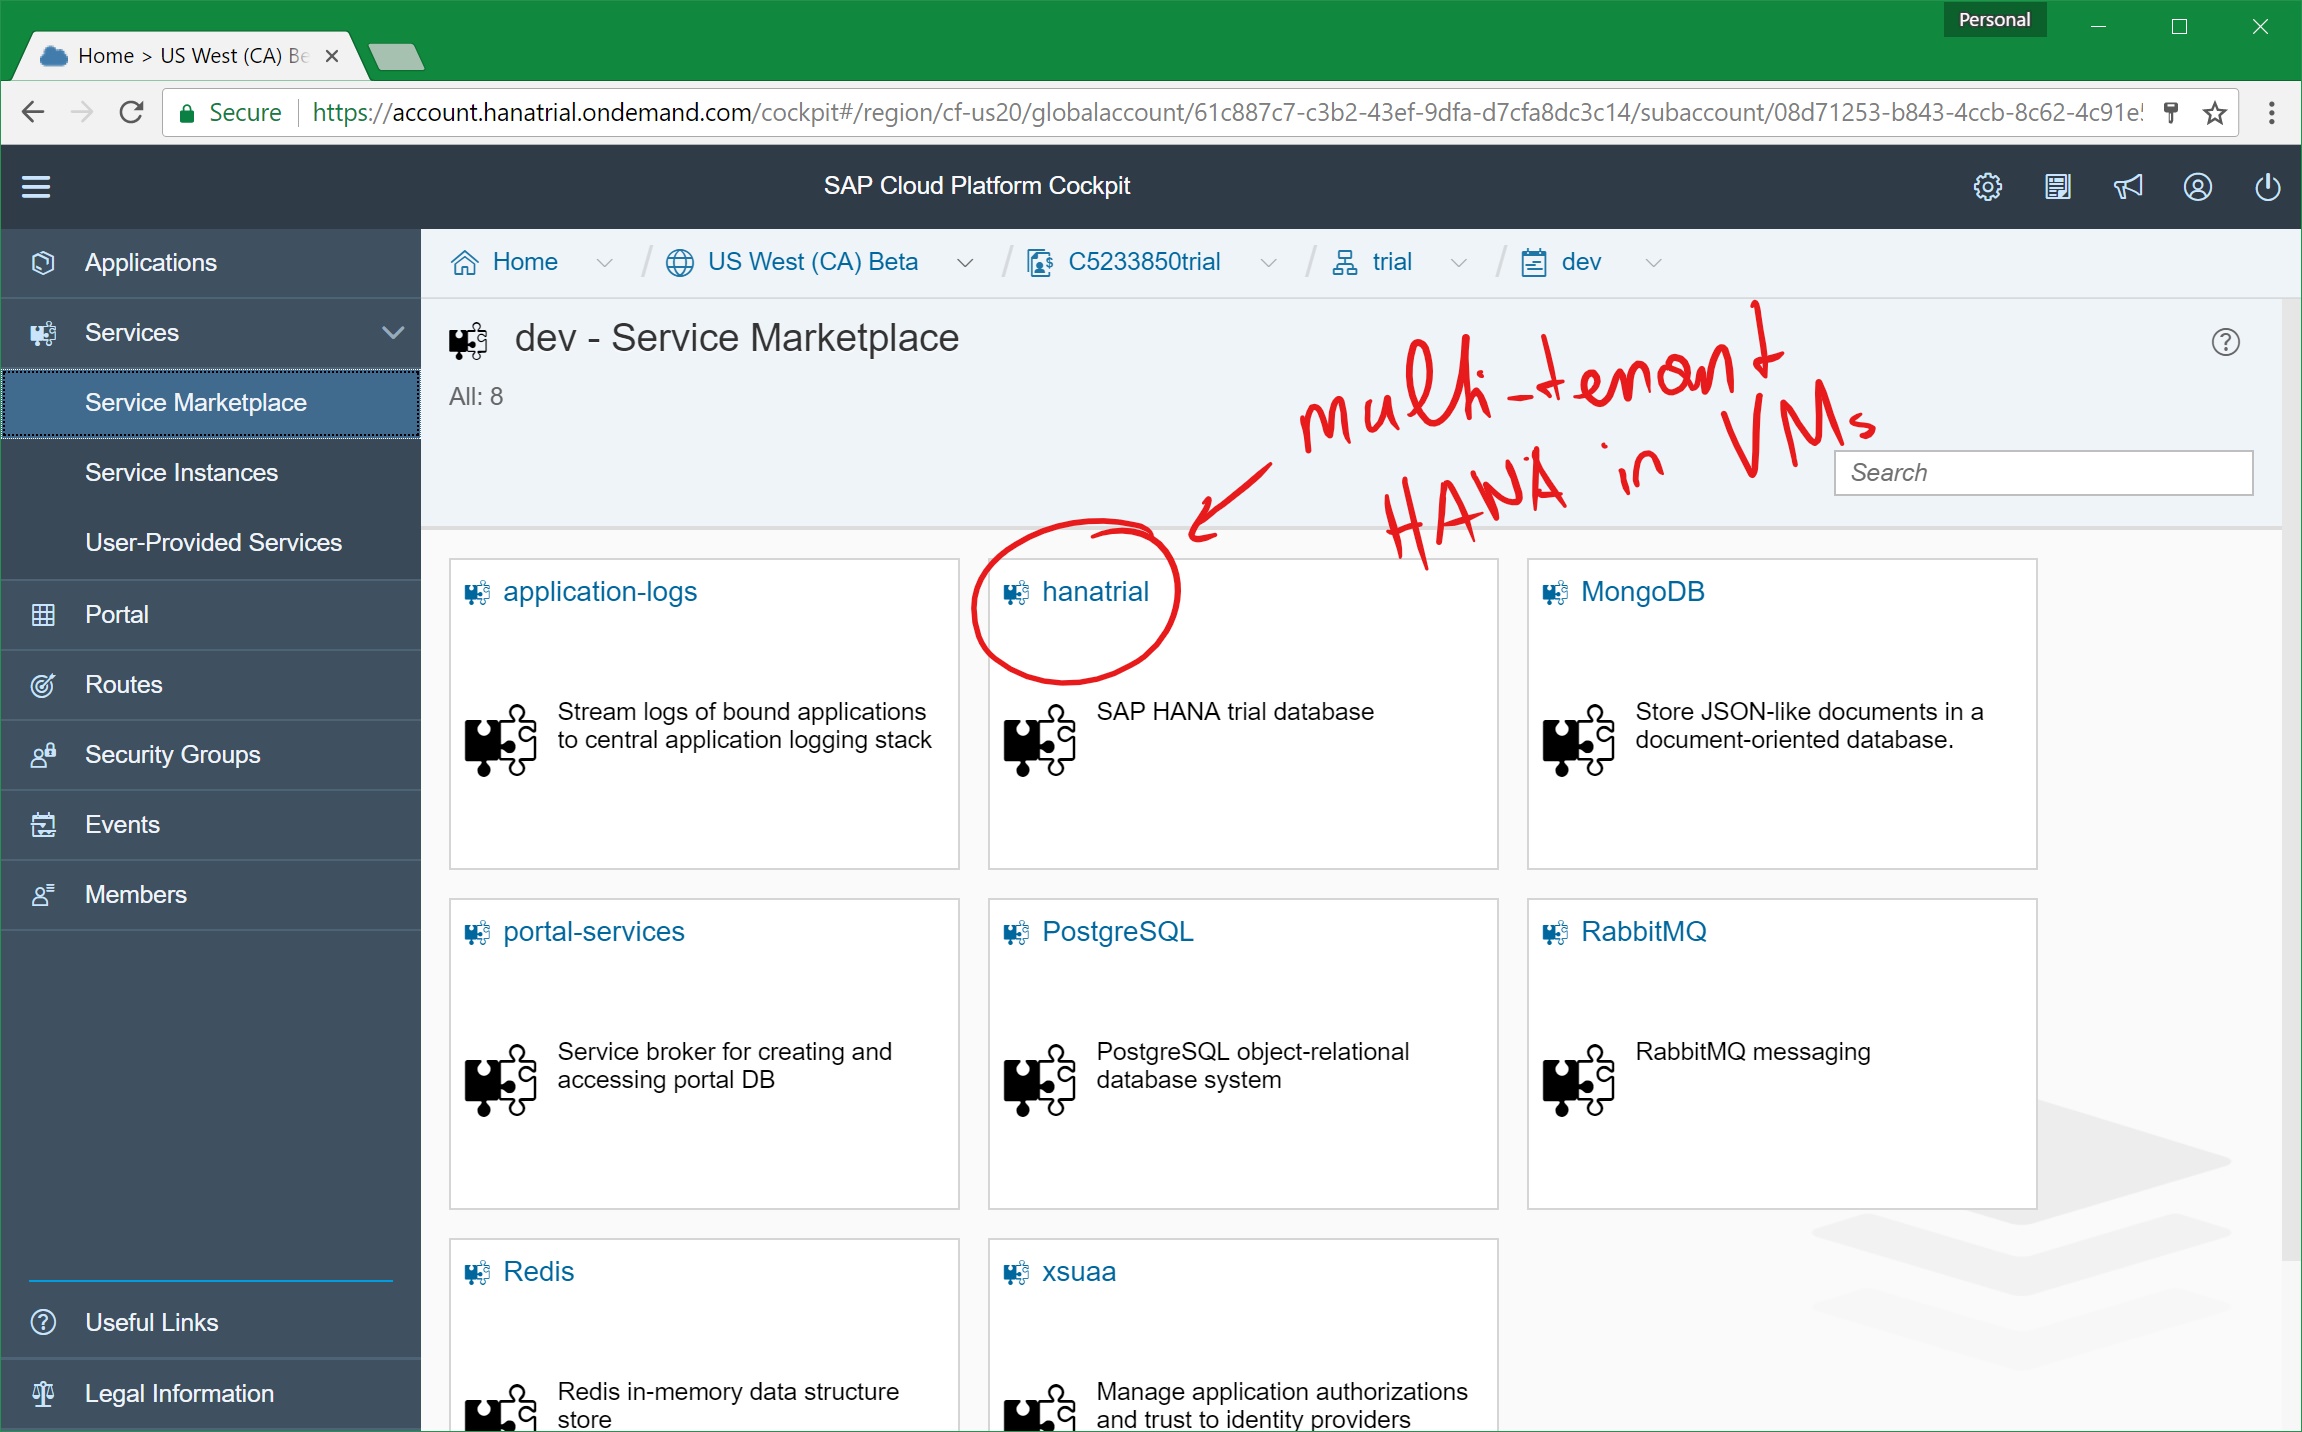
Now, since this is a beta as well as a trial, the backing services are all running as single instances in containers behind the scenes. I think that’s more than fair because you’re not paying for the service as long as it is in beta. And… this is also the general approach followed by SAP for using trial accounts on generally available regions, as well. For GA and production (non-trial) environments, these backing services will run in Virtual Machine clusters, of course.
The exception even for today in that list is… guess what… SAP HANA of course. The HANA backing service offered as part of the Azure SCP beta is a multi-tenant, shared HANA environment that runs in Virtual Machines behind the scenes.
Note: When using any of the backing services from the SCP market place, you indeed use SAP-deployed backing services. That gives you a higher level of portability since SAP and not Azure controls the versions and configurations used for the technologies that are the foundation for those backing services. Now, if you still would prefer to use native Azure services, you can use the Azure Meta Service Broker to hook them up with applications you run in SCP the Cloud Foundry way (you can use them, directly, as well, of course). But in that case, you need to be aware that this has impact on how portable your applications are across multiple cloud vendors if that’s relevant for you.
Using the Cloud Foundry CLI
Now, the cool thing about SCP is, that it is Cloud Foundry. It’s a Cloud Foundry PaaS enriched by many SAP services (ok, it will take a while till we have them all active on Azure as that requires further engineering work). It ultimately means, you manage and work with it as with other Cloud Foundry environments including the CLI and the APIs. For SAP-specific services such as HANA, SAP provides plug-ins for the CLI to make it easier to work with those services such as the HANA MTA plug-in which I think SAP announced during this year’s Sapphire, as well.
For CLI/API interaction purposes, SCP uses different API endpoints for each region. When using the Azure Beta region which we’ve deployed right now, you’d use the following API endpoint:
cf api api.cf.us20.hana.ondemand.com
cf login
From that moment forward, everything looks and feels like Cloud Foundry. You can push apps, you can explore your marketplace etc. The learning curve is quite easy for Cloud Foundry experienced developers, I’d say:
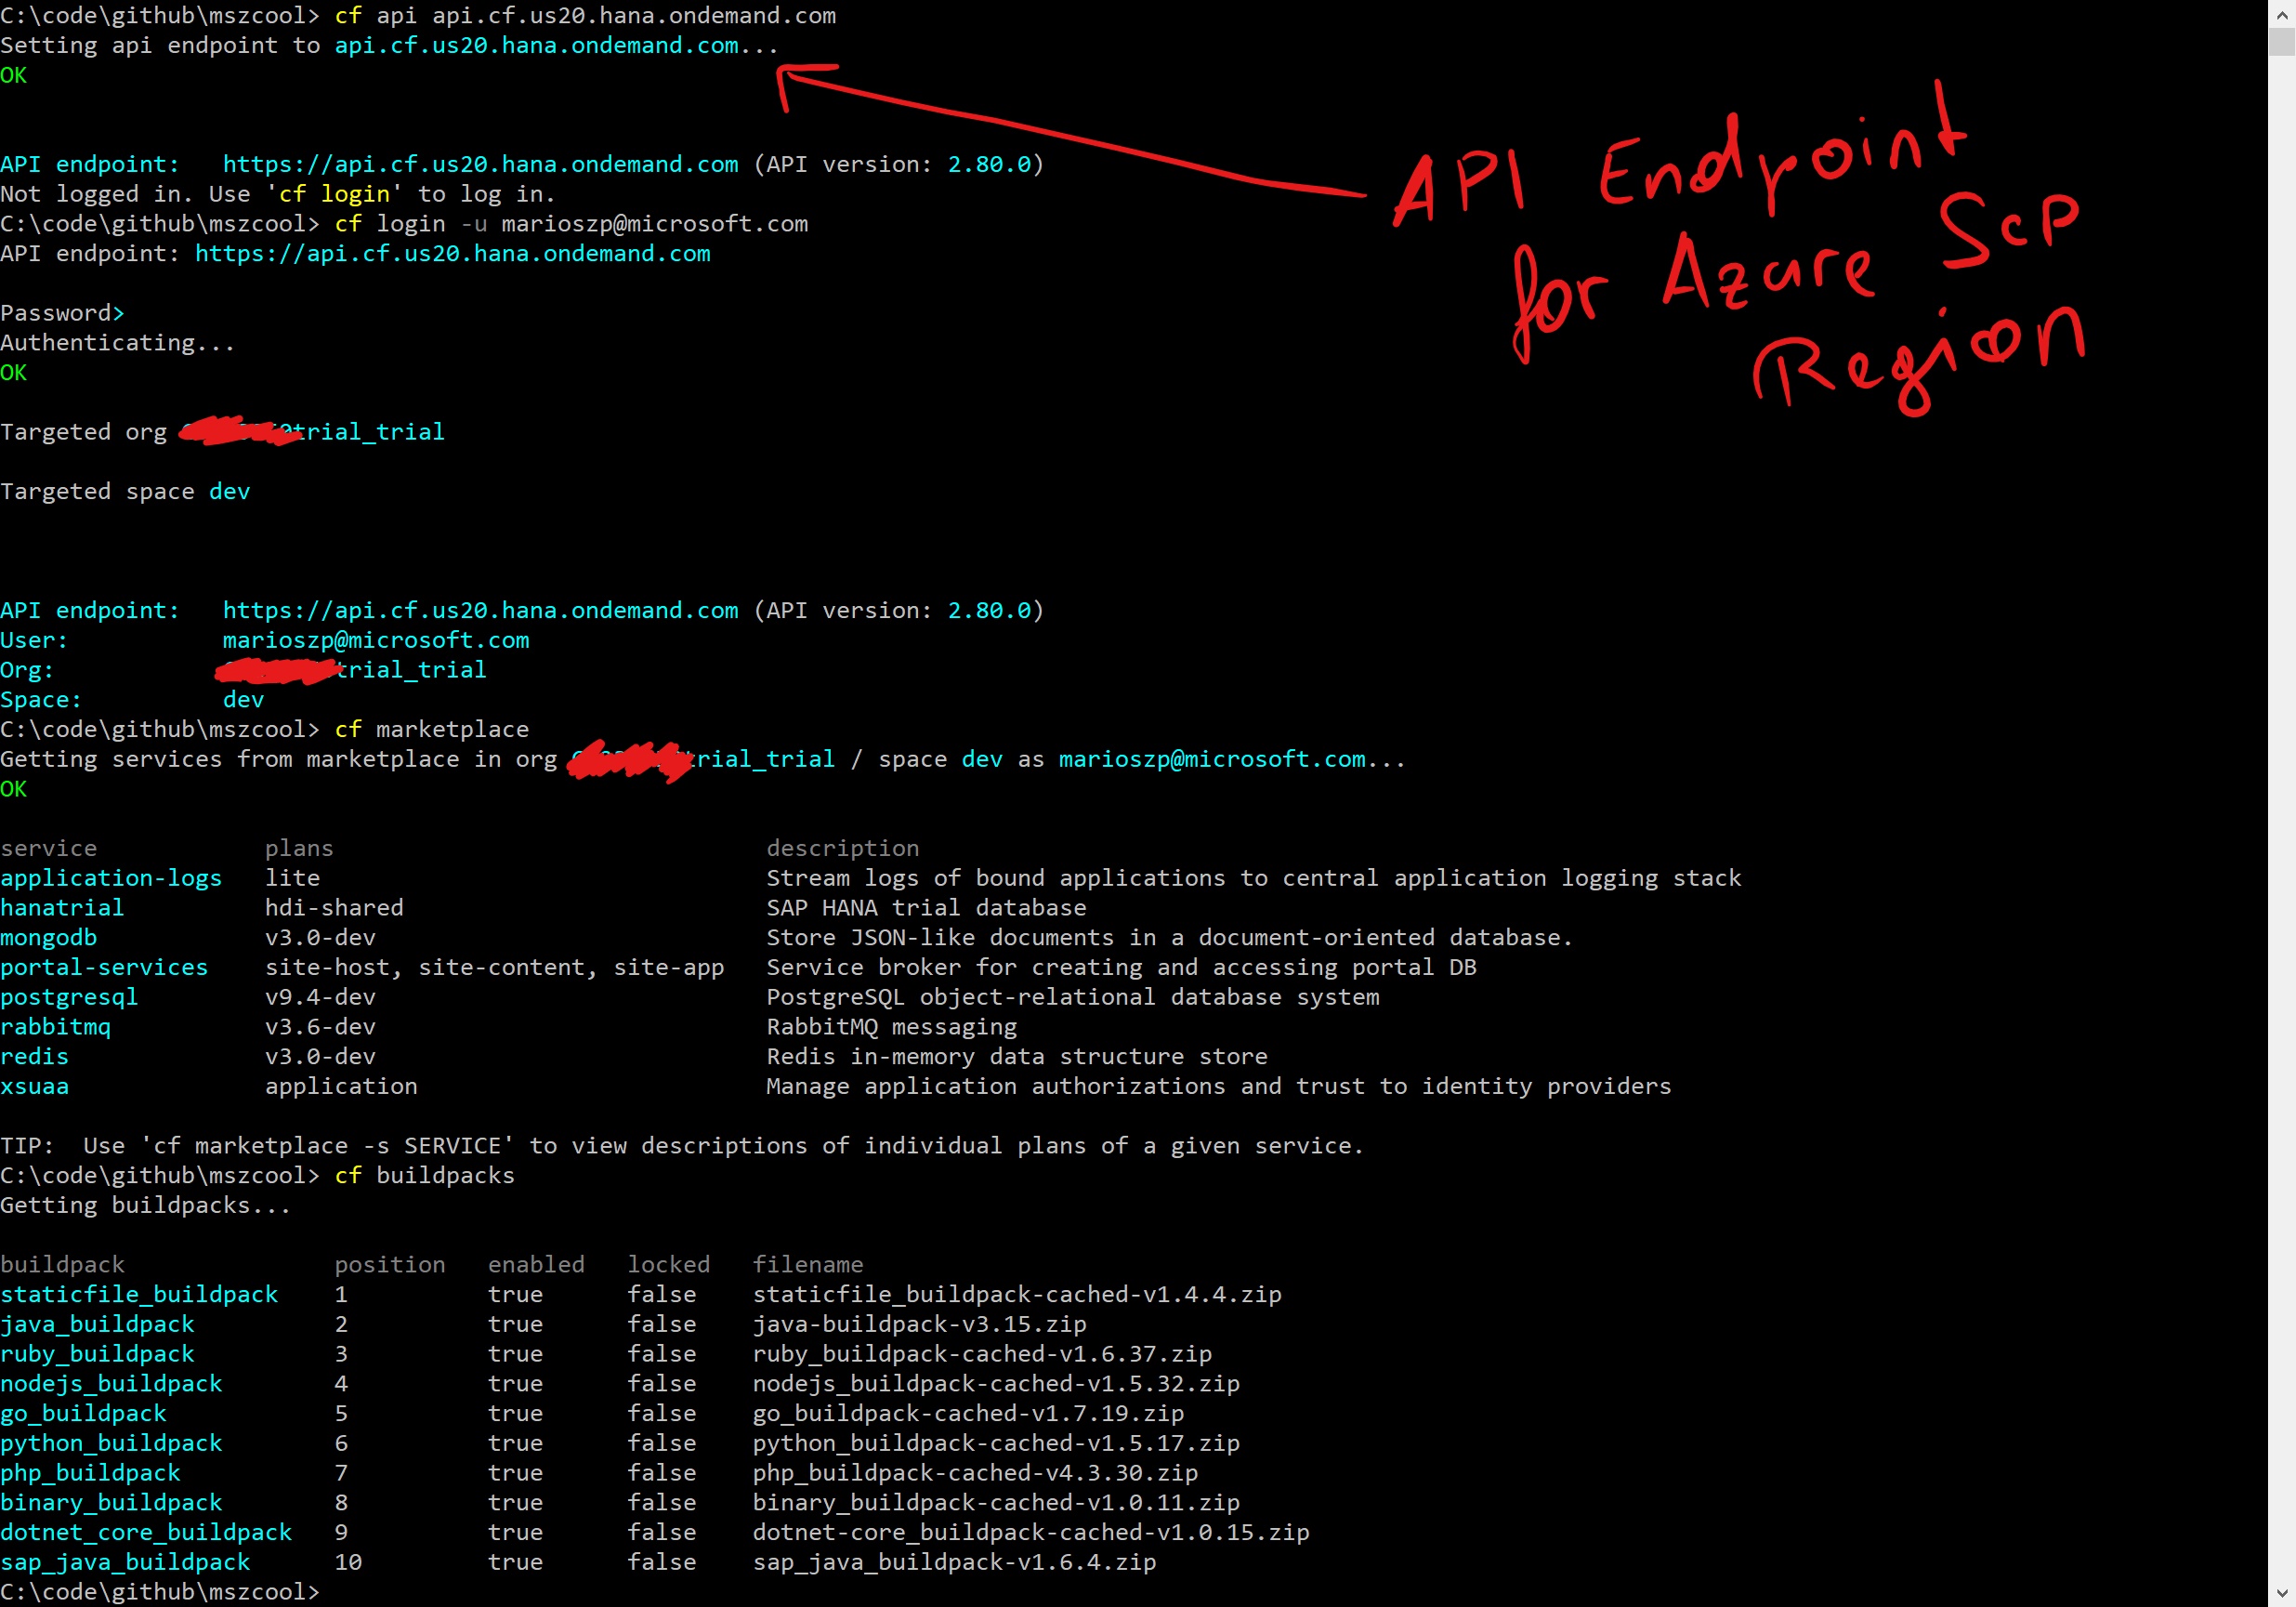
Of course, I was curious what development runtimes SAP has enabled and as a .NET developer I wanted to know about .NET. Looking at the screen shot above, I found it great that .NET Core was enabled. But be aware: SAP typically offers some sort of enterprise support for languages and runtimes in their environment, but from the build packs listed, only a few enjoy that status. .NET Core does not. So, check back with SAP on that… .NET Core only gets community-level support through the Cloud Foundry Foundation.
Using the Azure Meta Service Broker with SAP Cloud Platform
When you’re running on Azure, it makes sense to use Azure-native services if you want to. At the end of the day, that’s when you can unleash the full power of running on a specific cloud platform, right:)? And… you still could implement your “portability” thorugh IoC/DI at the application level to have a more effective/efficient integration into native cloud services but still stay portable to a certain extent.
Fortunately, SAP allows you to enable the Azure Meta Service Broker at the space-level when using SCP. I thought I wanna try that out again now this is in beta (we prototyped that in early phases). Essentially, you really only need to follow the standard-procedure to enable the Azure Meta Service Broker as documented here.
The first step, though, is to create an Azure SQL Database instance and a Service Principal in your Azure Active Directory, as shown below. The Service Principal is needed because the service broker dynamically creates/deletes resources as they are requested through the Cloud Foundry API (or the CLI).
$ az ad app create --display-name=yourazureadappdisplayname --homepage=http://yourhomepage.com --identifier-uris="https://yourazureadserviceprincipalname" --key-type=Password --reply-urls="https://notreallyimportantwhatyouputhere"
AppId                                 DisplayName                  Homepage                 ObjectId                              ObjectType
------------------------------------  ---------------------------  -----------------------  ------------------------------------  ------------
yourazureadserviceprincipalappid      yourazureadappdisplayname    http:/yourhomepage.com   thecreatedappobjectid                 Application
$
$ az ad sp create --id https://yourazureadserviceprincipalname
AppId                                 DisplayName                  ObjectId                              ObjectType
------------------------------------  ---------------------------  ------------------------------------  ----------------
yourazureadappdisplayname             yourazureadappdisplayname    thecreatedappobjectid                 ServicePrincipal
$
$ az ad app update --id=yourazureadserviceprincipalappid --password="yourazureadserviceprincipalpassword"
$
Don’t forget to give the created service principal contributor-rights to the resource group you want to use for the resources of the Meta Service Broker.
After you’ve done the basic creation of the assets mentioned above, the next step is to clone the Azure Meta Service Broker repositiory and adjust the Cloud Foundry Application Manifest for it. The Meta Service Broker essentially is a CF-application that represents the Service Broker for several Azure Services as documented. You can run it wherever you want, but it’s built for being pushed as an application into CF with configuration data about your Azure Subscription to use for the resources created by the Meta Service Broker. Here’s a sample configuration, so that’s how a filled manifest.yml for the Azure Meta Service Broker looks like.
Note that the parameters for SUBSCRIPTION_ID, TENANT_ID, CLIENT_ID and CLIENT_SECRET need to match those you’ve used or retrieved through the Azure CLI commands above as they represent your subscription as well as the servvice principal you’ve created above! Ok, the commands above don’t give you the subscription ID. You can retrieve that by issuing az account list --output=json or by looking it up in the Azure Portal.
---
applications:
- name: meta-azure-service-broker
  buildpack: https://github.com/cloudfoundry/nodejs-buildpack
  instances: 1
  env:
    ENVIRONMENT: AzureCloud
    SUBSCRIPTION_ID: yoursubscriptionid
    TENANT_ID: yourazureadtenantidfromtheserviceprincipal
    CLIENT_ID: yourazureadserviceprincipalappid
    CLIENT_SECRET: yourazureadserviceprincipalpassword
    SECURITY_USER_NAME: usertoauthenticateagainstmetaservicebroker
    SECURITY_USER_PASSWORD: passwordtoauthenticateagainstmetaservicebroker
    AZURE_BROKER_DATABASE_PROVIDER: sqlserver
    AZURE_BROKER_DATABASE_SERVER: yourazuresqldbserver.database.windows.net
    AZURE_BROKER_DATABASE_USER: yourazuresqldbuser@yourazuresqldbserver
    AZURE_BROKER_DATABASE_PASSWORD: yourazuresqldbpassword
    AZURE_BROKER_DATABASE_NAME: yourazuresqldbdatabasename
    AZURE_BROKER_DATABASE_ENCRYPTION_KEY: 32charactersofyourchoicegohereok
    AZURE_SQLDB_ALLOW_TO_CREATE_SQL_SERVER: false
    AZURE_SQLDB_ENABLE_TRANSPARENT_DATA_ENCRYPTION: true
Assuming you have logged-in with cf login as mentioned above, you can just push the meta service broker application into your SCP tenant using cf push. Important tip: since the settings specified above in the manifest are set as environment variables, be careful with special characters used by bash when defining the passwords. Either avoid or escapte them!! A successful deployment of the meta service broker app should end up with the following output on your console:
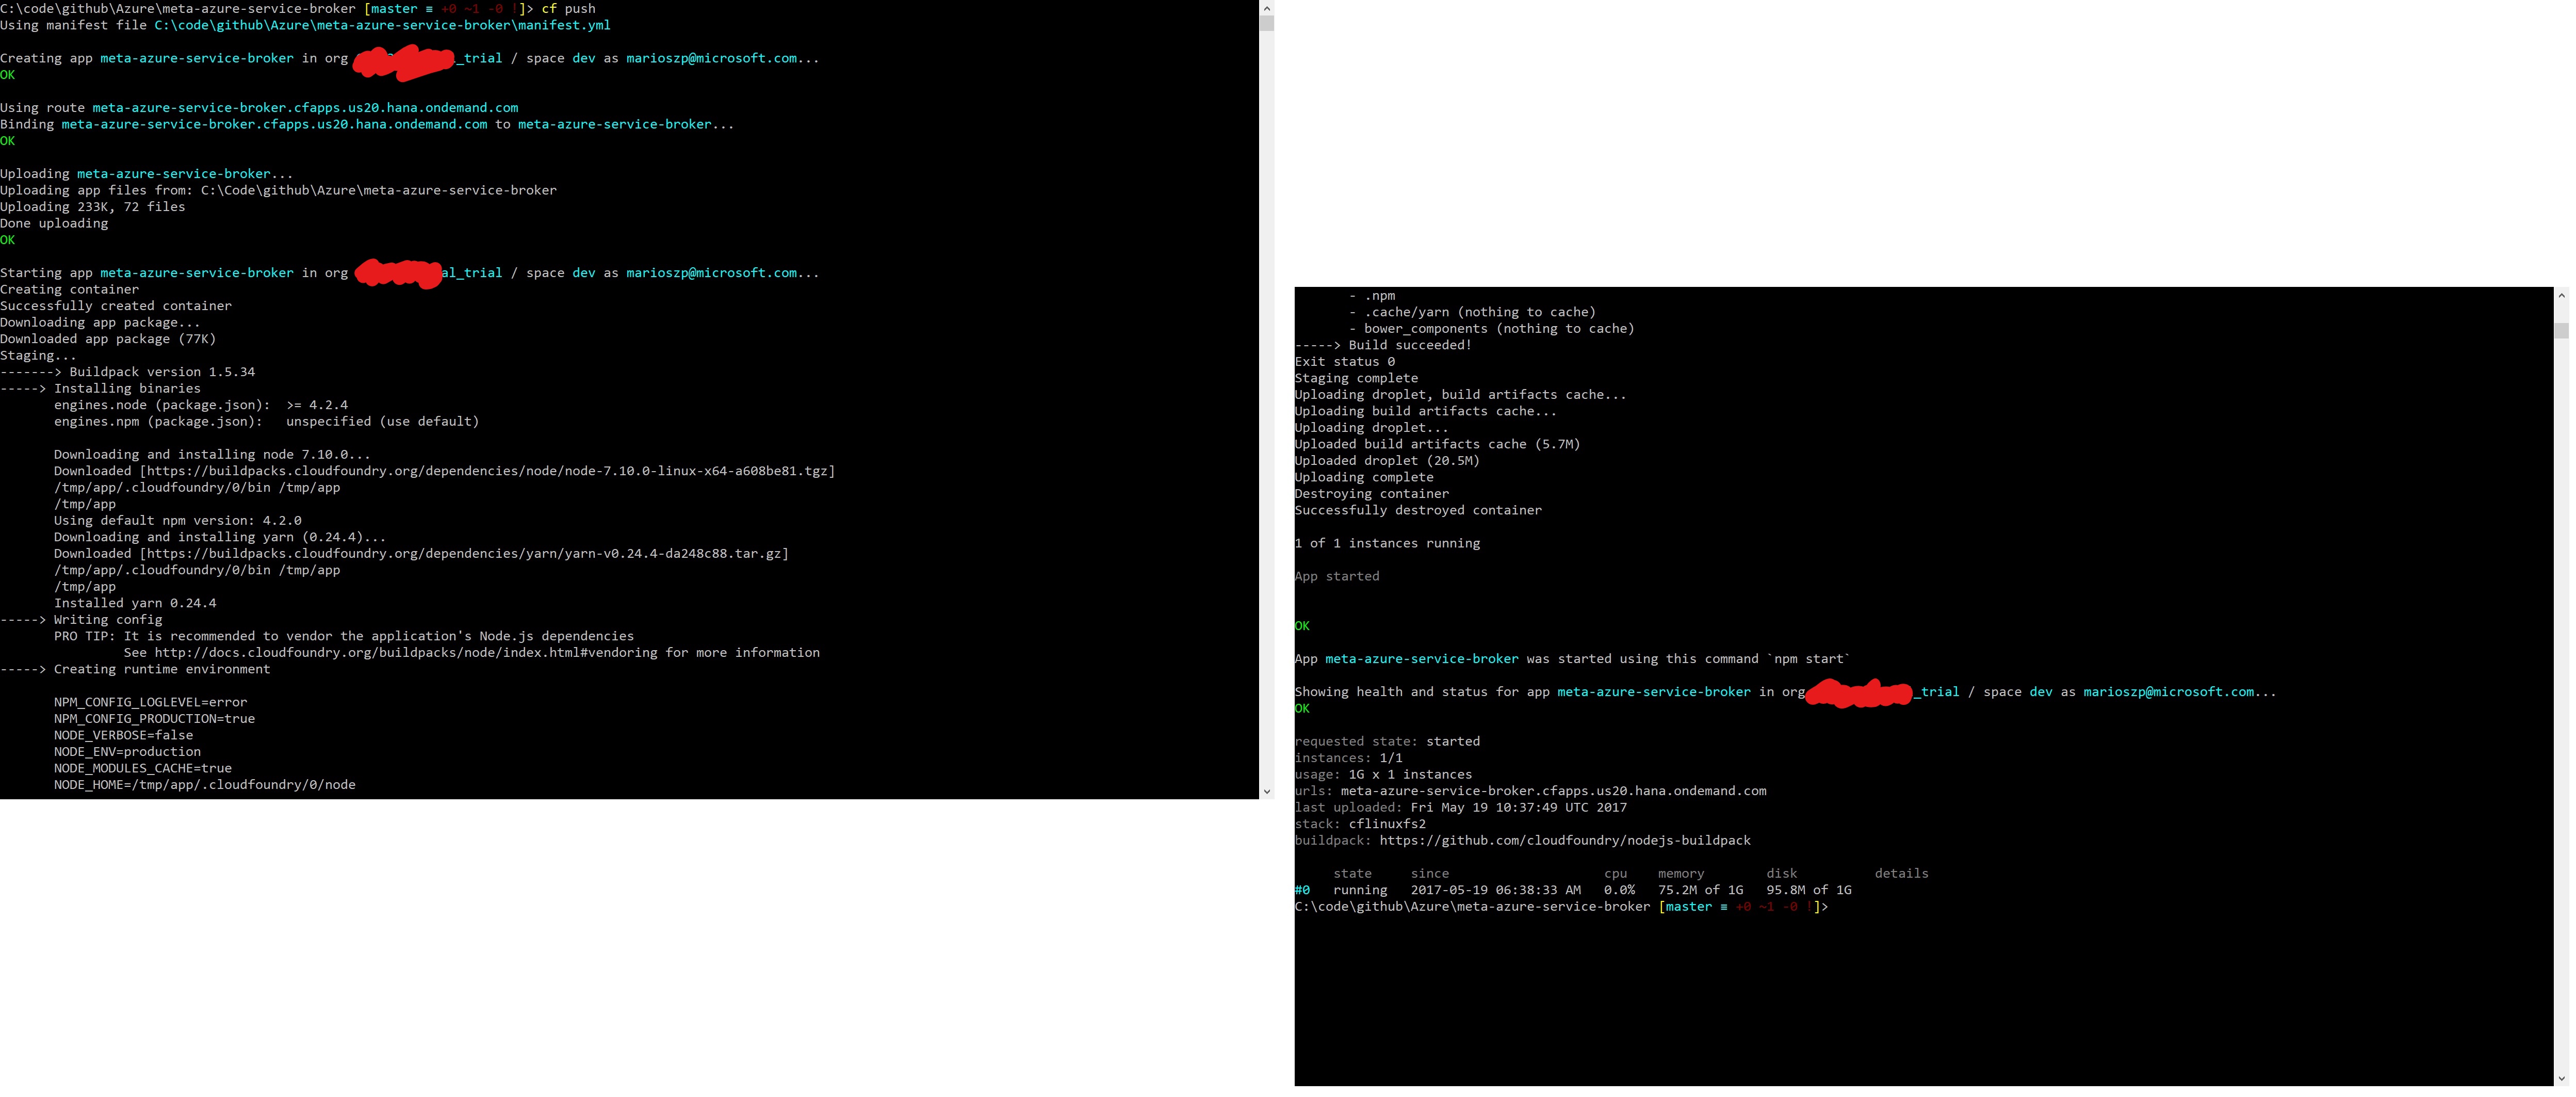
When you’ve pushed the application, you only created the meta service broker but you did not tell Cloud Foundry that this is indeed a Service Broker and not any other type of general application. So, as a next step after the meta service broker has been deployed, successfully, is to register it as a service broker. The steps for that are:
- Review the deployed application and take note of it’s entry point URL.
- Create the service broker using that URL. You also need to authenticate against the meta service broker. For that purpose, use the previously specified
SECURITY_USER_NAMEandSECURITY_USER_PASSWORDparameters from the manifest file above.
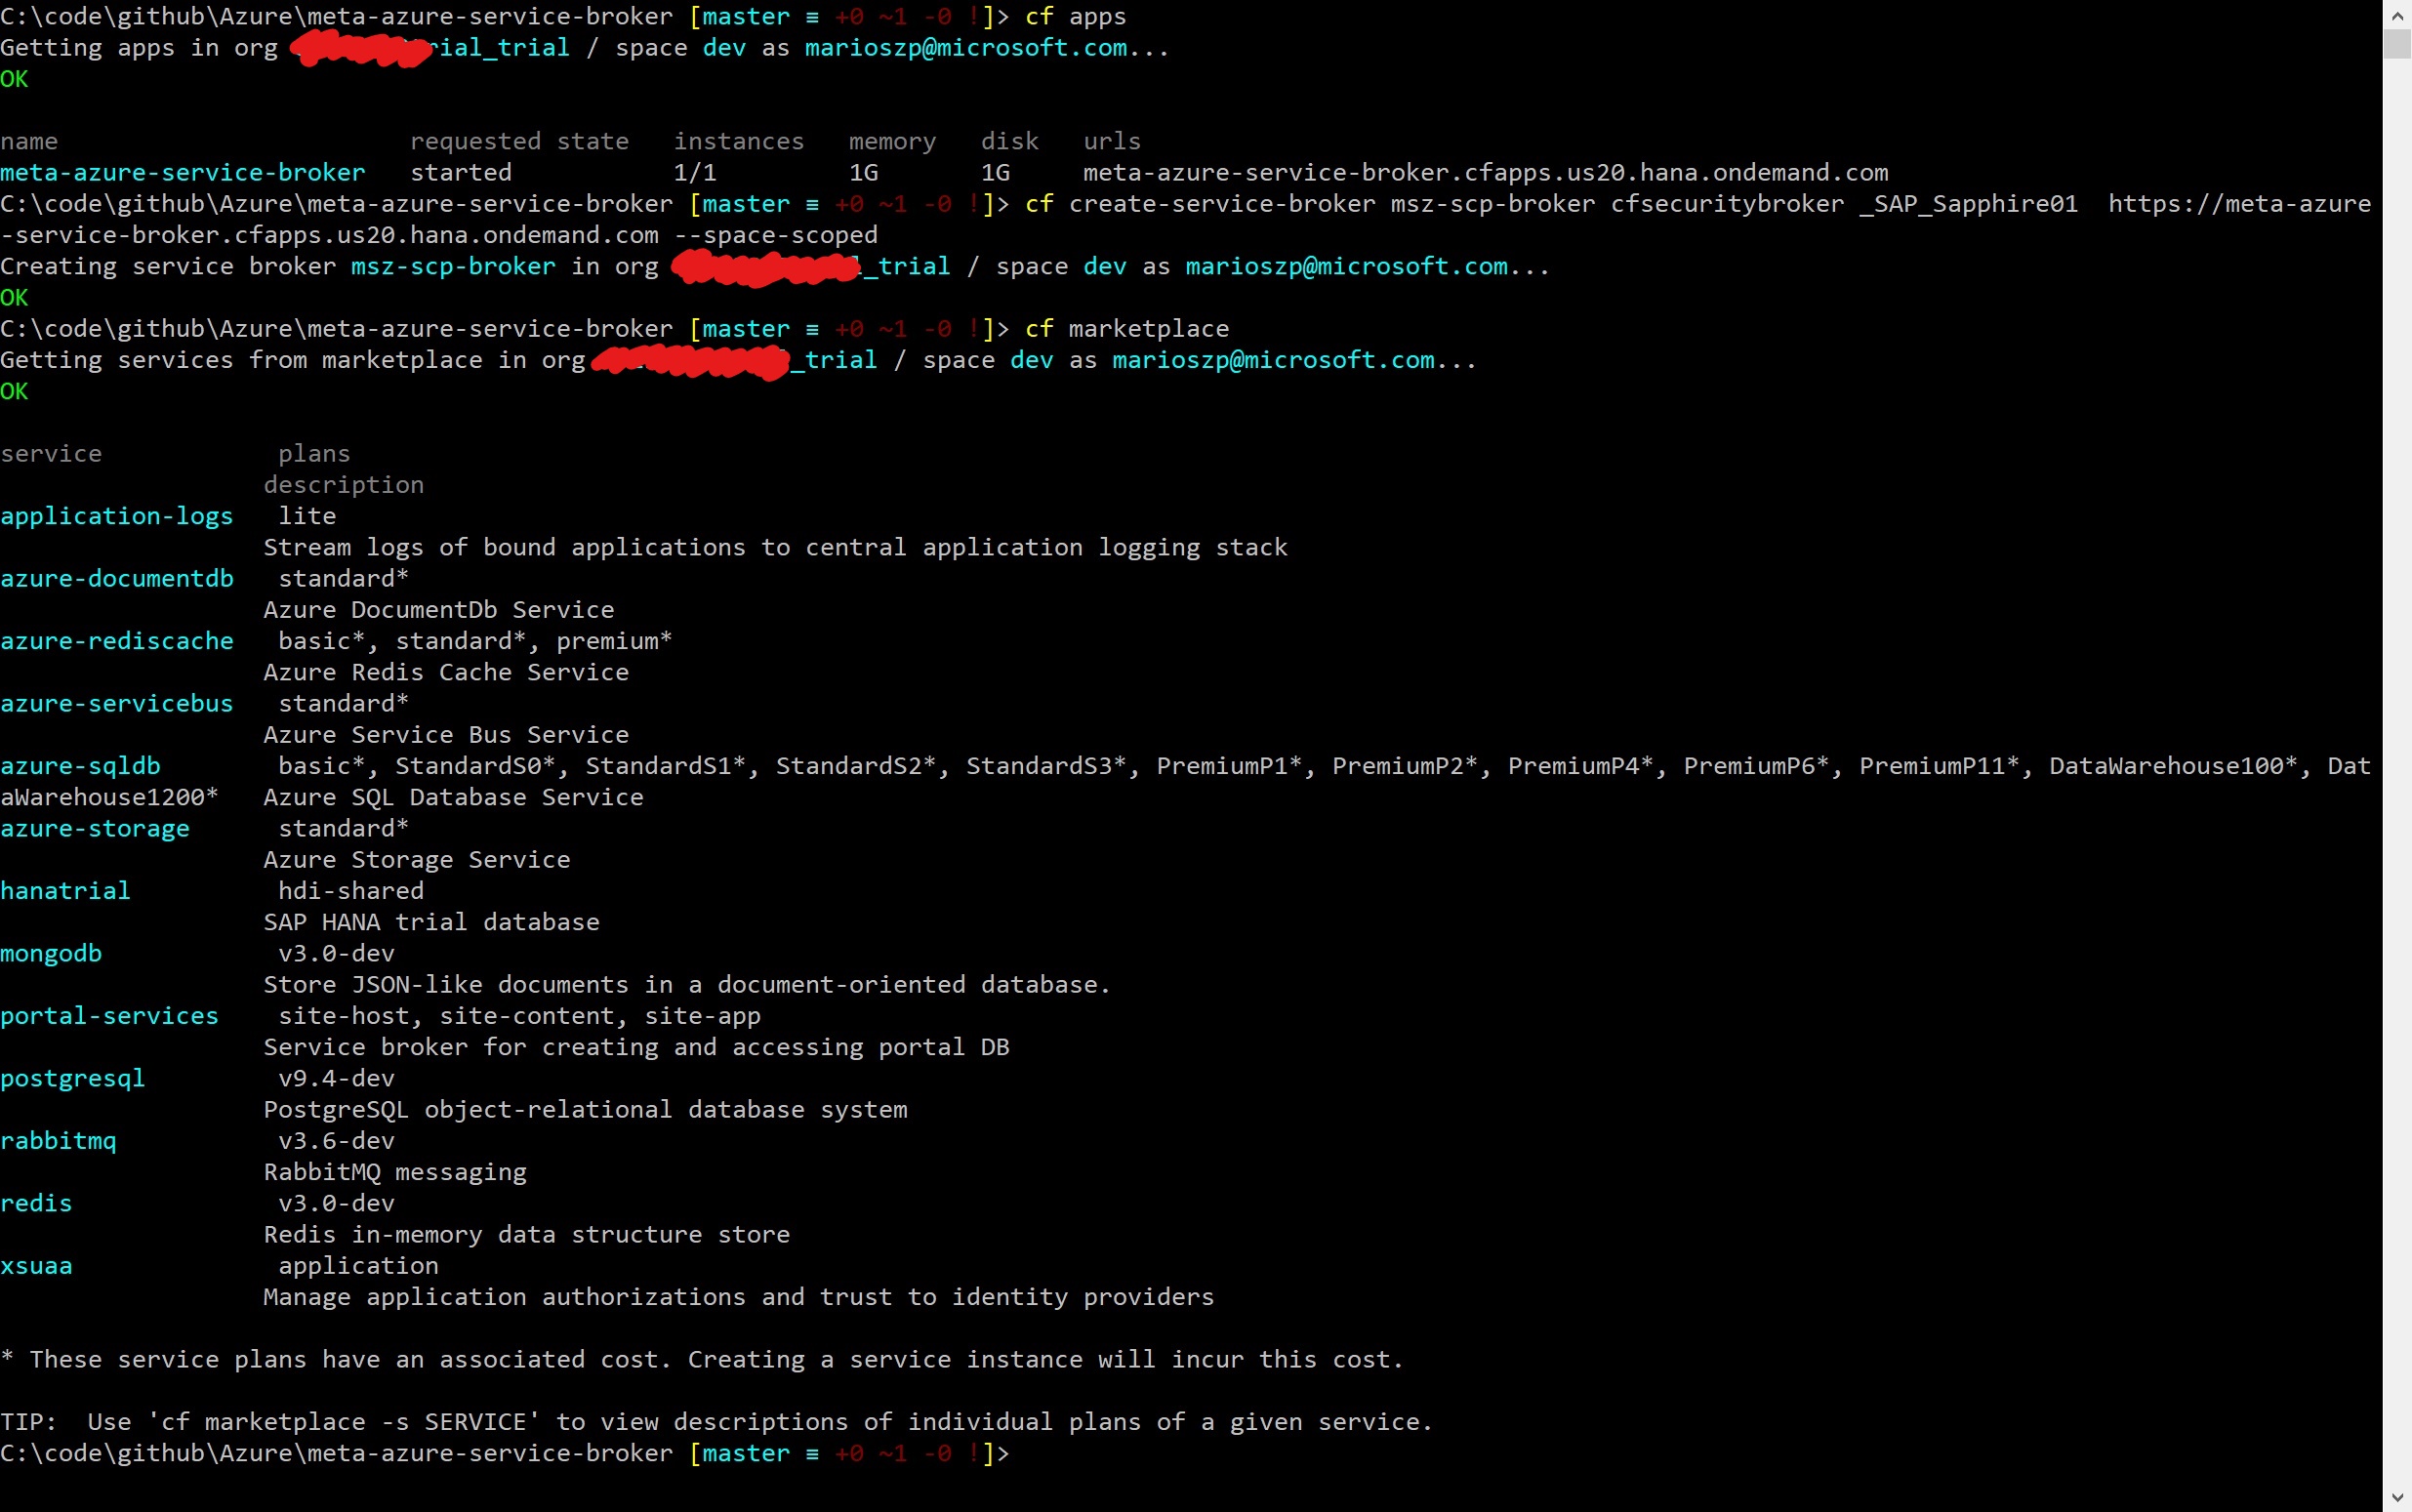
$ cf apps
Getting apps in org yourorgname_trial / space dev as your@username.com...
OK

name                        requested state   instances   memory   disk   urls
meta-azure-service-broker   started           1/1         1G       1G     urlfromyourapppush.cfapps.us20.hana.ondemand.com
$
$
$ cf create-service-broker nameofyourbroker usertoauthenticateagainstmetaservicebroker passwordtoauthenticateagainstmetaservicebroker  https://urlfromyourapppush.cfapps.us20.hana.ondemand.com --space-scoped
Important Note: since SCP is a multi-tenant Cloud Foundry environment, you need to know that you are only the administrator of the spaces you’re creating. Permissions to organizations are limited and you don’t have any permissions beyond organizations. That means when activating the service broker, you need to use the --space-scoped switch to activate the broker on your space. When you do that, you are using a so called private broker with private plans which become active, automatically. That means, although the documentation of the Azure Meta Service Broker states it, you do not need to call cf enable-service-access since all services are enabled for your space in that case, by default. A simple cf marketplace confirms that:
As a next step, you can start using the services exposed by the Azure Meta Service Broker. At the time of writing this post, those services included: Azure Storage, Azure SQL DB, Azure DocumentDB, Azure Service Bus, Azure Redis Cache and Azure Key Vault services. Means you can start using those services right away. If you have asks/requests for additional services Microsoft should enable, I think you’re best by posting requests/issues into the GitHub Repository for the Azure Meta Service Broker or file a pull request.
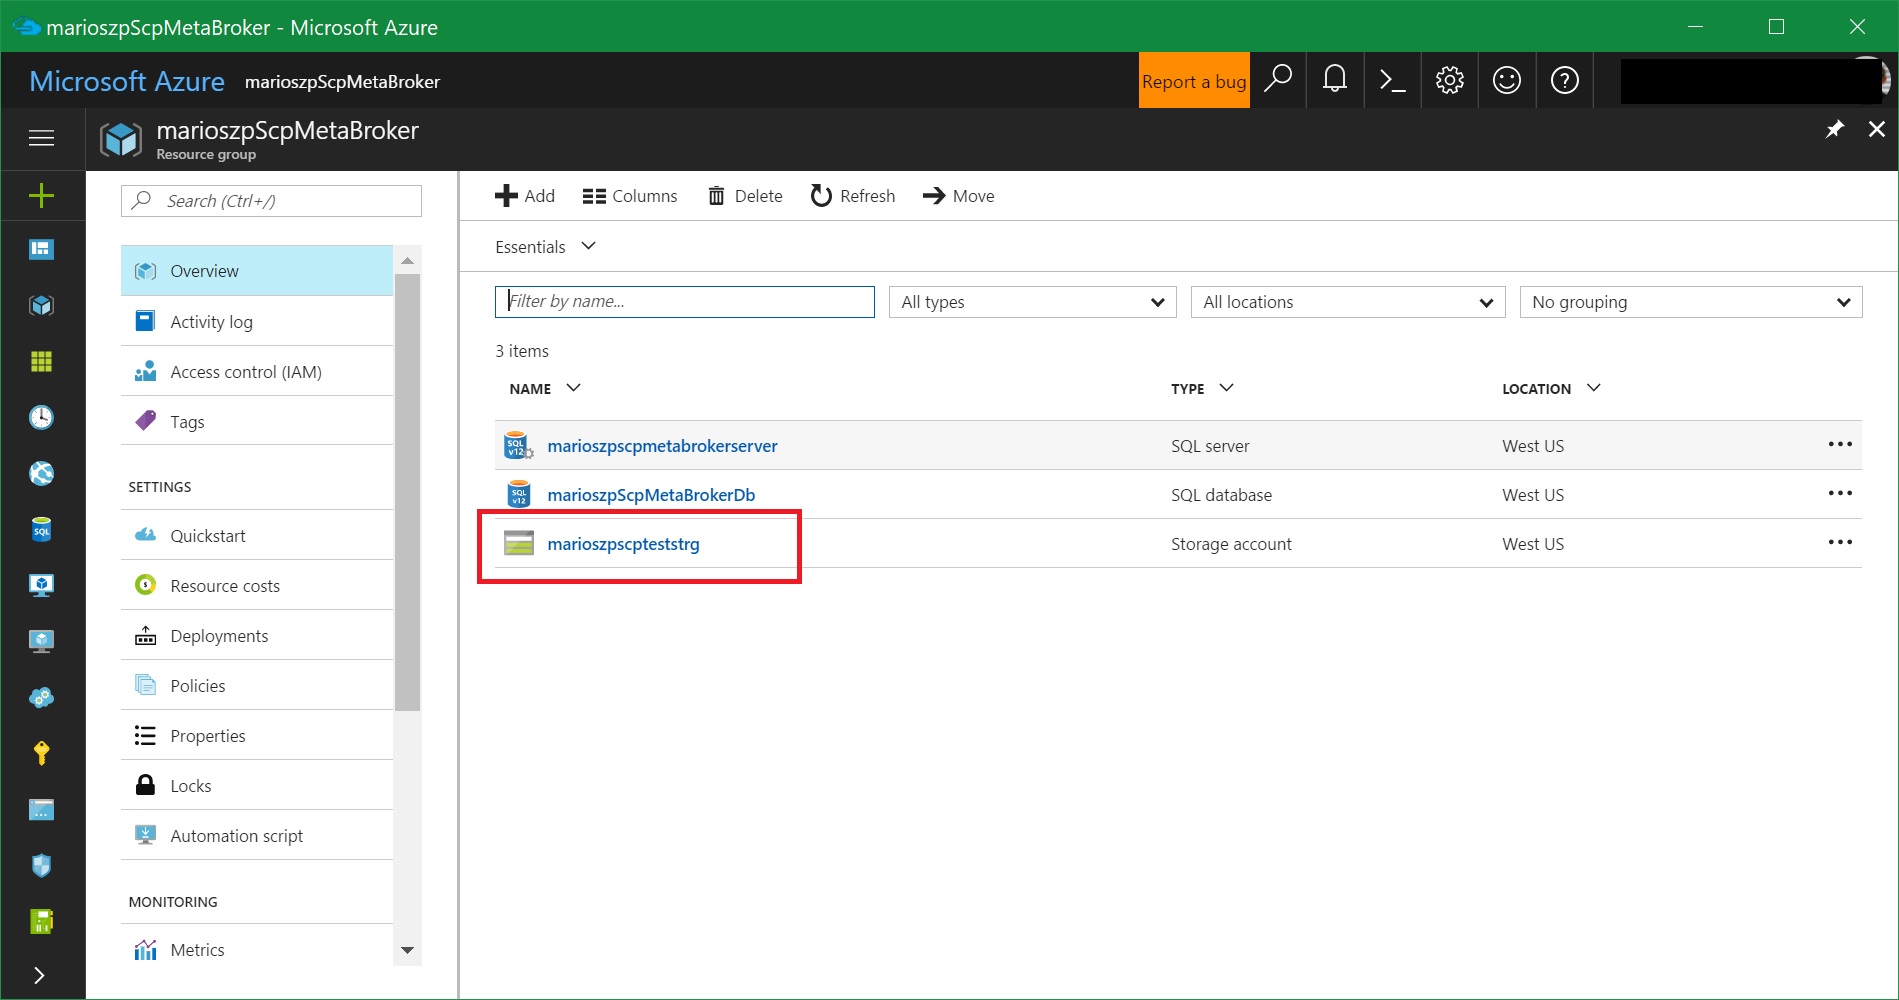
The way how you make use of the services follows standard cloud foundry patterns with service brokers. You create a service and then you bind the service to one or many applications using the Cloud Foundry service broker APIs or CLI-commands. Let’s create an Azure Storage account that way so you get a sense of it. The approach is always the same for all services offered through the Azure Meta Service Broker.
First you create a parameters-file specifying some of the provisioning paramters for creating the respective Azure service. An example of such a parameters JSON-file for creating an Azure storage account via the service broker looks as follows:
{
  "resource_group_name": "marioszpScpMetaBroker",
  "storage_account_name": "marioszpscpteststrg",
  "location": "westus",
  "account_type": "Standard_LRS"
}
With this JSON-file in-place, you can leverage the service broker CLI commands or Cloud Foundry APIs to create a new service and make Cloud Foundry aware of it:
$ cf create-service azure-storage standard marioszpscpstoragetest -c .\params.json

$ cf service marioszpscpstoragetest

Service instance: marioszpscpstoragetest
Service: azure-storage
Bound apps:
Tags:
Plan: standard
Description: Azure Storage Service
Documentation url:
Dashboard:

Last Operation
Status: create succeeded
Message: Created the storage account, state: Succeeded
Started: 2017-05-19T11:02:21Z
Updated: 2017-05-19T11:02:40Z
$
Now, once this is done you can check on the provisioning status and availability of that service using the cf service marioszpscpstoragetest command which gives you all the details about the created service. Finally, by using the cf bind-service command, you can bind the service to any application you’ve deployed. Configuration parameters will then be exposed through environment variables as per the documentation of the respective service in the Azure Meta Service Broker GitHub. For an Azure storage account, an environment variable with a JSON-document will be added to your applications Environment variables that contains e.g. the storage account name and storage account keys you can use to authenticate and execute calls against the created storage account.
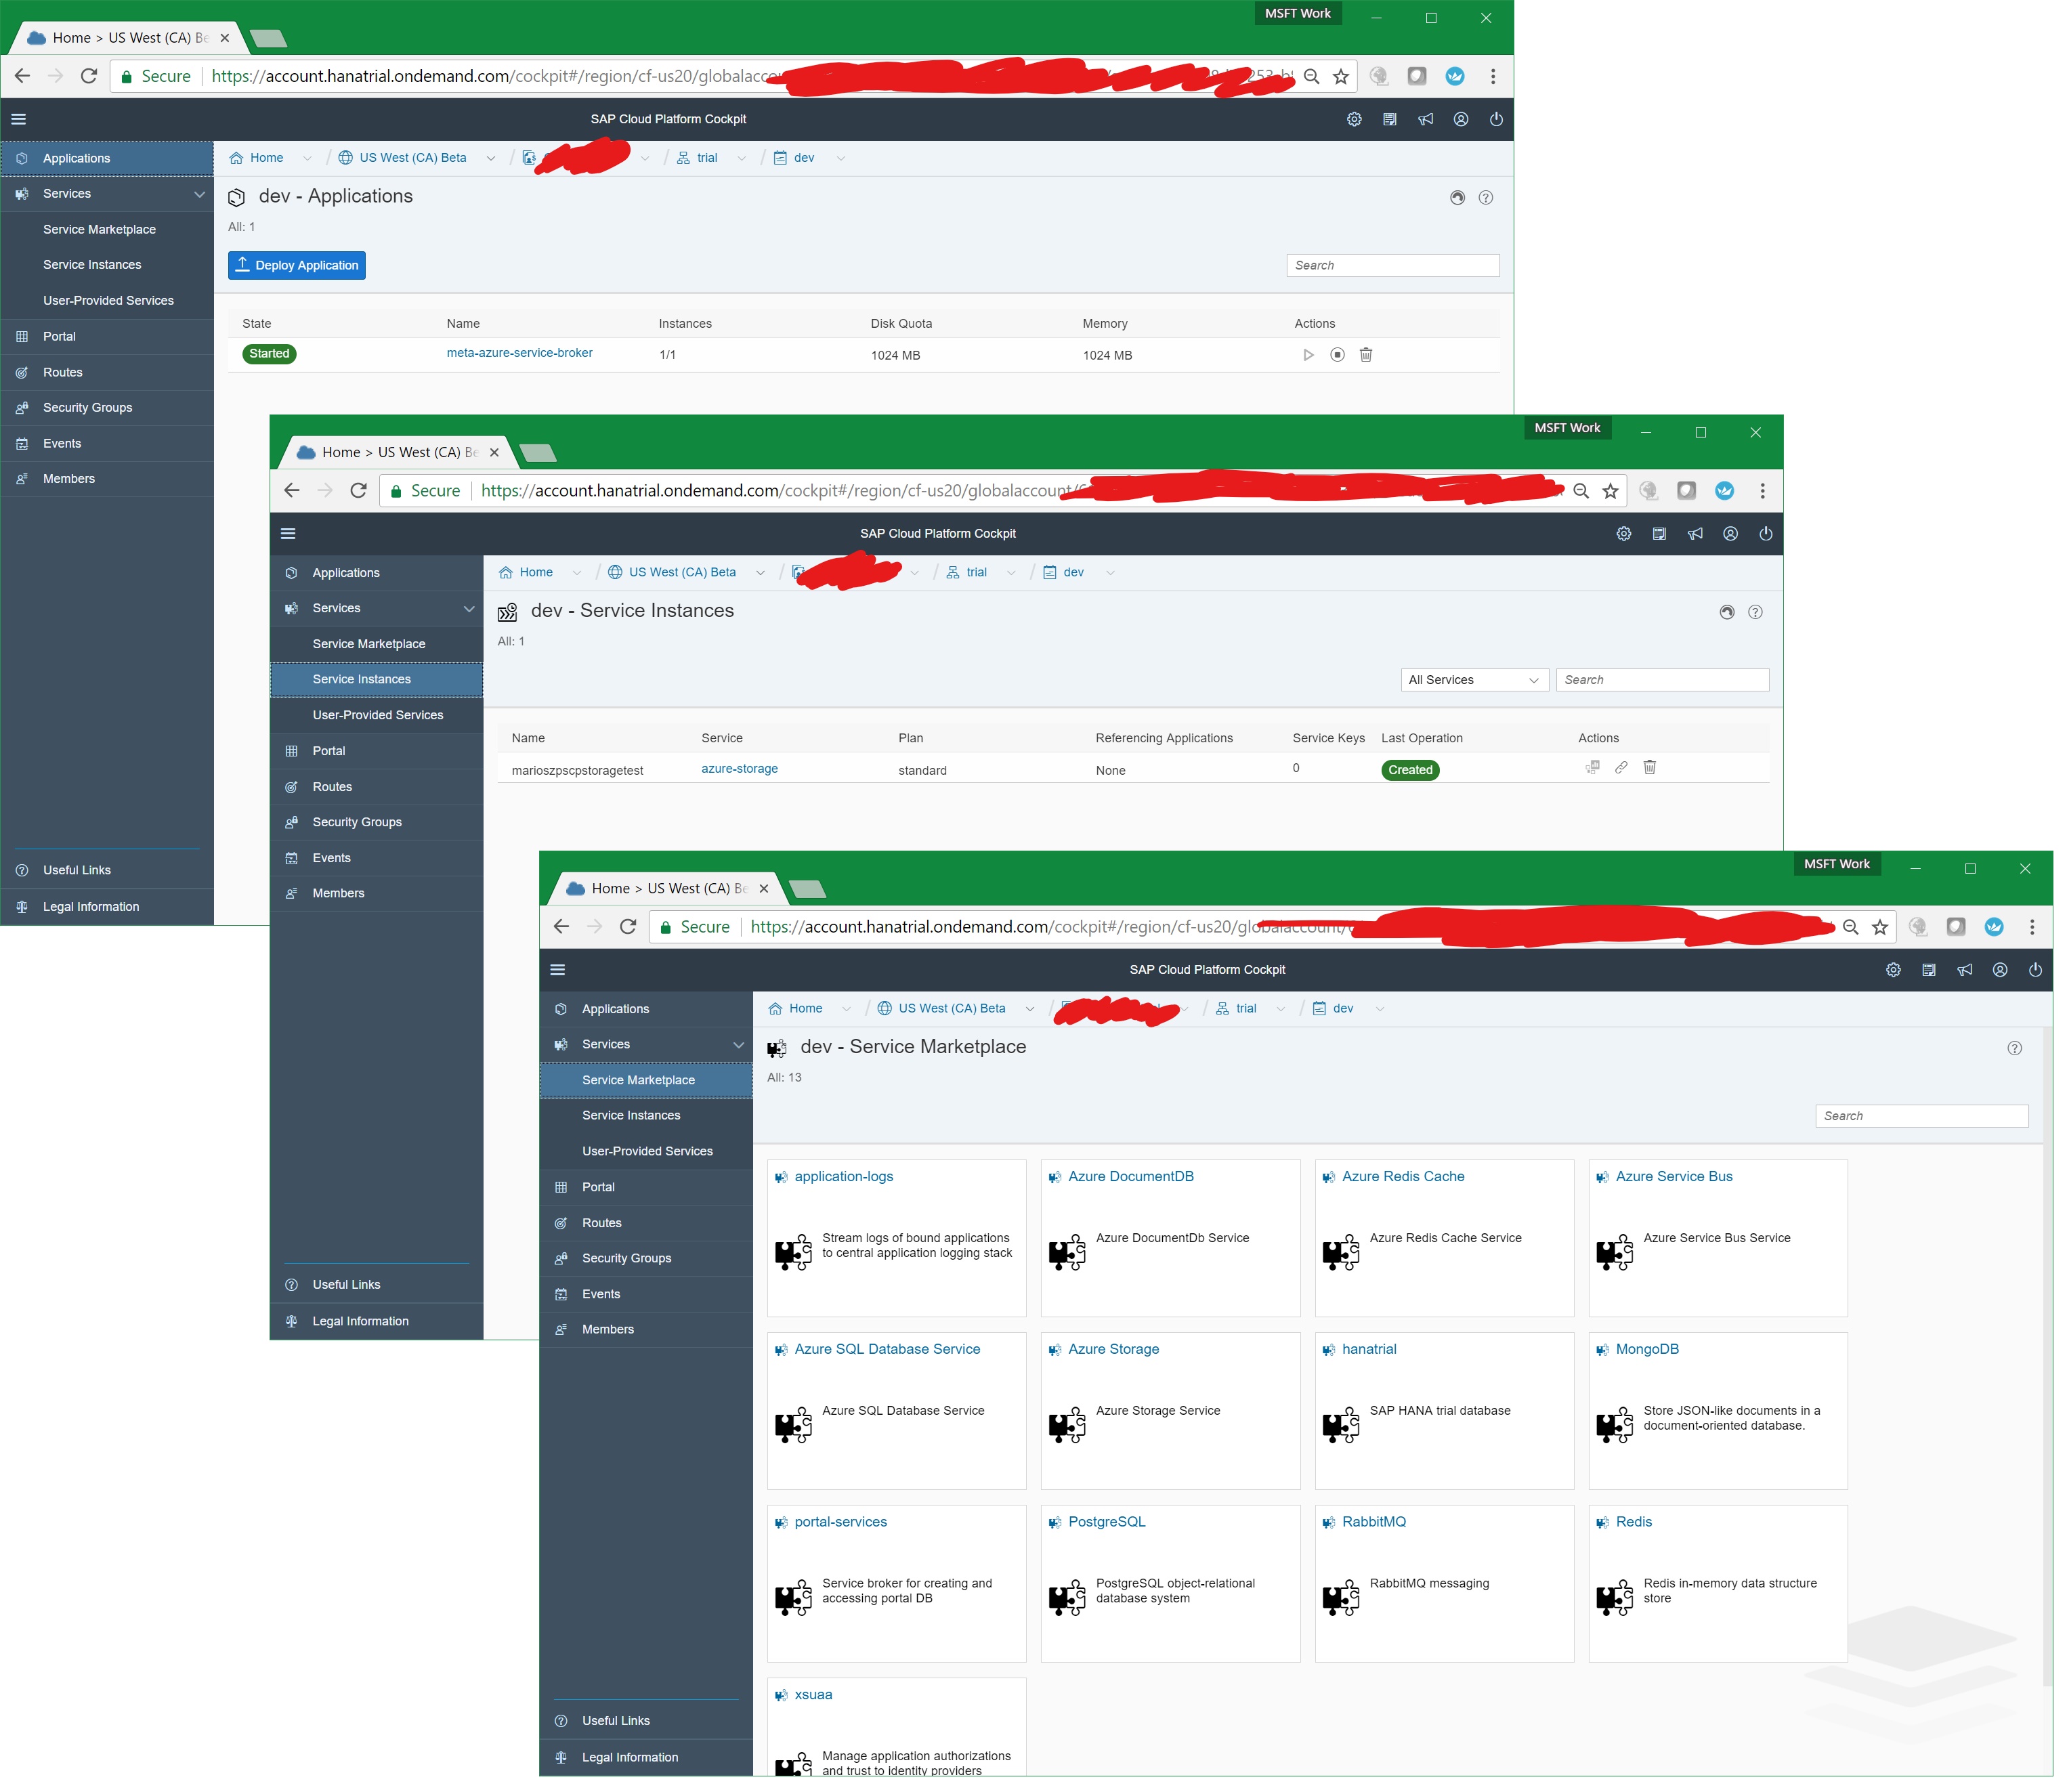
What’s really cool now is, that all of what I’ve done above with the Cloud Foundry CLI is visible in the SAP Cloud Platform Cockpit, as well. For example, since I’ve activated the Azure Meta Service Broker, you’ll see all the services in the marketplace in the portal as well. Even the Azure Storage Account which is surfaced as a service as shown below. That means the Azure Meta Service Broker really brings SCP and Azure close together and allows you to look at Azure resources through the SCP as well as the Azure management perspectives.
Final Words
This is just the beginning of SAP Cloud Platform on Azure. Note that we’ve announced Beta. During our path forward for becoming generally available, we’ll get to see several improvements in Azure’s Bosh CPI and optimized backing services (currently all except HANA run in single instance containers in the Beta/Trial).
There’s one question a lot of people ask when looking at something like this, though: how does that relate to native Azure PaaS services such as Azure App Services or Service Fabric? The answer is simple: Azure is an open Cloud Platform. Microsoft’s strategy is clearly to enable as many relevant platforms as possible in addition to Microsoft’s own technology. This gives customers and partners choice and allows them to leverage the skills and knowledge they have available in their portfolio, already. Cloud Foundry and it’s flaviours do fit very well into this strategy. If you prefer Cloud Foundry based PaaS platforms, then Azure is a place where you can go… and if you want you can even integrate with all the native goodness of Azure including especially Azure Active Directory for Single Sign-On or all of the other services in addition to those offered with the Azure Meta Service Broker.