In my last workshops together with Andreas about ECMA Office Open XML file formats I demonstrated a way for generating Word documents using the packaging API and custom XML data islands. But actually the possibility I presented in the workshop is not the only one… and I have to admit… it’s not the easiest one.
Therefore I thought I’ll share my thoughts on generating documents without the need of having Office installed on your machine based on the new file format including the advantages and disadvantages for each approach. The options I’ll take a look at are the following ones (of course you can find downloads for samples I’ve created always at the end of each blog-entry):
| Easiest way possible | Using Custom XML islands together with content controls |
| Hard and powerful | Using Custom XML islands together with dynamically generated content controls |
| Medium but still powerful | Custom attached schema to mark content in document relevant for automated generation |
| Out of discussion (in my oppinion) | Invent custom “markup tags” for marking content in documents and generated based on these |
In this and subsequent blog entries I’ll discuss each of these ones including their advantages and disadvantages. For this blog I’ll start off with the easiest one - just leveraging custom XML data islands.
Generating Documents with Custom XML Data Islands & Content Controls
This approach leverages the new functionality introduced with Word 2007 with custom XML data islands and content controls. Your code which is generating the document (probably running on the server) just updates the custom XML island in the Office Open XML package and the content is bound to the document surface using content controls.
What are typical characteristics of scenarios for this approach?You have a fixed form-structure for your document that does not need to be extended, dynamically. You just need to fill in information into fields and fields of “fixed-sized” tables on the server-side without extending Word-specific markup (such as adding new rows to tables).
How does this approach work?The first thing you need to do is agreeing on the data-structure you are working with. This data-structure models a schema that describes the business-information stored in your document. Based on this schema you can create a document template, design it’s UI with content controls and bind the controls using the Word Content Control Toolkit published on Codeplexx. On the server you simply use the System.IO.Packaging API shipping with the .NET Framework 3.0 for modifying the custom XML. Whenever the user opens the document in Word 2007, information from the custom XML is bound to the document UI automatically and any changes in the document are reflected back to the custom XML data island. More details later in this blog…
What are the advantages of this approach?
- It’s very easy to implement.
- You can write program logic that works directly with your business-data structure based on an XML schema.
- With content control, business data is automatically updated in both, the document and the custom XML data island without writing additional, client sode code.
- You don’t know anything about Word programming on the client or Word Processing ML in your custom code.
What are the disadvantages of this approach?
- It works with Word 2007, only. Although you can open the files with older versions of Office without any problems, older versions of Office don’t have the functionality of Content Controls available as this was not implemented in previous Office versions, yet.
- This is a very limited approach because it does not allow you to extend content in the document such as table rows, columns or complete sections in the document at all.
Sample Implementation
Last but not least I want to round off this first blog entry with a simple sample implementation demonstrating this approach. The first thing is starting up with an XML schema describing our content. Let’s assume we are using Word for automatically generating invoice documents. A schema for an invoice could look similar to the following (we assume this schema for the remaining post and the subsequent posts I’ll create on this topic):
<xs:schema targetNamespace="blogs.msdn.com/mszcool/officeopenxml/generatingdocumentsseries/2007/07" elementFormDefault="qualified" xmlns="blogs.msdn.com/mszcool/officeopenxml/generatingdocumentsseries/2007/07" xmlns:mstns="blogs.msdn.com/mszcool/officeopenxml/generatingdocumentsseries/2007/07" xmlns:xs="http://www.w3.org/2001/XMLSchema">
 <xs:element name="InvoiceElement">
 <xs:complexType>
 <xs:sequence>
 <xs:element name="InvoiceNumber" type="xs:string" />
 <xs:element name="InvoiceDate" type="xs:date" />
 <xs:element name="Customer">
 <xs:complexType>
 <xs:sequence>
 <xs:element name="CompanyName" type="xs:string" />
 <xs:element name="Contact">
 <xs:complexType>
 <xs:sequence>
 <xs:element name="Firstname" type="xs:string" />
 <xs:element name="Lastname" type="xs:string" />
 <xs:element name="Email" type="xs:string" />
 </xs:sequence>
 </xs:complexType>
 </xs:element>
 <xs:element name="Street" type="xs:string" />
 <xs:element name="ZipCode" type="xs:string" />
 <xs:element name="City" type="xs:string" />
 <xs:element name="Country" type="xs:string" />
 </xs:sequence>
 </xs:complexType>
 </xs:element>
 <xs:element name="InvoiceItems">
 <xs:complexType>
 <xs:sequence>
 <xs:element name="InvoiceItem" maxOccurs="unbounded">
 <xs:complexType>
 <xs:sequence>
 <xs:element name="ItemNumber" type="xs:int" />
 <xs:element name="ItemName" type="xs:string" />
 <xs:element name="ItemAmount" type="xs:decimal" />
 <xs:element name="ItemUnitPrice" type="xs:decimal" />
 <xs:element name="ItemToals" type="xs:decimal" />
 </xs:sequence>
 </xs:complexType>
 </xs:element>
 </xs:sequence>
 </xs:complexType>
 </xs:element>
 <xs:element name="InvoiceTotals" type="xs:decimal" />
 </xs:sequence>
 </xs:complexType>
 </xs:element>
</xs:schema>
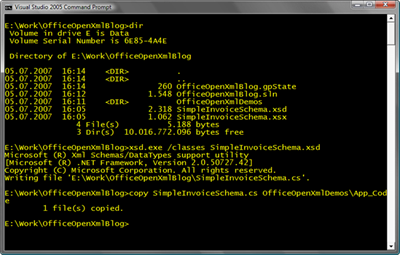
Based on this schema we now can generate a class with xsd.exe, a tool shipping with the .NET Framework for generating .NET types out of XML schemas and vice versa. This enables us later to use the XmlSerializer of the .NET Framework System.Xml.Serialization namespace to serialize and de-serialize XML instances based on this schema into the .NET type we generated through xsd.exe. Thus we save ourselves from writing the typical XPath code when working with XML in a DOM;)
As I am demoing the stuff in a web application, I copy the generated code file to the App_Code sub directory of my web application. Now we are set to proceed with the next steps. If you don’t know why I am doing this right now you will definitely understand better when we start writing the code for generating the document in our web application on the server.
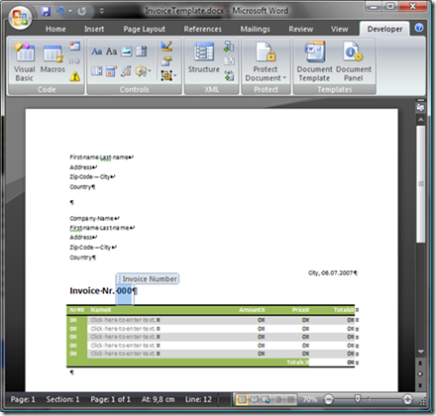
Next we can design the document for our invoice including the content controls. For finding content controls you need to activate the developer tab ribbon in the Word options. The invoice we’re designing could look similar to the following one whereas the content controls I am using are text block (either simple or RTF), drop-down lists and date-time drop-downs.
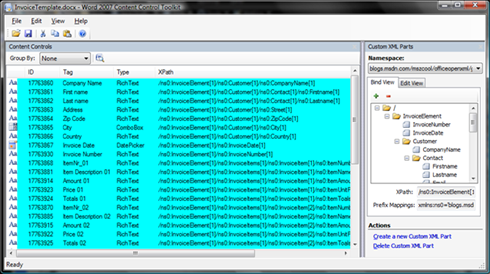
As you can see we’ve marked the parts of the document we would like to bind to our XML schema structure with Word Content Controls from the developer tab ribbon. In the developer tab ribbon you will find these controls in the “Controls” group as you can see in the image above, as well. Furthermore for this simple type of document generation our document contains a fixed number of item rows (in my example 5, but of course it can be more). Each row of the table contains several content controls which we will bind to a row in an XML instance using the word content control toolkit as you can see in the next figure below. But before we can do that we have to create a Sample-XML document that we will add to our document as a Custom XML data island with the Word Content Control Toolkit. The XML document instance based on our schema needs to have 5 InvoiceItem as our template supports 5 items as you can see above (that’s it for this rather simple approach, of course you can do it dynamically as well which is more complex and covered in one of my subsequent blog entries).
<InvoiceElement xmlns="blogs.msdn.com/mszcool/officeopenxml/generatingdocumentsseries/2007/07">
 <InvoiceNumber>12345</InvoiceNumber>
 <InvoiceDate>2007-07-06</InvoiceDate>
 <Customer>
 <CompanyName>Microsoft Austria</CompanyName>
 <Contact>
 <Firstname>Mario</Firstname>
 <Lastname>Szpuszta</Lastname>
 <Email>dpeat@microsoft.com</Email>
 </Contact>
 <Street>Am Euro Platz 3</Street>
 <ZipCode>1120</ZipCode>
 <City>Vienna</City>
 <Country>Austria</Country>
 </Customer>
 <InvoiceItems>
 <InvoiceItem>
 <ItemNumber>0</ItemNumber>
 <ItemName></ItemName>
 <ItemAmount>0</ItemAmount>
 <ItemUnitPrice>0</ItemUnitPrice>
 <ItemToals>0</ItemToals>
 </InvoiceItem>
 <InvoiceItem>
 <ItemNumber>0</ItemNumber>
 <ItemName></ItemName>
 <ItemAmount>0</ItemAmount>
 <ItemUnitPrice>0</ItemUnitPrice>
 <ItemToals>0</ItemToals>
 </InvoiceItem>
 <!-- ... 3 more InvoiceItem Items ... -->
 </InvoiceItems>
 <InvoiceTotals>0</InvoiceTotals>
</InvoiceElement>
Now let’s move on save the previously created Word document into your web project’s directory folder as a template, close word, open the Word Content Control toolkit. Create a new custom XML using the Content control toolkit and copy the XML shown above in the edit-mode of the XML pane of the tool. Then switch to bind mode and bind each of the XML elements to one content control in your document as shown below:
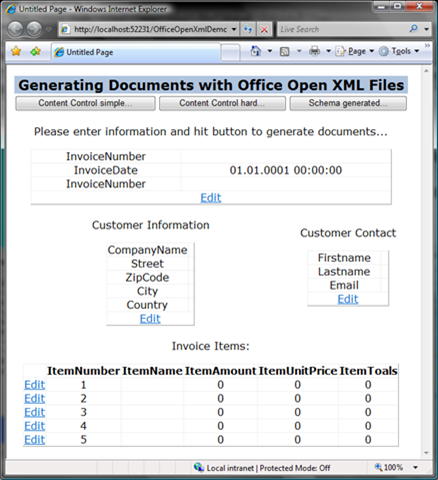
As you can see in the image above, each InvoiceItem’s members are bound to different content place holder controls for the document. This document now acts as a template for our solution. The solution we’re creating is a simple ASP.NET page that leverages the previously created classes (using XSD.EXE to create classes from the schema) to bind content from the classes to the UI of the application. The application looks similar to the following one and uses ASP.NET object binding to bind the objects’ content to the actual UI of the ASP.NET web application. I don’t want to spend too much time on ASP.NET in this posting as you can download the sample from the attachments of this post, anyway.
For this first blog post we implement the event procedure of the “Content Control simple…” button to generate a document based on the first approach which is explained in this simple example. As we use object binding with ASP.NET and have a little, self-written class in place (you can see it when downloading the sample, it’s called InvoiceAdapter and adds a pre-populated InvoiceElement instance with 5 InoviceItem instances to the Session which are bound to the UI shown above).
So assuming that we have an InvoiceElement stored in the session, we can let the user enter information into the page and hit one of the buttons to generate a document based on the information entered into the ASP.NET based UI with a very small amount of code as follows:
InvoiceElement element =
    Session[InvoiceAdapter.CurrentInvoiceTemplateKey] as InvoiceElement;
if (element.InvoiceItems.Length != 5)
{
    StatusLabel.Text = "You need exactly 5 rows as in your template for this approach!";
    return;
}

// Then copy the document template
string templatePath = Server.MapPath("~/InvoiceTemplate.docx");
string generatedPath = Server.MapPath
                       (
                            string.Format("~/Generated/Invoice{0}.docx",
                                          element.InvoiceNumber)
                       );
if (File.Exists(generatedPath))
    File.Delete(generatedPath);
File.Copy(templatePath, generatedPath);

// Now you can open the copied file using the packaging APIs
using (***Package p = Package.Open(generatedPath, FileMode.Open, FileAccess.ReadWrite)***)
{
    // Now we can get the path to our custom XML in the template
    Uri partUri = new Uri("/customXml/item1.xml", UriKind.Relative);
    PackagePart part = p.GetPart(partUri);
 // Overwrite existing part, therefore open with FileMode.Create
    using (***Stream s = part.GetStream(FileMode.Create)***)
    {
        // Now use the XmlSerialize to write back the content
        XmlSerializer serializer = new XmlSerializer(typeof(InvoiceElement));
        serializer.Serialize(s, element);
    }

    // Flush memory-content back to the package
    p.Flush();
}

StatusLabel.Text = "Document generated as " +
    string.Format("Invoice{0}.docx", element.InvoiceNumber);
That’s fairly easy - and we’ve reached an attractive goal with that little amount of code. Think of what that meant in the past when you had to work with the good, old COM automation object model (which meant you had to install Office on the server). Now you don’t need to install Office on the server to generate documents and generating documents is just simple XML processing.
Wrap-Up and final comments
That’s of course the easiest way for generating documents on the server. But actually it’s so simple and restricted that I’d rather call it “filling in business information on the server” instead of “generating documents”:)) The biggest advantage of this approach is, that it is (a) simple and (b) if you need to process the information entered or modified by the user on the server it works the same, simple way technically. Still for professional document generation we need more possibilities, of course. Therefore I’ll take a look at other approaches in subsequent posts;)
You can download the sample I’ve created for showing this approach here.


