[restored from my Wordpress blog]
I am currently working with a software vendor in the media space who has some really valuable software assets implemented as console applications, today. These command line applications are used for some high-performance image transcoding/encoding jobs and are implemented with C/C++ (originally built for Unix/Linux environments).
Now the partner wants to run this application as part of a Platform-as-a-Service (PaaS) deployment on Windows Azure using Web/Worker Roles for a new online service they’re currently building. But a requirement is to enable that scenario without rewriting the application and re-using it as it is.
In this blog post I’ll show, how you can run console applications correctly in Windows Azure Worker Roles without a single modification of the original console application itself. This is a scenario I’ve been challenged with in some other engagements with my partners and the requirements and solutions where always similar.
I’ll start with a bit background information and then I’ll dig into the solution based on an anonymized sample use case that pretty much captures all the requirements I’ve been confronted with in such cases with several partners. The complete sample code is published on my code workspace on codeplex and is available as a download or by cloning the git-repository I am using there.
BACKGROUND #1 - WHY NOT RE-WRITING THE APPLICATION?
The console application that performs transcoding/encoding tasks is not fully owned by the partner. Furthermore the application runs perfectly fine on the machines they run in their own data center – and that should remain exactly the same as not all customers will be deployed in the cloud. Furthermore their on-premise data center runs on Linux VMs and therefore the console application needs to run on both, Linux and Windows (as they’re moving to Windows Azure PaaS and not IaaS).
BACKGROUND #2 - WHY DO THEY WANT TO DO WINDOWS AZURE PAAS INSTEAD OF IAAS?
Next you might think it might be easier to just take Linux VMs on Windows Azure and run their console application there. Indeed that was our first approach for the overall design of the solution. But using Windows Azure Virtual Machines (and IaaS in general) means that you have to maintain the virtual machines by yourself while running the solution. Maintenance for mean means things such as taking care of OS-updates, updating the application code appropriately without downtime and the like.
That’s okay if you’re just running a bunch of virtual machines that you need to maintain. But in this case the partner needs to run > 100 virtual machines in a scale out scenario for a massive amount of transcoding jobs. With such a scale, maintenance really becomes an annoying accompanist over time that will result in increased effort, time and money required to operate the environment.
In PaaS and with Windows Azure Cloud Services (Web/Worker Roles) on the other side the operating system and all application deployments are managed automatically by the Windows Azure platform. That said the software vendor does not need to manage updates manually and maintain the operating system anymore, at all. For the ongoing operations management it means a huge amount of effort goes away and frees up time for more important and valuable things. Therefore we jointly decided to move towards PaaS instead of continuing the IaaS/virtual machine approach.
THE SOLUTION #1 – HIGH-LEVEL ARCHITECTURE AND “CONDITIONS”
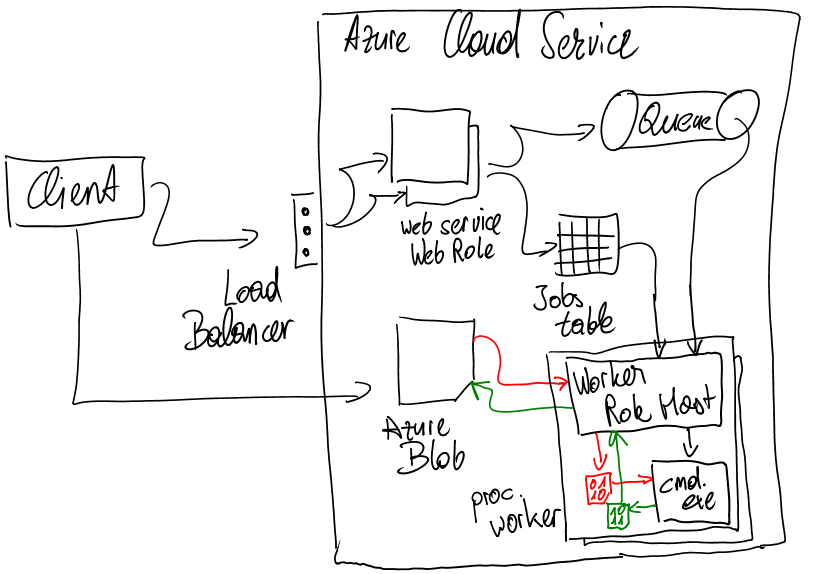
The sample implementation I am providing as an add-on to this post outlines the final architecture in a simplified way. Essentially we decided to run the console application in Windows Azure Worker Roles as part of an encoding/transcoding cloud service. This service gets its jobs from an Azure queue which is filled by a web service accessed by some other, permitted applications of the customers form the software vendor. Basically the flow looks as follows:
- The originator of a job uploads assets into Azure BLOB storage.
- The originator then calls a web service to submit a new encoding/transcoding job.
- This web service validates the submitted job and if okay it adds an entry to an Azure TABLE with the details on the job.
- After that the web service adds a message to queue to initiate the processing of the job by the worker.
- The worker picks-up the job, reads the details (e.g. the asset in BLOB storage to be processed).
- The worker downloads the asset from the BLOB storage onto the local machine.
- Then the worker executes the console application against the downloaded asset and stores the result locally, as well.
- After that the worker uploads the resulting asset (the output from the console application) to BLOB storage again (in a separate container).
- When that’s done, the worker updates the table with the Job information and marks the job as “done”.
- Finally the worker deletes all assets from the local file system as they’re not needed on the executing compute instance, anymore.
As you can see from the solution above, the primary aspect to consider is that the local storage on Web/Worker Roles in Windows Azure is transient. All compute instances need to be treated as “stateless” and if there’s some state on these compute instances, it needs to be “temporary”. Therefore all assets that are an output from the processing need to be uploaded to Azure BLOB (or another permanent storage service such as Azure TABLEs, Azure SQL DB etc.) after they’ve been processed on a single compute instance, successfully.
On the other hand, the console application does not understand anything about Azure BLOB storage and the like. It does understand command line parameters, local file system input and local file system output for storing results, typically. Therefore the worker needs to download the input to the local file system so that the console application is able to process the assets and after processing upload the results typically written into a local file system by such console applications to Azure BLOB storage. Given that the console application must not be changed in our scenario (which is often the case), the worker needs to take care of that processing.
Of course that is not the only scenario related to command line applications, but it is the one I’ve been challenged with most often and with several of our software vendors we’ve been working with. Therefore it is a scenario common enough for me to outline at a greater detail.
Below a sketch of that architecture in a simplified way – more correct would be a complete implementation of a queue-centric workflow pattern as outlined in Jason Short’s blog…
Note that you can easily scale out that solution by adding any number of instances of the worker role you want. E.g. you could set the number of instances to 100 worker instances so that you can process 100 transcoding jobs in parallel. Of course in addition to that you could optimize that by being able to run multiple instances of your console app at the same time on a single compute instance. But still, the easy scale out just happens by adding compute instance nodes to this and every instance picks up jobs from the queue as available and processes them in parallel.
THE SOLUTION #2 – SOME IMPLEMENTATION DETAILS
Now that we know how the solution is structured in general, we can take a look at some more details. The sample I’ve posted on my workspace is on a fictive (yet realistic) use case of generating thumbnails from images and it implements the architecture outlined earlier. For the concrete case I’ve mentioned above we just need to replace the use case (and therefore the command line tool subject of discussion) with their use case and tool and we’re all set. Of course we’ve implemented a more details (such as error handling, dead letter queue, etc.) which I’ve left in my sample implementation for the sake of focus and simplicity, but the overall approach is the same.
In this section let’s instead of going into all details let’s focus on the heart of the Worker Role which runs the legacy console application and does the work around executing that legacy application. There are a few things to keep in mind to do this correctly. These are:
- First the console application does not understand anything about Azure BLOB storage and will never be (since it should not be changed and should run as-is on-premise and in the cloud). So content needs to be downloaded and uploaded to and from BLOB-storage from the worker role host process.
- The logic of this one is implemented as part of the RoleEntryPoint-class you can implement for every Web/Worker Role in Windows Azure.
- Since the console application relies on the local file system (for reading and writing content), we need to make sure to do this in the right way. What does that mean?
- Well, the file system and drive structure for Web/Worker Roles is defined by Azure and might change over time.
- Therefore hard-coding drive- and directory-access is definitely not the best solution.
- For this purpose, Local Resources do exist in Windows Azure Web/Workers that give you access to the local file system in the right way.
- Deploying the console application needs to happen alongside with the Worker Role project so that we can call it. Calling the console application also should not happen with hard-coded paths.
- Deployment of the console app happens by adding it to the Worker Role project and making sure the Build Action is set to “Copy Always in solution explorer. That way the necessary console application executable will be included in the *.cspkg Azure deployment package by Visual Studio.
- Second to call the console application, correct environment variables should be used. The environment variable we are using in our sample will be the ROLEROOT environment variable which points to the root directory of the extracted content from our *.cspkg Azure deployment package. From there we can easily find the console application using relative path specifications and therefore being “resistant” against possible, future changes of deployment file structures from Azure Web/Worker Roles.
Before looking at further coding details, let’s have a quick look at how the console application of my sample works so you get a better understanding of the scenario at a greater level of detail. Essentially the sample application creates thumbnails from existing images on the local file system and creates an output file for the generated thumbnail:
.png)
Think of this as your legacy-application you want to run in Windows Azure Worker Roles without being changed. Okay, now let’s look at some code from the worker role implementation. Looking at the solution structure, the RoleEntryPoint-implementation does all the plumbing (querying the queue, downloading and uploading content from Azure BLOB storage and calling the console application). For that purpose the console legacy app needs to be deployed with the worker role through the Azure deployment package. That is done by adding the console app to the project and making sure the “Copy to Output Directory”-property is set to “Copy Always” as shown here:
.png)
As a next step you need a file system directory to which and from which your console application can read content and write new content to. In our case that’s from where the console application reads the actual source images downloaded by the worker role to the local file system of the instance processing the job and where it writes the resulting thumbnail to. From there the worker host implementation picks it up and uploads it to BLOB storage.
For that purpose you need to specify a local resource which is essentially a local, temporary directory given to you by the Windows Azure Role Environment APIs for Web/Worker Roles. Given you can specify a size for that, the environment can guarantee that this size is available locally (also depending on the instance size you have chosen for your Web/Worker Role). Local resources are configured on the properties dialog for the Worker Role in the Windows Azure Project in Visual Studio as shown below:
.png)
Now that we know the “setup” for our project, we can look at some of the interesting pieces of code for the overall solution. The first thing I’d like to take a look at is the overall structure of our Worker Role and the initial steps before the actual processing starts as they are super-important for anything afterwards:
public class WorkerRole : RoleEntryPoint
{
    // ... some private variables are defined here ...

    public override bool OnStart()
    {
        // ... default implementation
    }

    public override void Run()
    {
        // ... some other code here not so important right now...

        // Now reserve a local temp path where images will be saved by the console app
        Trace.WriteLine("Getting a local directory for temporary work with image thumbnail generation...");
        var localResource = RoleEnvironment.GetLocalResource(
                    SharedConstants.LocalStorageForImageProcessingName);

        // Next retrieve the path of the executable deployed with this worker role
        // based on the environment 'RoleRoot' variable
        var legacyAppExecutable = System.IO.Path.Combine(
                                            System.Environment.GetEnvironmentVariable("RoleRoot"),
                                            "approot",
                                            "LegacyApp",
                                            "ThumbnailProducerApp.exe"
                                        );

        // Receive messages, download the image, process them with the console app and upload the image to blob
        while (true)
        {
            var message = queueRep.GetMessageForJob(out jobId, out hasBeenDequeued);
            if (!string.IsNullOrEmpty(jobId))
            {
                // Process the message ...
            }
            Thread.Sleep(5000);
        }
    }

    // ... private implementation methods go here ...
}
There are a few super-important aspects in this code. First we get access to the local resource defined earlier using RoleEnvironment.GetLocalResource(). This gives us access to the local path we have requested through our project properties (see picture above) with the amount of disk space required. We don’t need to take care of disk structures and file system structures, we will get a directory that works. Into this directory, the worker will download content from BLOB, execute the console app onto it and give the console app this directory as an output.
Next we are getting the right path to the console application we’ve deployed alongside with our worker role implementation. For that instead of hard-coding any path in our solution, we use environment variables which are pre-defined by the Windows Azure environment in our Web/Worker Role, already. In specific the “RoleRoot”-environment variable will point to the root directory to which our *.cspkg content has been extracted to. There, under approot we will find the files from our project and from there we can point to the legacy console app deployed with our package.
These two are the most important aspects to consider for calling the console application later on. After we’ve set them up, we start the processing loop for our worker where we try to get messages from the message loop and if there are any, we start processing them. The method ThumbnailQueueRepository.GetMessageForJob() also makes sure that poison messages do not keep our workers busy forever as shown below:
public CloudQueueMessage GetMessageForJob(out string jobId, out bool dequeued)
{
    var message = _jobsQueue.GetMessage(TimeSpan.FromMinutes(2));
    if (message == null)
    {
        jobId = string.Empty;
        dequeued = false;
        return null;
    }

    if (message.DequeueCount > 3)
    {
        // Remove the poison message from the queue
        _jobsQueue.DeleteMessage(message);

        jobId = message.AsString;
        dequeued = true;
    }
    else
    {
        // Return the job ID
        jobId = message.AsString;
        dequeued = false;
    }

    return message;
}
Note that I’ve decided to encapsulate queue, table and blob-processing into a repository-class in my sample implementation so that in theory they could be easily replaced with other implementations at a later point in time (such as using Azure Service Bus Queues instead of Azure Storage Queues for different scenarios). Implemented completely correct I should have added poison messages to a dead-letter queue, but I didn’t do this for the sake of keeping the sample simpler.
Now let’s come to the heard of the worker where the console application gets ultimately called. This happens in the Worker Role project in a method called ProcessJob(). This method gets the path to the console application which we resolved using the RoleRoot-environment variable as well as the path to the local temporary directory.
It then downloads the source image which is added through an http-URL in the Azure table I’ve created for maintaining the details of the job received through the queue before. It is accessed using JobsRepository.GetJob(). After downloaded it calls the console application simply using Process.Start() based on the path we have resolved earlier.
The console application of course saves the file into our temporary directory (which we pass in through command line arguments) from where the Worker implementation below picks it up and uploads it to BLOB-storage (encapsulated in the BlobRepository-class in my sample).
Finally in any case the worker implementation shown below tries to clean-up all files from the temporary directory (which is just deleting all files from the temporary directory using System.IO classes from the .NET framework). The clean-up is important to be done because if we won’t do it, the temporary space fills up over time and then we’re running into out-of-space exceptions if our temporary space is full based on the quota we’ve requested in the project properties, earlier.
And that’s it, all of that is encapsulated in the ProcessJob()-method below, which is part of my Worker Role project from the sample implementation.
private void ProcessJob(string jobId, string appPath, string localTempPath)
{
    //
    // First get the job data
    //
    var job = JobsRepository.GetJob(jobId);
    job.Status = ThumbnailJobEntity.JOB_STATUS_RUNNING;
    JobsRepository.UpdateExistingJob(job);

    //
    // Temporary files used for processing by the legacy app
    //
    var sourceFileName = Path.Combine(localTempPath, "source_" + jobId);
    var targetFileName = Path.Combine(localTempPath, "result_" + jobId);

    try
    {
        //
        // Next download the source image to the local directory
        //
        var httpClient = new HttpClient();
        var downloadTask = httpClient.GetAsync(job.SourceImageUrl);
        downloadTask.Wait();
        using (var sourceFile = new FileStream(sourceFileName, FileMode.Create))
        {
            downloadTask.Result.Content.CopyToAsync(sourceFile).Wait();
        }

        //
        // Then execute the legacy application for creating the thumbnail
        //
        var app = Process.Start
                    (
                        appPath,
                        string.Format("\"{0}\" \"{1}\" Custom 100 100", sourceFileName, targetFileName)
                    );
        // You should set a timeout to wait for the external process and kill if timeout exceeded
        app.WaitForExit();

        //
        // Evaluate the result of execution and throw exception on failure
        //
        if (app.ExitCode != 0)
        {
            var errorMessage = string.Format("Legacy app did exit with code {0}, processing failed!", app.ExitCode);
            Trace.WriteLine(errorMessage, "Warning");
            throw new Exception(errorMessage);
        }

        //
        // Processing succeeded, Now upload the result file to blob storage and update the jobs table
        //
        using (FileStream resultFile = new FileStream(targetFileName, FileMode.Open))
        {
            var resultingUrl = BlobRepository.SaveImageToContainer(resultFile, job.TargetImageName);

            job.Status = ThumbnailJobEntity.JOB_STATUS_COMPLETED;
            job.TargetImageUrl = resultingUrl;
            JobsRepository.UpdateExistingJob(job);
        }
    }
    finally
    {
        //
        // Deletes all temporary files that have been created as part of processing
        // It would also be good to run that time-controlled in regular intervals in case of this fails
        //
        TryCleanUpTempFiles(sourceFileName, targetFileName);
    }
}
IN SUMMARY
The scenario outlined in this blog article is a very common one I have been challenged from partners often: run a console application in Windows Azure PaaS without modifying it. With the following considerations, that can be accomplished easily:
- Use LocalResource through project properties and RoleEnvironment.GetLocalResource() instead of hard-coding paths.
- Let the console application access all files required through that local resource path.
- Download and upload input-files and output-files to and from BLOB storage to that local resource path for processing by the console application to keep web/worker role instances “stateless” and be able to scale out (well, this is a MUST).
- Instead of hard-coding the path to your console application, use the environment variable “RoleRoot” to get the correct path to your console application.
- For a list of environment variables issued by Windows Azure look at the following blog post: http://blog.toddysm.com/2011/03/what-environment-variables-can-you-use-in-windows-azure.html
- Make sure you clean up the files you store in the local temporary file system to avoid running into disk space problems and the like.
I do hope this post, the sample and the details were helpful to many other developers. As mentioned, I’ve been challenged by software development partners I’ve been working with more often with such a scenario and therefore I decided to post a more detailed sample implementation on it.